Manager & Owner Manual
Running the restaurant day to day: the back office, reports, payroll, menu changes, refunds and closing out.
Online version with search and the Ask assistant: help.realpos.net/manager
- Get around the back office
- The POS Manager screen
- Add and edit menu items
- Categories and departments
- Modifiers
- Modifier Sets
- Pizza Builder
- Order types
- Schedules and day parts
- 86 an item and change prices on the POS
- Design your table layout
- Set up terminals
- Printers and kitchen screens
- Payment types
- Gratuities and surcharges
- Void reasons
- Fix and add timeclock punches
- Run payroll
- Set up tip-outs and tip pools
- Group employees (FOH, BOH)
- Leave shift notes
- Run sales reports
- Read the Daily Report
- Check credit card transactions
- Check voids and discounts
- Refund a guest
- Paid In and Paid Out
- Shift closeouts and cash drops
- Store close and end of day
- Your customer list
- Gift cards and loyalty
Get around the back office
Sign in to the back office, find your way around its menu, and know which page holds which setting.
The back office is the website where you set up and run the restaurant: the menu, staff, store settings, hardware and every report. Open login.realpos.net in any browser, on a computer, tablet or phone.
#Sign in
- Go to login.realpos.net.
- Type your Email address and Password.
- Click Sign In.
Forgot it? Click Forgot your password? under the button.
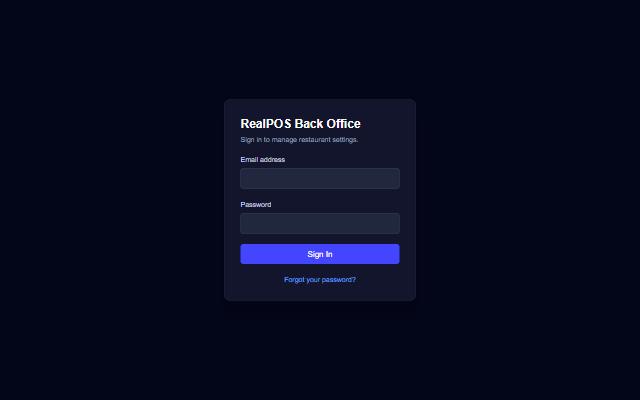 The back office sign-in page
After you sign in, the back office opens on Stats, today's numbers at a glance.
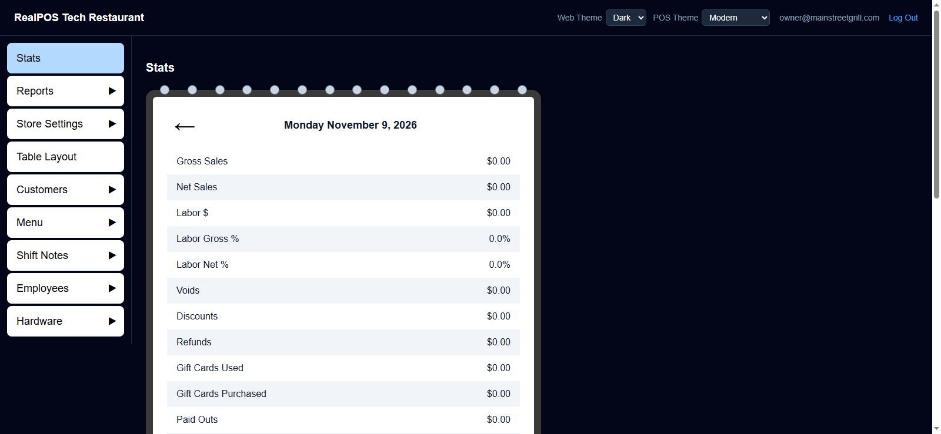 The back office, open on Stats
#The menu down the side
On a computer the menu runs down the left side. Each heading either opens a page or holds a group of pages.
- Click a heading's name to open it. A group with no page of its own opens its first page (for example Menu opens Categories).
- Click the ▶ arrow beside a heading to see the pages inside it, then click one.
Once you're on a page in a group, the other pages of that group show as blue tabs across the top. Click a tab to jump between them without going back to the side menu.
On a phone, tap the three-line menu button at the top left. Tap a heading's name to open it, or the arrow beside it to see its pages.
#What's where
| Menu | Pages | What you do there |
|---|---|---|
| Stats | Today's sales, labor and guests. See Reports. | |
| Reports | Sales, Closeouts, Payroll, Security, Credit Cards | Every report. See Reports, Daily report, Closeouts, Payroll, Security reports, Credit card report. |
| Store Settings | Taxes, Discounts, Gratuities, Surcharges, Paid In/Out, Payments, Revenue Centers, Schedules, Void Reasons, Store Close | How the restaurant charges, gets paid and closes the day. See Set your tax rate, Discounts, Gratuities and surcharges, Paid In and Paid Out, Payment types, Schedules, Void reasons, Store close. |
| Table Layout | Draw your dining room. See Table layout. | |
| Customers | Customers, Loyalty, Gift Cards | Your guest list, loyalty members and gift cards. See Customers and Gift cards and loyalty. |
| Menu | Categories, Departments, Items, Modifiers, Modifier Sets, Instructions, Order Types | Everything on the menu. See Menu items, Categories and departments, Modifiers, Modifier Sets, Order types. |
| Shift Notes | Manager Notes, Staff Notes, Employee Notes | Notes for managers, for everyone, or for one person. See Shift notes. |
| Employees | Employees, Jobs, Groups, TipOuts, Timeclocks, Settings | Staff, what they can do, and their hours and pay. See Enter your employees, Jobs and security, Employee groups, Tip-outs, Timeclock. |
| Hardware | Terminals, Printers/KDS, Printer Templates | Your registers, printers and kitchen screens. See Terminals and Printers and kitchen screens. |
#The top bar
Across the top you'll see your restaurant's name and:
- Web Theme: Dark or Light. This only changes how the back office looks in this browser.
- POS Theme: Classic, Liquid Glass or Modern. This changes the look of every terminal in the restaurant. It isn't shown on a phone; change it from a computer or tablet.
- Log Out: signs you out of the back office.
#Good to know
- Most day-to-day jobs can also be done on a terminal from the Manager screen. See The POS Manager screen.
- If Print on a report does nothing on your phone, the back office was probably opened inside another app (from a link in a text or email). Open login.realpos.net in Chrome or Safari and print from there. Many reports also offer Open as PDF when this happens.
The POS Manager screen
Open the Manager screen on a terminal and find reports, shift notes, the menu, employees and hardware without leaving the floor.
The Manager screen puts the back office's everyday jobs on the terminal itself: run a report, leave a note, fix a price, edit a timeclock punch. What you change here is the same data the back office shows.
#Open it
- On the POS, tap Manager in the top bar.
- If your job doesn't include the Manager permission, a box says "An override is required to access the Manager menu". A manager types their override PIN to let you in.
To leave, tap Table Layout in the top bar (or the back arrow).
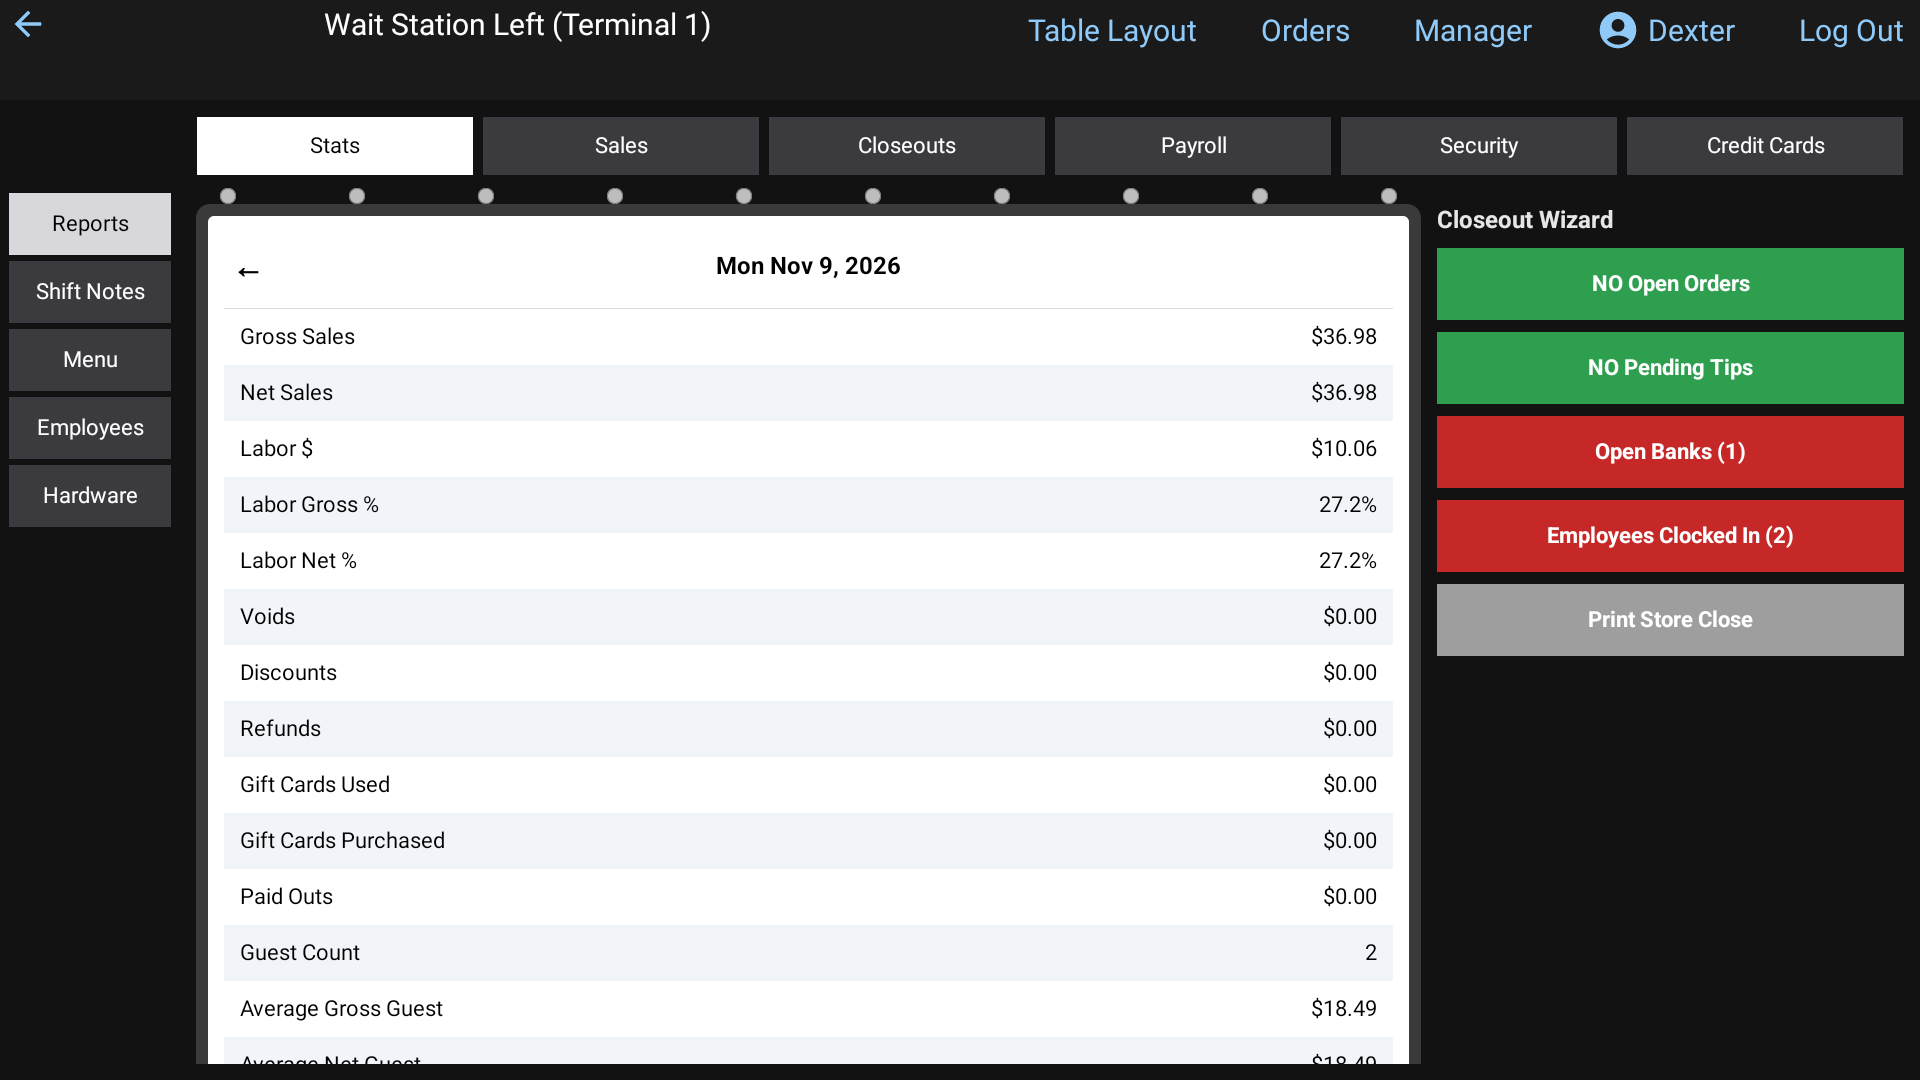 The Manager screen on the POS
#What's on it
The buttons down the left side switch sections:
| Section | Tabs across the top | What it's for |
|---|---|---|
| Reports | Stats, Sales, Closeouts, Payroll, Security, Credit Cards | The same reports as the back office. Stats also holds the Closeout Wizard for the end of the night. |
| Shift Notes | Manager Notes, Staff Notes, Employee Notes | Leave notes for managers, for everyone, or for one employee. |
| Menu | Categories, Departments, Items, Modifiers, Modifier Sets, Instructions, Order Types | Edit the menu, same as the back office's Menu pages. |
| Employees | Employees, Jobs, Groups, Timeclocks | Add and edit staff, jobs and groups, and fix punches. |
| Hardware | Terminals, Printers/KDS | Your terminals, printers and kitchen screens. |
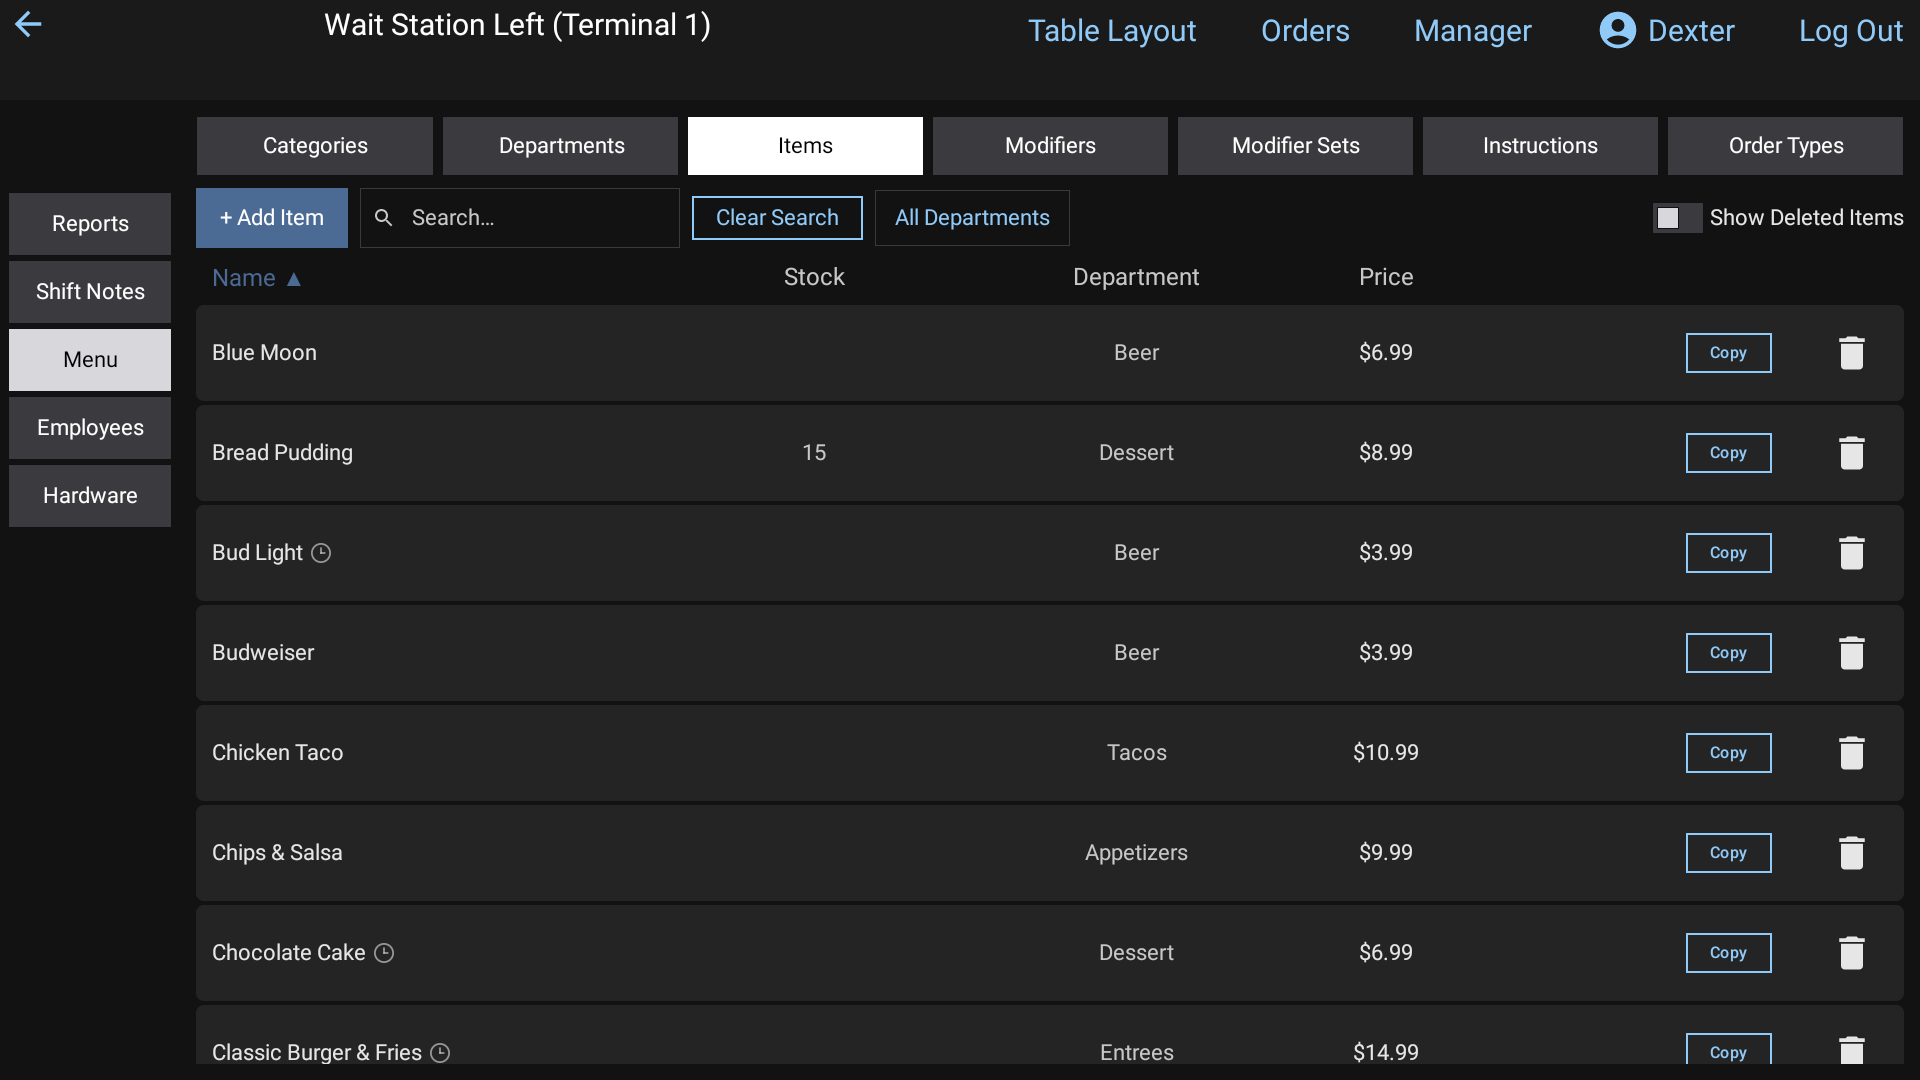 Editing the menu from the Manager screen
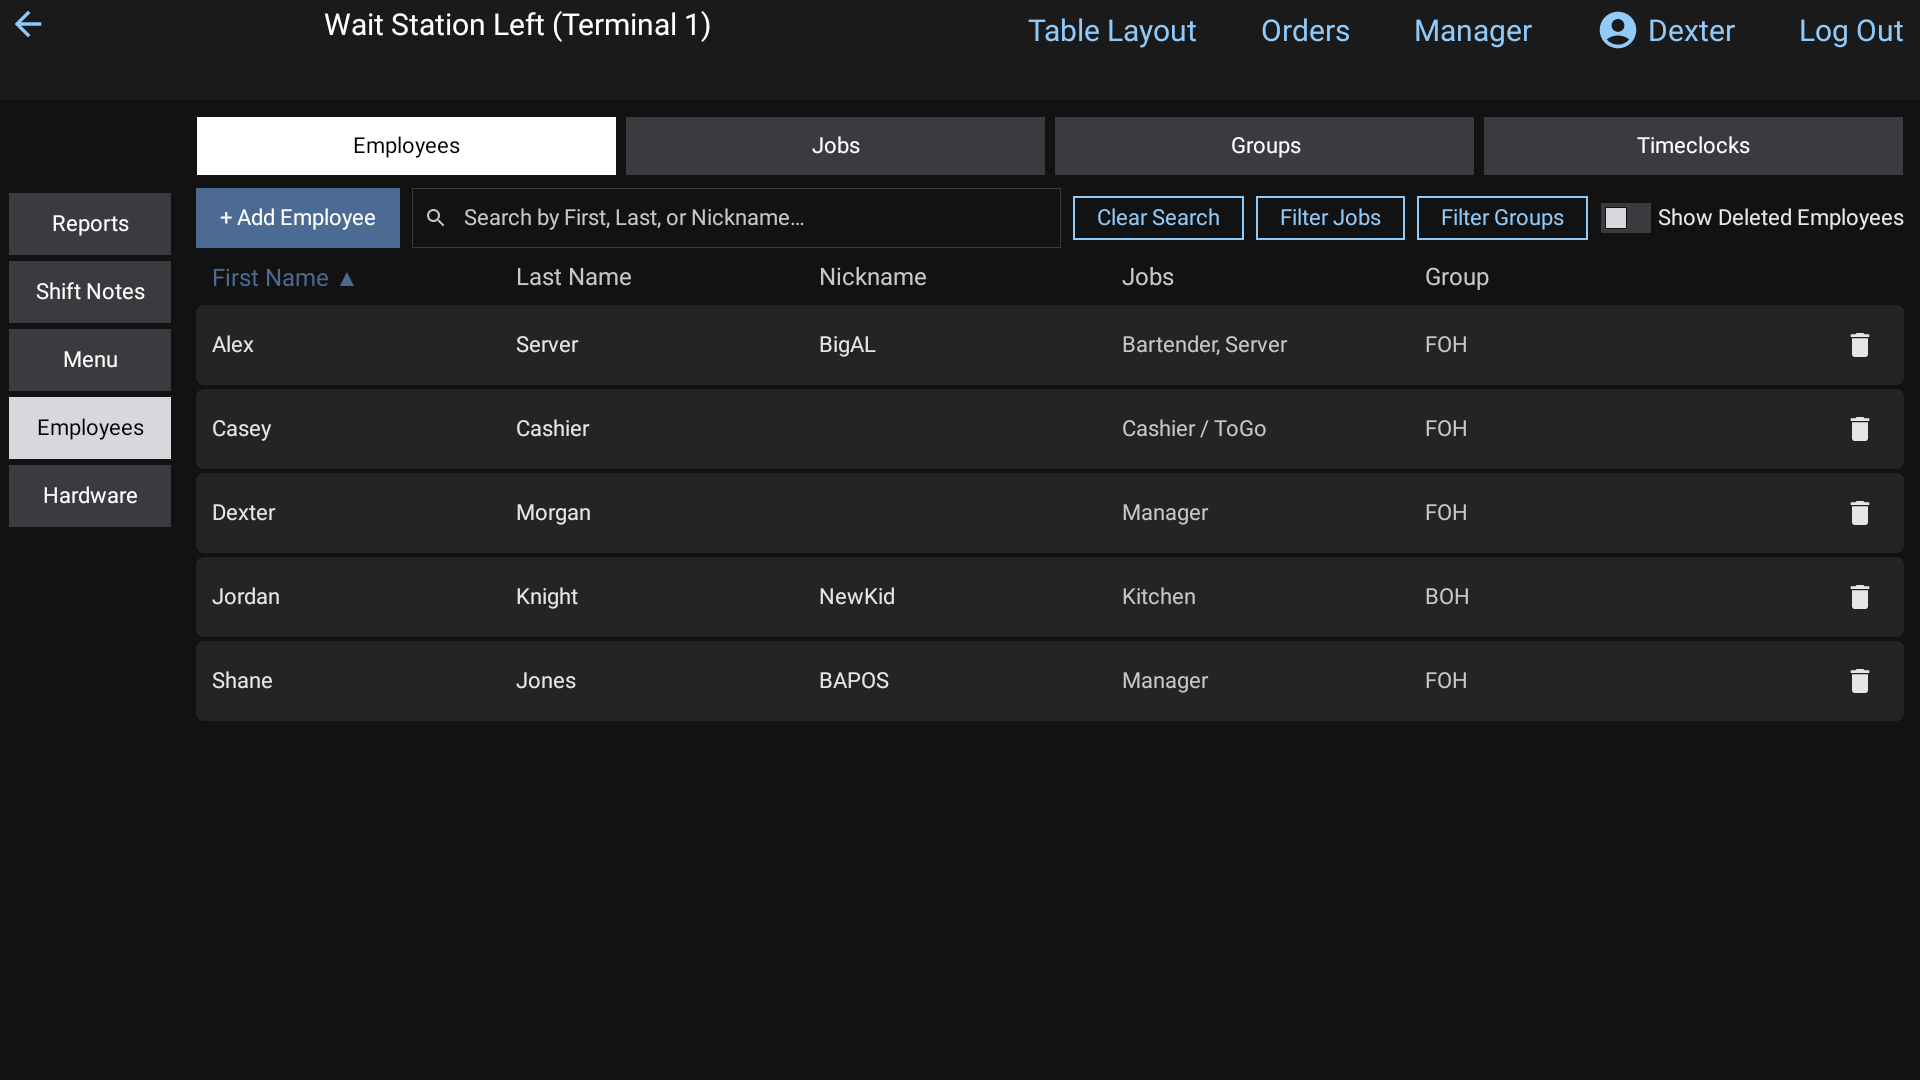 Employees on the Manager screen
#Where to read more
- Reports: Reports, Daily report, Closeouts, Store close, Payroll, Security reports, Credit card report
- Shift notes: Shift notes
- Menu: Menu items, Modifier Sets, 86 and price changes
- Employees: Enter your employees, Timeclock, Employee groups
- Hardware: Terminals, Printers and kitchen screens
#Good to know
- If you're in the middle of editing something and tap another section or leave the screen, the POS checks with you first so you don't lose unsaved changes.
- When you open Reports and another terminal hasn't been able to sync, a Terminal not syncing box names it and warns "This could affect closeout numbers." Check that terminal's connection before closing out.
- The terminal's own settings (printers, timeouts and so on) are not here. Long-hold the terminal's name at the top of the screen instead. See Terminals.
Add and edit menu items
Create items, set prices, kitchen names, printers, tax and modifier sets, and edit many items at once.
Items are the buttons your staff tap on the POS order screen. Every item lives in one Department (the list down the left of the order screen) and can carry Modifier Sets, a tax, price schedules and its own printer or kitchen screen.
You manage items in the back office (login.realpos.net) under Menu > Items, or on the POS under Manager > Menu > Items. Both edit the same menu.
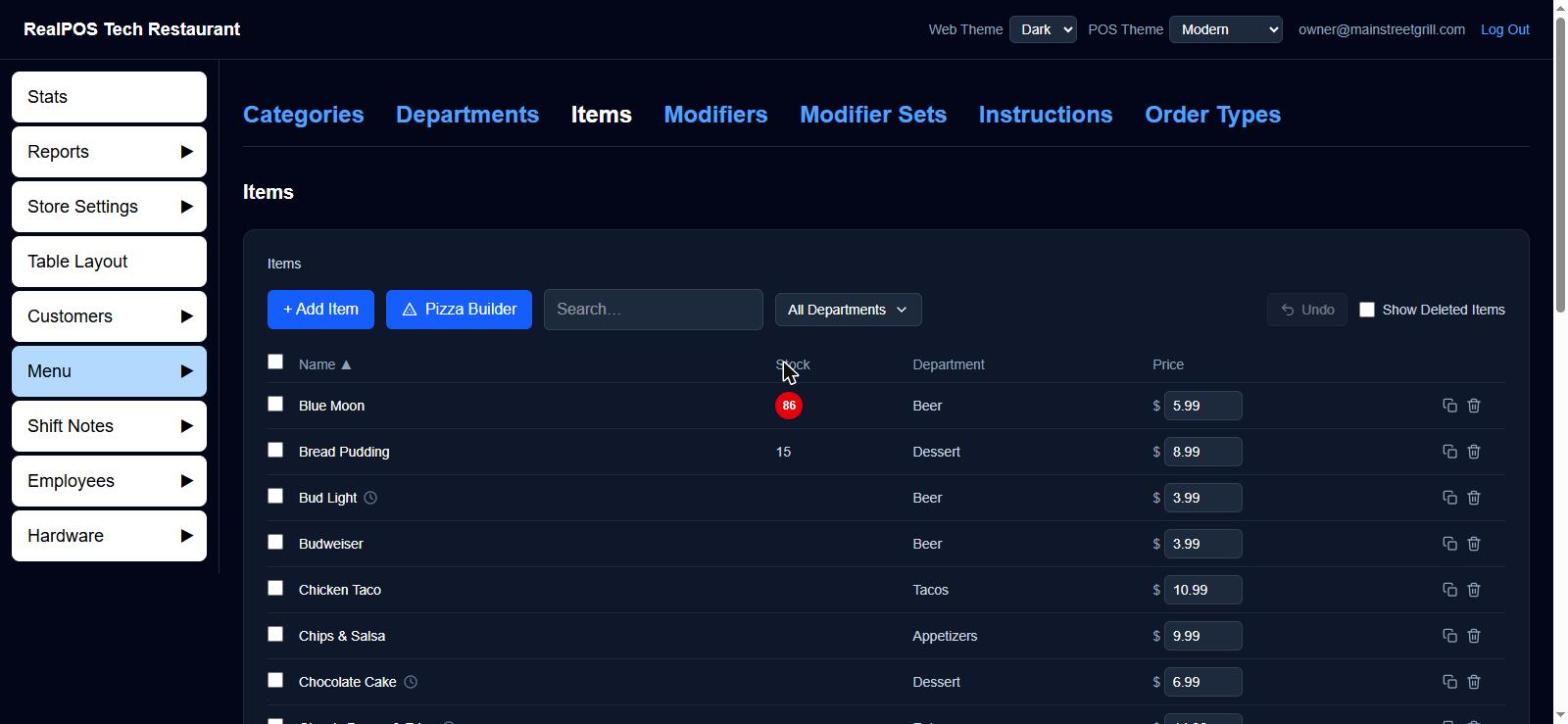 The Items list in the back office
#Add an item
- In the back office, go to Menu > Items.
- Click + Add Item. A new item called "New Item" opens, ready to name.
- Fill in Item Name and Price.
- Pick its Department.
- Set the other fields you need (see below), then click Save.
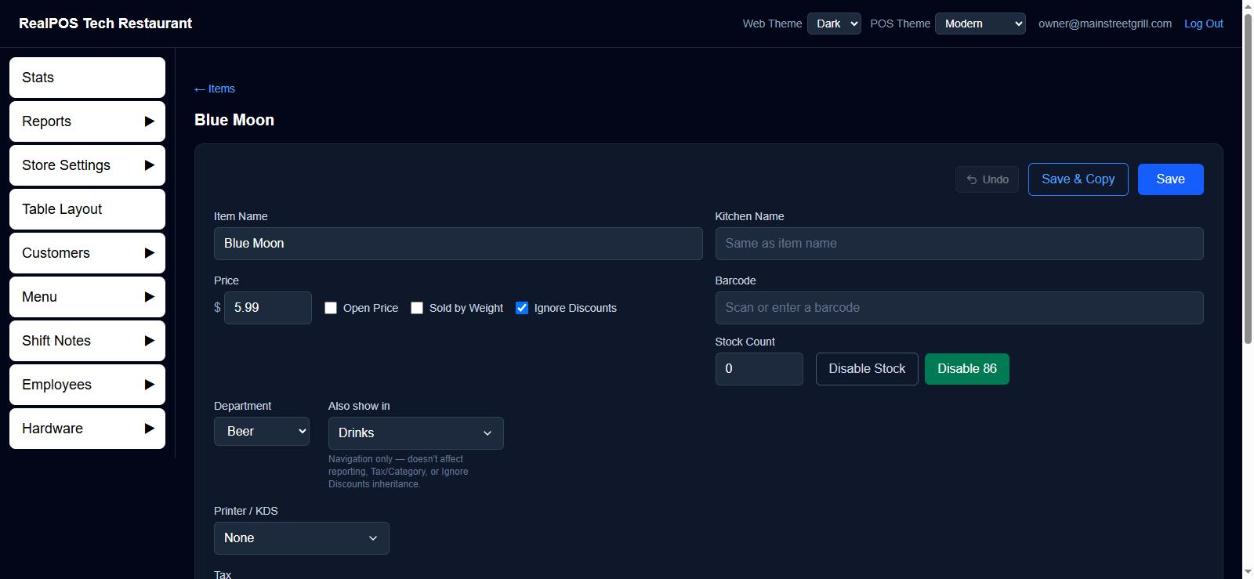 An item's edit page
#The fields on an item
- Item Name: what staff see on the button and guests see on the check. Names must be unique.
- Kitchen Name: an optional shorter or clearer name for kitchen tickets and kitchen screens. Leave it blank to use the item name.
- Price: the normal price.
- Open Price: the POS asks for the price every time the item is rung in. Handy for market-price specials.
- Sold by Weight: the POS asks for the weight every time, then multiplies it by the price. Pick Lb. or Oz. for the unit.
- Ignore Discounts: discounts skip this item. It also applies if the item's Department or Category has Ignore Discounts ticked.
- Barcode: scan or type a barcode. Two items can't share a barcode.
- Stock Count, Disable Stock and 86: track how many are left, or mark the item out of stock. These save straight away, without Save. See 86 an item and change prices on the POS.
- Also show in: shows the button in extra Departments on the POS too. This only affects where the button appears. Reports, tax and discounts still follow the item's own Department.
- Printer / KDS: which printers and kitchen screens get this item when it's sent. New items start on a printer or screen named "General" if you have one. See Printers and kitchen screens.
- Tax: leave it on Inherit from Dept/Category to use the tax set on the Category, or pick a tax just for this item. Tick Non Taxable to never tax it. See Set your tax rate.
- Modifier Sets: the choices offered when the item is rung in. See Modifier Sets.
- Price Schedules: a different price during set times, like a happy hour. See Schedules.
#Attach Modifier Sets to an item
- On the item's page, under Modifier Sets, click + Add.
- Tick one or more sets and click OK. Sets with no modifiers in them yet are greyed out.
- Drag the handle to put them in order. This is the order the set columns appear in on the POS.
- Use Free with − and + to give away the first few picks from a set on this item. For example, Free 2 means the first two picks from that set cost nothing, then the set's normal prices apply.
Click a set's name to preview its modifiers and prices. The ✕ removes it from this item.
These changes save straight away. Undo at the top of the page reverses the last one.
#Copy an item
- From the list: click the copy icon on the item's row. A copy named "(copy)" opens with the name selected so you can type over it.
- From an item's page: Save & Copy saves your changes and opens a copy of the item.
A copy keeps the price, department, printers, tax, flags and Modifier Sets. If you leave a copy without saving it, it's removed.
#Change prices from the list
You can type a new price straight into the Price box on the Items list. It saves when you click away. Undo reverses it.
#Edit many items at once
- Tick the items you want on the Items list (the top checkbox selects everything showing).
- Click Edit Selected.
- Fill in only the fields you want to change: Price, Department, Also show in, Printer / KDS, Tax, Modifier Sets. Anything you leave blank or Unchanged stays as it is on each item.
- Click Save.
#Find items
- Search… filters by name.
- The department button (All Departments) narrows the list to the departments you tick. The back office remembers your choice on that browser.
- Click Name, Stock, Department or Price to sort.
- A clock icon next to a name means the item has a price schedule. A red 86 in the Stock column means it's out of stock.
#Delete and restore items
Click the trash icon on an item's row to delete it. It disappears from the POS. To bring it back, tick Show Deleted Items and click the + on its row. Undo also reverses a delete straight away.
#Instructions
Instructions are short cooking notes staff can add to one item, such as "Well done" or "No salt". Set them up under Menu > Instructions:
- Type the instruction in + Add instruction and click +.
- Click a line to edit it. Drag the handle to reorder.
- Use the trash icon to remove one.
On the POS, staff tap one unsent item, then Instructions to pick from this list. Instructions print on the kitchen ticket with a * after them so the kitchen can tell them apart from modifiers.
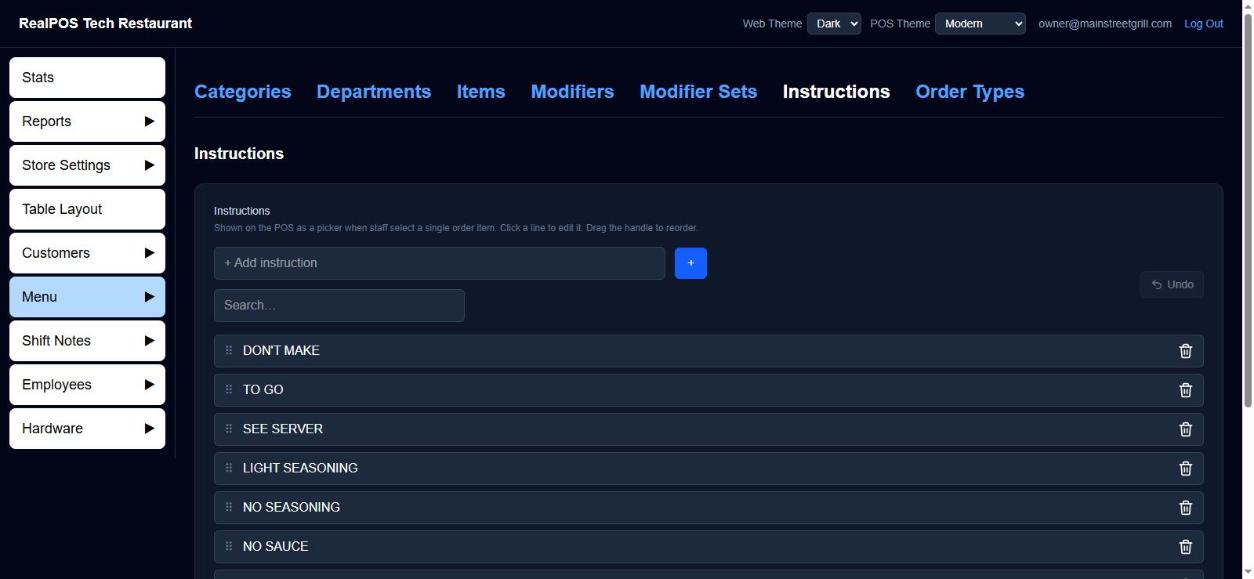 The Instructions list
#Edit the menu on the POS
On the POS, Manager > Menu has the same tabs as the back office: Categories, Departments, Items, Modifiers, Modifier Sets, Instructions and Order Types. Changes you make there are sent to the back office.
The Menu Builder on the POS
#Good to know
- The POS Menu button needs two permissions on the employee's job: Allows access to the Manager menu and Allows access to Menu in Manager Menu. See Jobs and security.
- Pizza items are easiest to make with the Pizza Builder.
- If you open an item from a report, ← Back to report and Save take you back to that report.
Categories and departments
Use Departments to organize the POS order screen and Categories to set tax for groups of items.
RealPOS groups your menu two ways:
- Departments are what staff see. They're the list down the left of the POS order screen (Appetizers, Entrees, Drinks...). Every item belongs to one Department.
- Categories are for tax. A Department joins a Category, and every item in it picks up that Category's tax unless the item sets its own.
Both are in the back office (login.realpos.net) under Menu, and on the POS under Manager > Menu.
#Add a category
- Go to Menu > Categories and click + Add Category.
- Type a Name.
- Pick a Tax, or leave No tax assigned.
- Tick Ignore Discounts if discounts should never apply to anything in this Category.
- Click Save.
A Category with no tax shows in pink on the list with — No Tax Assigned, so it's easy to spot.
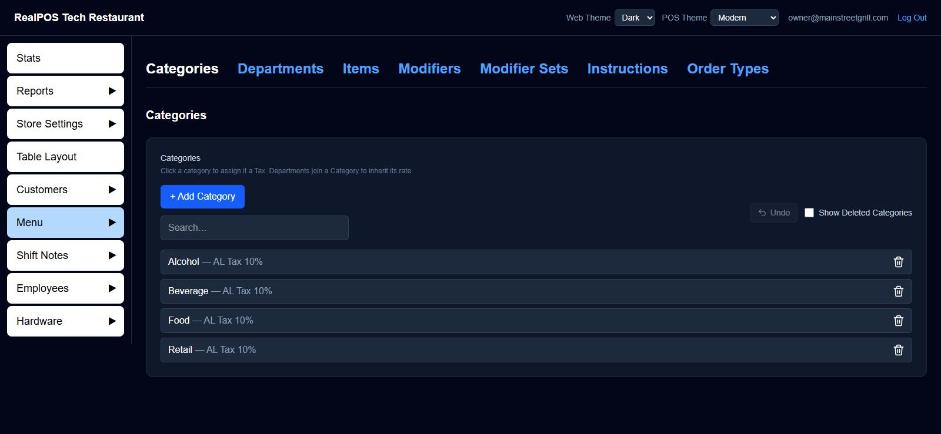 The Categories list
#Add a department
- Go to Menu > Departments and click + Add Department.
- Type a Name.
- Pick its Category (this is where its tax comes from).
- Tick Ignore Discounts or Non Taxable if they apply to the whole Department.
- Click Save.
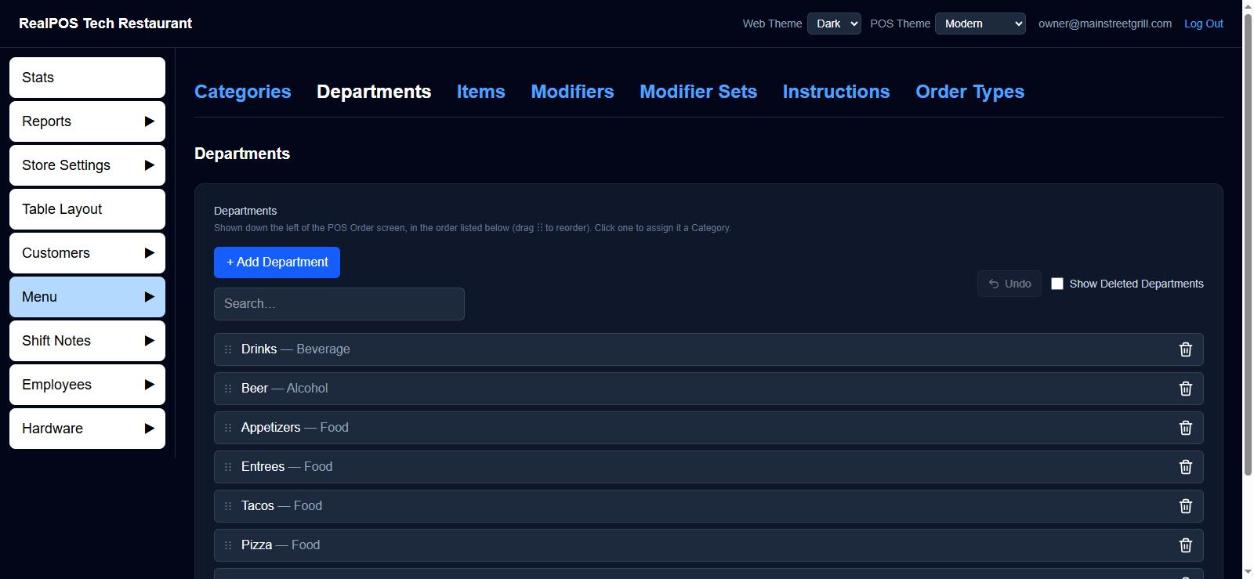 The Departments list
#Put departments in order
On Menu > Departments, drag the ⋮⋮ handle on a row up or down. The POS order screen shows Departments in this order. The new order saves as you drag.
#Show a department only at certain times
A Department can be limited to set times, like a Breakfast department that only appears in the morning.
- Open the Department.
- Under Schedules, click + Add and pick a schedule.
While at least one schedule is attached, the Department only shows on the POS during those windows. With none attached it's always shown. Schedules save as soon as you add or remove them. See Schedules.
#Delete a category or department
- Click the trash icon on its row, or open it and click Delete Category / Delete Department, then Yes, delete.
- You can't delete a Category while Departments are still in it, or a Department while Items are still in it. Move them first. The message tells you how many are left.
- Tick Show Deleted Categories or Show Deleted Departments and click + to restore one. Undo reverses the last delete or restore.
#Good to know
- Tax rates themselves are set up under Store Settings > Taxes. See Set your tax rate.
- An item can also appear in extra Departments with Also show in on the item's page. That only adds a button. Reports and tax still follow its own Department. See Add and edit menu items.
- The Departments list refreshes on its own every 15 seconds, so changes made on the POS show up without reloading.
Modifiers
Create the individual choices (like Ranch, Medium Rare or No Onions) that go into Modifier Sets.
A modifier is one choice a guest can make about an item: "Ranch", "Medium Rare", "Add Bacon". Modifiers don't go on items directly. You put them into Modifier Sets, and attach the sets to items. A modifier's price is set inside each set, so the same modifier can cost different amounts in different sets.
You manage modifiers in the back office (login.realpos.net) under Menu > Modifiers, or on the POS under Manager > Menu > Modifiers.
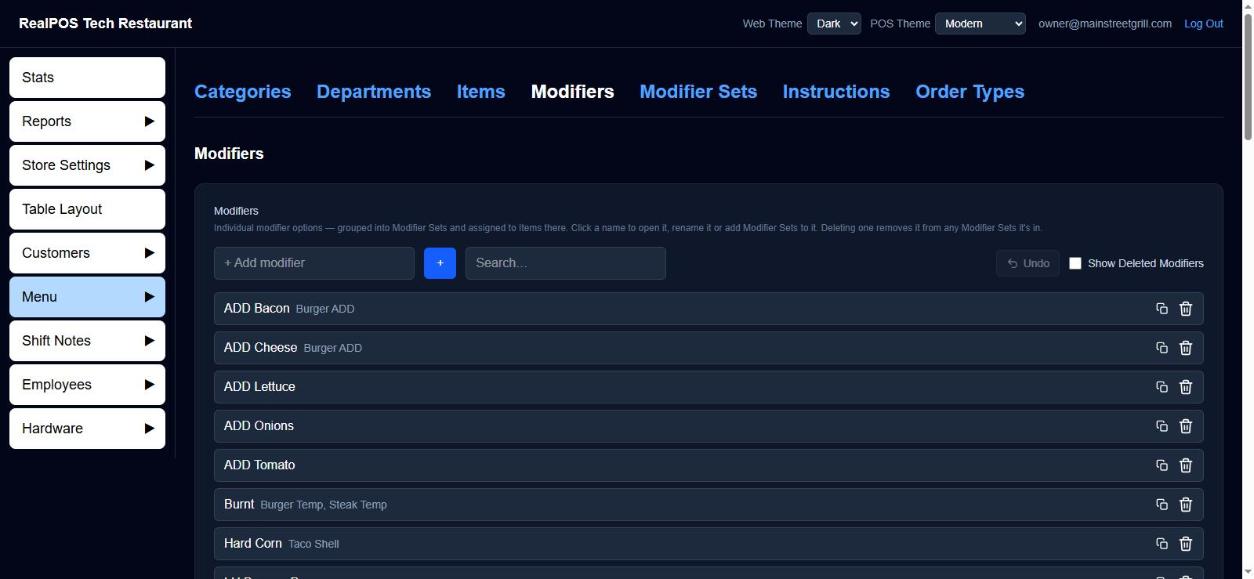 The Modifiers list
#Add a modifier
- Go to Menu > Modifiers.
- Type the name in + Add modifier and click +.
Next, add it to a Modifier Set so it shows up on the POS. Each row on the list shows which sets the modifier is already in.
#Rename a modifier
Click its name to open it, change Name, and click Save. Names must be unique.
#Copy a modifier
Click the copy icon on its row. You get "(copy)" of the modifier, already in every Modifier Set the original is in at the same prices, with its name selected so you can type over it.
#Modify a modifier (nested choices)
A modifier can open its own Modifier Sets when it's picked. For example, picking "Salad" could open a "Dressing" set right under it.
- Click the modifier's name to open it.
- Under Modifier Sets, click + Add, tick the sets, and click OK.
- Drag the handle to order them. Use Free with − and + to make the first few picks free.
On the POS, these sets open indented right under the modifier when it's picked. If one of them is a forced set, the modifier turns red until the required picks are made.
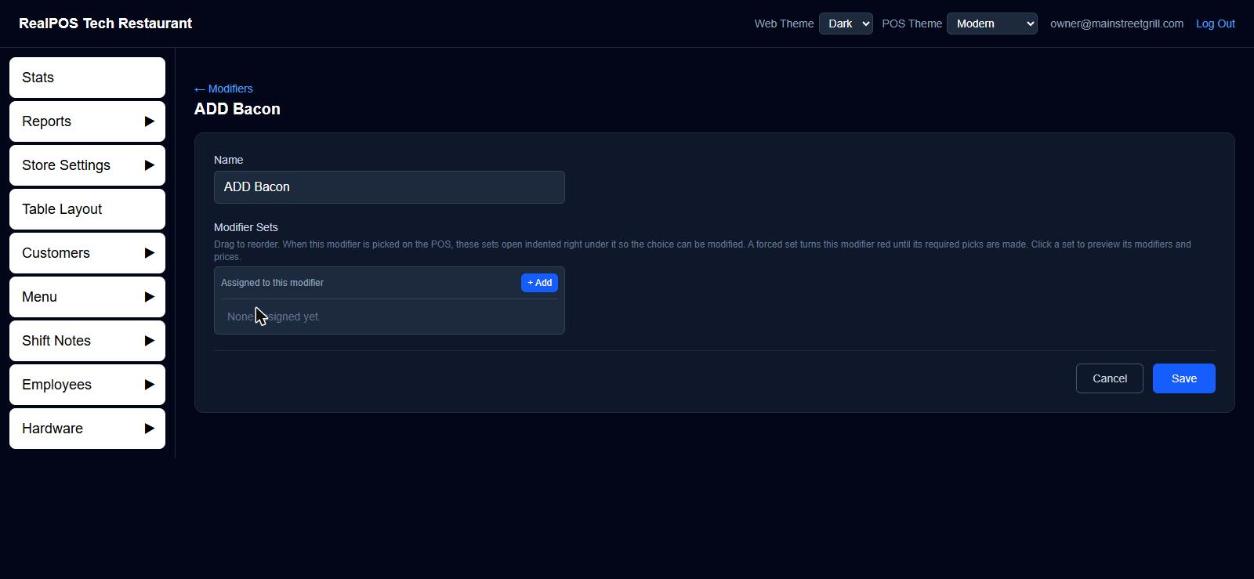 A modifier's page with its own Modifier Sets
#Delete and restore a modifier
Click the trash icon on its row. Deleting a modifier also takes it out of every Modifier Set it was in. Undo puts it back in those sets. To restore it later, tick Show Deleted Modifiers and click + on its row, then add it back to the sets you want.
#Good to know
- Quick per-item notes like "No salt" are usually better as Instructions than as modifiers.
- To make a lot of "NO / ADD / EXTRA" modifiers at once, use the Modifier Set Builder. See Modifier Sets.
Modifier Sets
Group modifiers into sets, set their prices and limits, attach them to items, and build NO/ADD sets in one go.
A Modifier Set is a group of choices offered together on an item, like "Burger Temp" (Rare, Medium, Well) or "Sides" (Fries, Salad, Slaw). You set each modifier's price inside the set, decide whether a pick is required, and attach the set to as many items as you like.
You manage sets in the back office (login.realpos.net) under Menu > Modifier Sets, or on the POS under Manager > Menu > Modifier Sets.
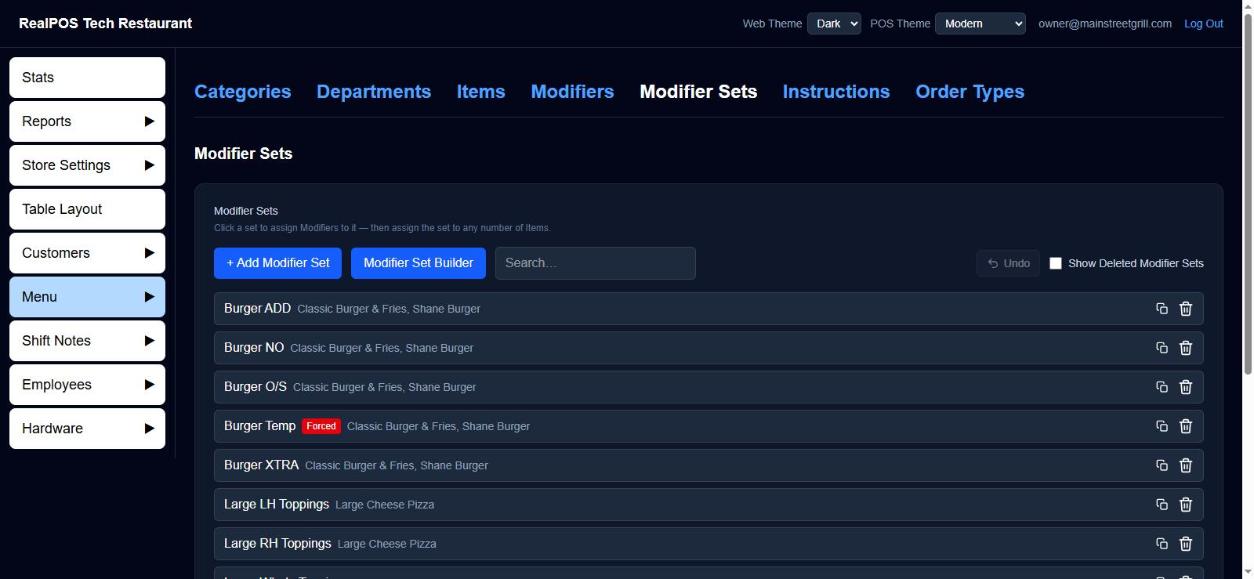 The Modifier Sets list
#Create a Modifier Set
- Go to Menu > Modifier Sets and click + Add Modifier Set.
- Type the Name.
- Click + Add Modifier, tick the modifiers you want, and click OK. They're added at $0.00.
- Type a price into each modifier's $ box (it saves when you click away). Or type one price in Default Modifier Price to give every modifier in the set that price when you click Save.
- Set the limits (below).
- Click Save.
The modifiers have to exist first. See Modifiers.
#Limits
- Forced Modifier (must select): how many picks are required. On the POS, Complete stays off until that many are picked. 0 means not forced. Forced sets show a red Forced tag on the list.
- Quantity (most picks allowed): the most picks allowed from this set in total. Once reached, the other buttons lock until one is taken off. 0 means no limit.
- Same Modifier Quantity: above 1, the same modifier can be picked that many times, each pick ringing in as its own line.
#Order the modifiers
Drag the ⋮⋮ handle to reorder the modifiers in the set. Tick Sort A-Z to sort them alphabetically in one click. Dragging a row afterwards turns Sort A-Z back off.
#Attach the set to items
You can do this from either side:
- On the set's page, under Items using this set, click + Add Item, tick items and click OK. The set goes to the end of each item's own set order.
- On an item's page, under Modifier Sets, click + Add. See Add and edit menu items.
A set needs at least one modifier before you can attach it. The trash icon next to an item detaches the set from it.
#Copy a set with a word swapped
The copy icon on a set's row makes a new set from it, swapping one word in the set's name and every modifier's name. For example, copy "NO Burger" and change "NO" to "ADD" to get "ADD Burger" with "ADD Lettuce", "ADD Tomato" and so on.
- Click the copy icon on the set's row.
- In Type the word in the mod set & modifier name you wish to replace, type the word to swap.
- In Change to:, type the new word.
- Click Create.
The swap keeps each word's capitals (NO becomes ADD, No becomes Add).
#Build NO / ADD / EXTRA sets at once
The Modifier Set Builder makes one set per prefix, each holding every ingredient you list, at that prefix's price.
- On Menu > Modifier Sets, click Modifier Set Builder.
- Type a Modifier Set Name, like "Burger". Choose Before or After to put the prefix before or after the name in each set's name ("NO Burger" or "Burger NO").
- Under Prefix, type a prefix (NO, ADD, XTRA, ON SIDE...) and its Upcharge $. Click + Add Prefix for more.
- Under Add Ingredients Matrix, type each ingredient. Click + Add Ingredient for more.
- Click Save.
With prefixes NO ($0) and ADD ($1) and ingredients Lettuce and Tomato, you get a "NO Burger" set (NO Lettuce, NO Tomato, free) and an "ADD Burger" set (ADD Lettuce, ADD Tomato, $1 each). Modifier names always start with the prefix.
Run it again with the same name to add a prefix or ingredient you forgot. It adds to the sets that are already there instead of making duplicates. The new sets are ordinary sets you can edit afterwards. Attach them to items the usual way.
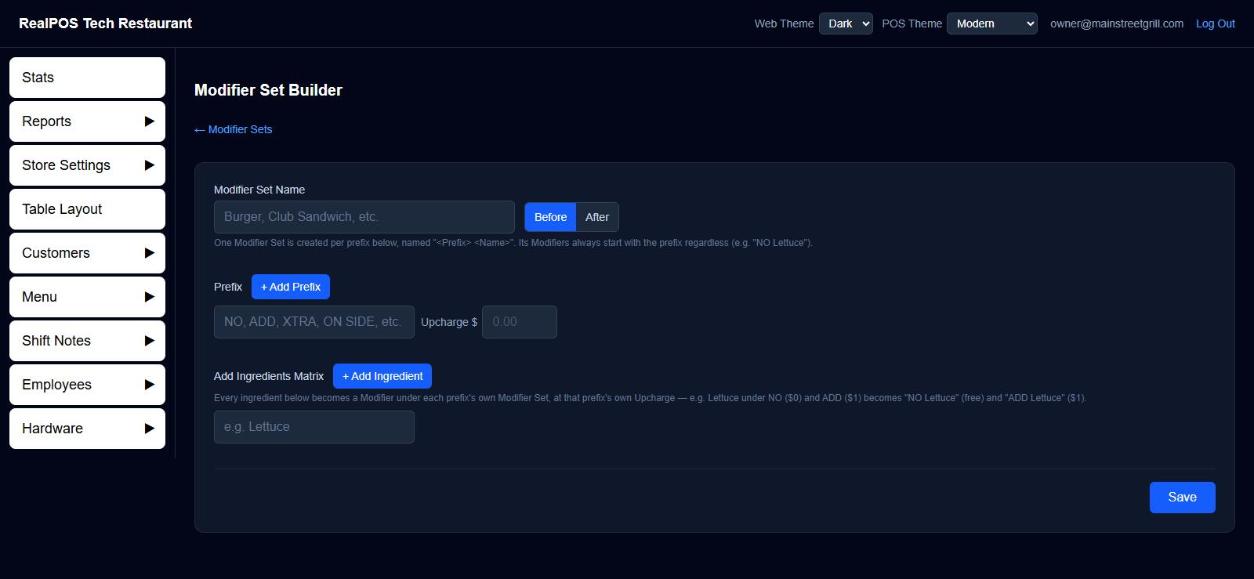 The Modifier Set Builder
#Delete and restore a set
Click the trash icon on its row, or Delete Modifier Set then Yes, delete on its page. You can't delete a set while items still use it. Detach it first. Tick Show Deleted Modifier Sets and click + to restore one.
#Good to know
- Undo on the set's page reverses the last change (a price, an add, a remove, a reorder).
- To make the first few picks from a set free on one item, use Free on that item's page. See Add and edit menu items.
- Pizza topping sets are made by the Pizza Builder and live in this same list.
Pizza Builder
Build pizza items in every size, with whole, half and quarter toppings and their prices, in one screen.
The Pizza Builder sets up a pizza for you: one item per size, plus topping sets for whole, half and quarter pies, all priced. It's in the back office (login.realpos.net) under Menu > Items > Pizza Builder.
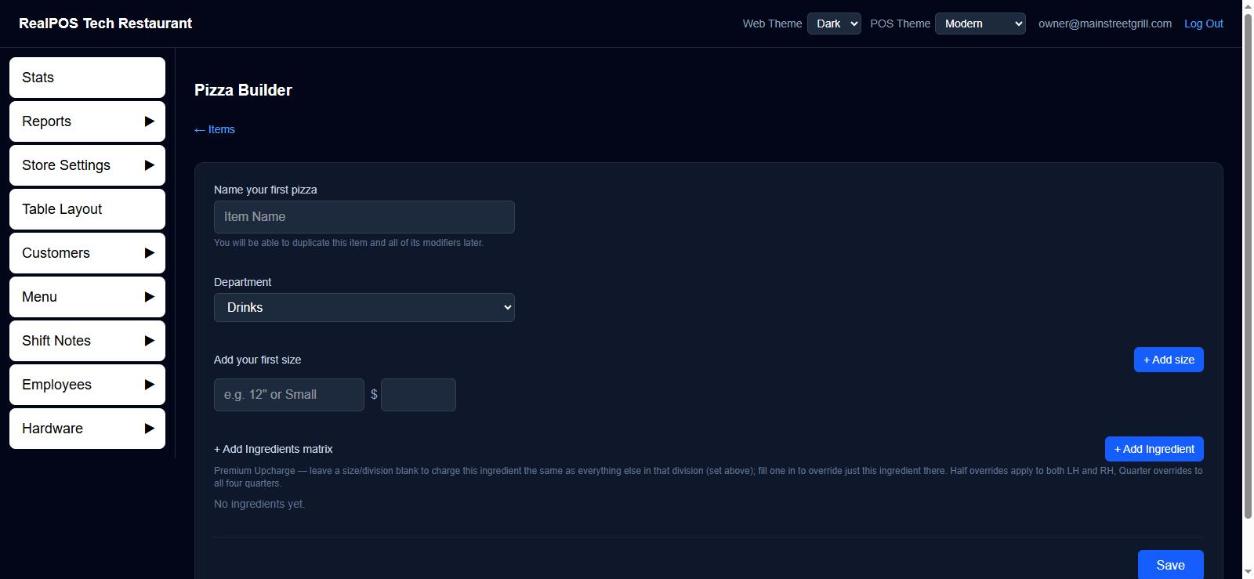 The Pizza Builder
#Build a pizza
- Go to Menu > Items and click Pizza Builder.
- Under Name your first pizza, type the name, like "Cheese Pizza".
- Pick the Department.
- Under Add your first size, type a size (like
12"orSmall) and its price. Click + Add size for more sizes. - For each size, under Will you allow?, tick Whole, Half and/or Quarter and type the price of one topping in that division. Each size needs at least one.
- Click + Add Ingredient for each topping, like "Pepperoni".
- If a topping costs more than the rest, click Premium Upcharge beside it and type its price for each size and division. Leave a box blank to use the normal price.
- Click Save.
#What it makes
For a pizza called "Cheese Pizza" with sizes Small and Large:
- One item per size, named with the size first: "Small Cheese Pizza", "Large Cheese Pizza", at the size's price.
- Topping sets on each item, one per side the size allows:
- Whole: "Small Whole Toppings", with toppings named "WH Pepperoni".
- Half: "Small LH Toppings" and "Small RH Toppings" (left and right half), toppings "LH Pepperoni", "RH Pepperoni".
- Quarter: "Small 1Q Toppings" through "Small 4Q Toppings", toppings "1Q Pepperoni" and so on.
A Half price applies to both halves, and a Quarter price to all four quarters. These are ordinary items, Modifiers and Modifier Sets. You can edit them afterwards like any others.
#Free toppings
On a pizza item's own page (open it from Menu > Items), Free Toppings sets how many toppings come free. It's one shared budget: 1 means one whole topping free, or two half toppings, or four quarter toppings, or any mix that adds up the same.
#Good to know
- Toppings are shared by name. "WH Pepperoni" is one modifier used in every size's Whole set, with its own price in each set.
- New pizza items go to a printer or kitchen screen named "General" if you have one. Change Printer / KDS on the items if they should go somewhere else. See Add and edit menu items.
Order types
Set up Dine In, Take Out, Pickup and other order types, and choose how each one behaves on the POS.
Order types (Dine In, Take Out, Pickup, Delivery...) tell everyone what kind of order it is. Each one can ask for a guest name, print in red for the kitchen, prompt for a tip on the card reader, or stay on the login screen until it's picked up.
Set them up in the back office (login.realpos.net) under Menu > Order Types, or on the POS under Manager > Menu > Order Types.
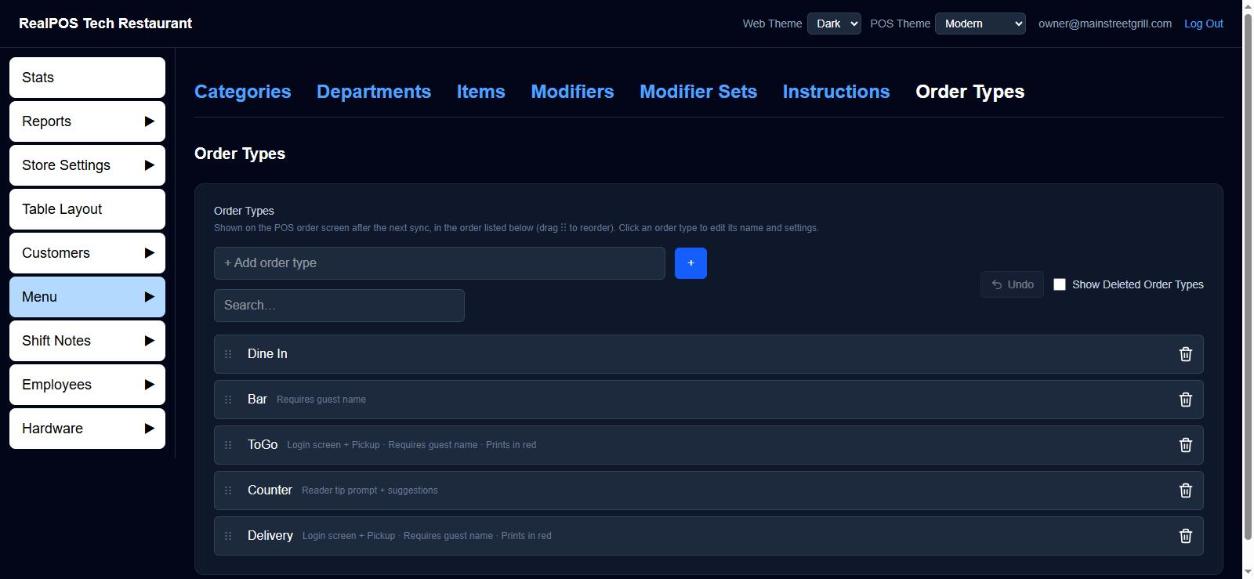 The Order Types list
#Add an order type
- Go to Menu > Order Types.
- Type the name in + Add order type and click +.
- Click the new order type to set its options (below).
The POS shows order types in the order on this list. Drag the ⋮⋮ handle to reorder them.
#Order type options
Click an order type to open Edit Order Type, change what you need, then click Save.
- Name: rename it.
- Show on login screen and require pickup: orders of this type stay on the staff login screen's preview even after they're paid. They show orange while open and purple once paid but not yet picked up, until they're cleared from the Orders tab's Pickup tab or a card tip is added.
- Require Guest Name: the POS asks for a guest name before the order can be sent, printed or paid. A loyalty member on the order counts as a name.
- Order Type prints in red: the order type's name prints in red on kitchen tickets and shows in red on kitchen screens, so the kitchen spots it.
- Prompt for Tip: the card reader asks the guest for a tip before a card payment on this order type. Use it for counter or takeout orders. Leave it off where guests sign a receipt and add the tip after, like dining in.
- Show Suggested Tip Amounts: with Prompt for Tip on, the reader shows tip buttons with dollar amounts, plus Other and No. The percents come from Recommended Gratuity on the terminal's Check Template.
- Table Layout: pick a layout to open first when someone starts an order of this type. Leave it on None — send straight to the Orders tab to skip the floor plan. See Table layout.
The list shows each order type's options in small grey text next to its name.
#Delete and restore an order type
Click the trash icon on its row. At least one order type must stay visible, so you can't delete the last one. Tick Show Deleted Order Types and click + to restore one. Undo reverses the last delete or restore.
#Good to know
- The POS picks up order type changes on its next sync. The back office list refreshes itself every 15 seconds, so changes made on the POS show up too.
- For how card payments are set up, see Payment types.
Schedules and day parts
Set weekly time windows for happy-hour prices and time-limited departments, and name the parts of your day.
A schedule is a weekly time window, like "Happy Hour: Mon–Fri 4:00 PM to 6:00 PM". You can use one in two ways:
- On an item, for a different price while the schedule is on.
- On a department, so the department only shows on the POS during the schedule.
Schedules are in the back office (login.realpos.net) under Store Settings > Schedules.
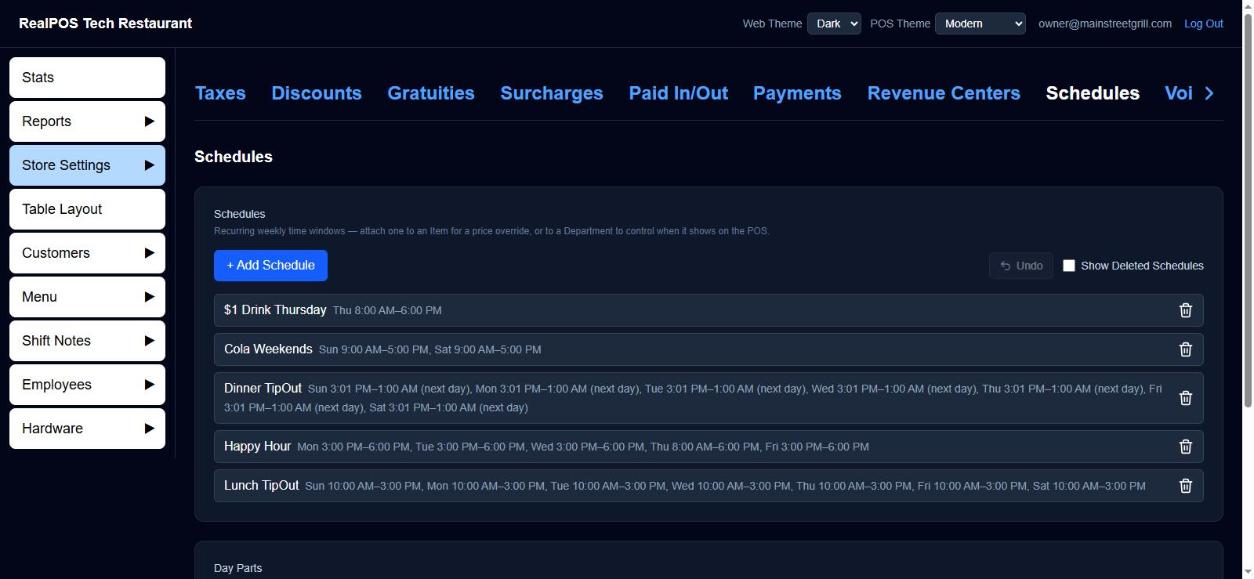 The Schedules list
#Create a schedule
- Go to Store Settings > Schedules and click + Add Schedule.
- Type a Name.
- Under Days & Times, tick each day it runs and set the start and end time. Ticking a day copies the times from the first day you set up, so you only change the ones that differ.
- If it runs past midnight, tick Overnight. The end time is then on the next day, for example 10:00 PM to 2:00 AM.
- Click Save.
The list shows each schedule's days and times next to its name.
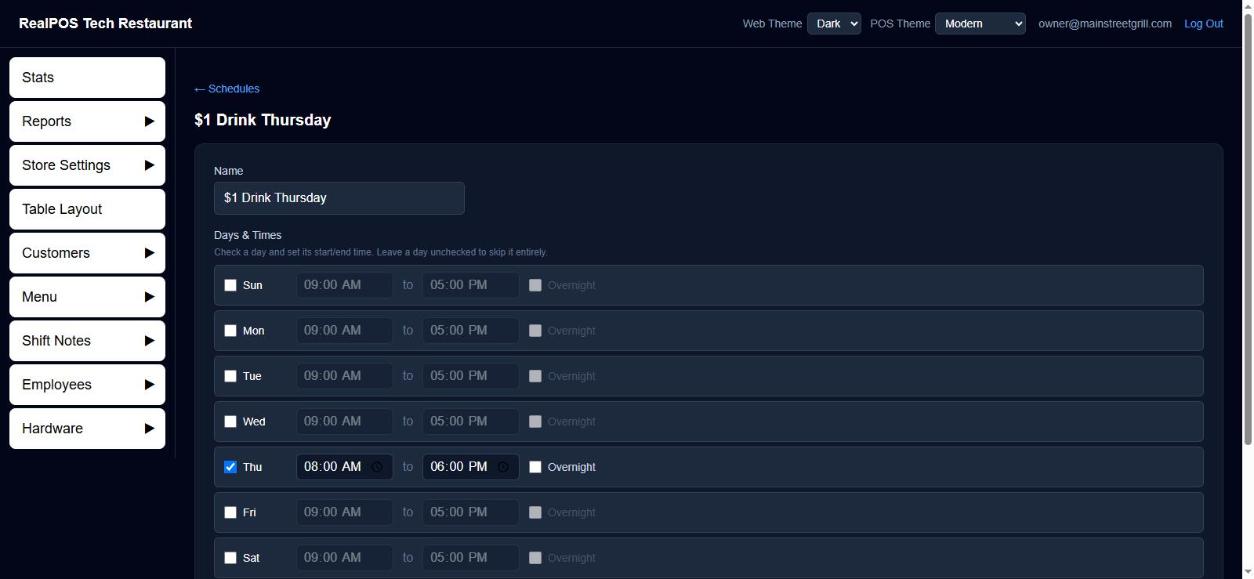 Editing a schedule's days and times
#Give an item a schedule price
- Open the item under Menu > Items.
- Under Price Schedules, click + Add and pick the schedule. It starts at the item's normal price.
- Type the schedule price in its $ box. It saves when you click away.
The item's normal Price is used whenever none of its schedules is on. If two schedules on the same item are on at the same time, the one higher in the list wins. Drag ⋮⋮ to change which comes first.
A clock icon next to an item's name on the Items list means it has a schedule price. You can also change schedule prices on the POS. See 86 an item and change prices on the POS.
#Show a department only during a schedule
- Open the department under Menu > Departments.
- Under Schedules, click + Add and pick the schedule.
With one or more schedules attached, the department only shows on the POS during their windows and is hidden the rest of the time. With none attached, it's always shown. See Categories and departments.
#Day parts
Below your schedules, Day Parts names the parts of your day, like Lunch and Dinner. Sales reports can break your sales down by Day Parts. See Reports.
- Click + Add Day Part.
- Type a Name, then set Start and End. Tick Overnight if it ends the next day.
- Click OK.
Click a day part to change it. Use the trash icon to delete one, and Show Deleted Day Parts with + to restore it.
#Delete and restore a schedule
Click the trash icon on its row, or Delete Schedule then Yes, delete on its page. Unlike most things, you can delete a schedule that's still attached to items or departments. Its prices and windows simply stop applying. Restore it (tick Show Deleted Schedules, then +) and every attachment comes back as it was, prices included.
86 an item and change prices on the POS
Mark items out of stock, count down limited items, and change prices for good or for one order, right from the POS.
When the kitchen runs out of something mid-shift, or a price needs fixing, you can do it right on the POS order screen without going to the back office.
#Open the item's stock and price window
On the POS order screen, press and hold an item's button for about two seconds. A window opens with a keypad on the left and these on the right:
- 86 (red): marks the item out of stock straight away.
- Disable 86 (green): shows instead of 86 when the item is already out. Tap it to make the item available again.
- Disable Stock: stops tracking stock for this item.
- Stock Count: how many are left.
- Price, and one box for each of the item's price schedules.
#86 an item
- Press and hold the item's button.
- Tap 86.
The window closes. The item's button turns grey and can't be tapped, and every terminal and the back office see it as out of stock. To bring it back, hold the button again and tap Disable 86 or Disable Stock.
#Count down a limited item
Use this for specials with a set number, like "12 prime rib tonight".
- Press and hold the item's button.
- Tap the Stock Count box and type the number.
- Tap Save.
The count shows in the corner of the item's button and goes down by one each time it's rung in. When it hits 0, the item is 86'd on its own. Disable Stock stops the count.
#Change a price for good
- Press and hold the item's button.
- Tap the Price box (or a schedule's box, like "Happy Hour") and type the new price. The first digit replaces the old price.
- Tap Save.
Nothing changes until you tap Save. Cancel throws away what you typed. C puts a price box back to what it was. If the register can't reach the back office, the change still applies on that register and a message tells you it couldn't send all price changes. Re-enter the price once you're back online, or change it in the back office.
#Change a price on one order only
Change Price changes the price of one line on the current order. The menu price stays the same.
- Tap the item on the order to select it.
- Tap Change Price.
- Type the new price and tap Enter.
The keypad says "This price change is temporary". It works before or after the item is sent. The changed price prints beside the item on the kitchen ticket, like <$2.99>.
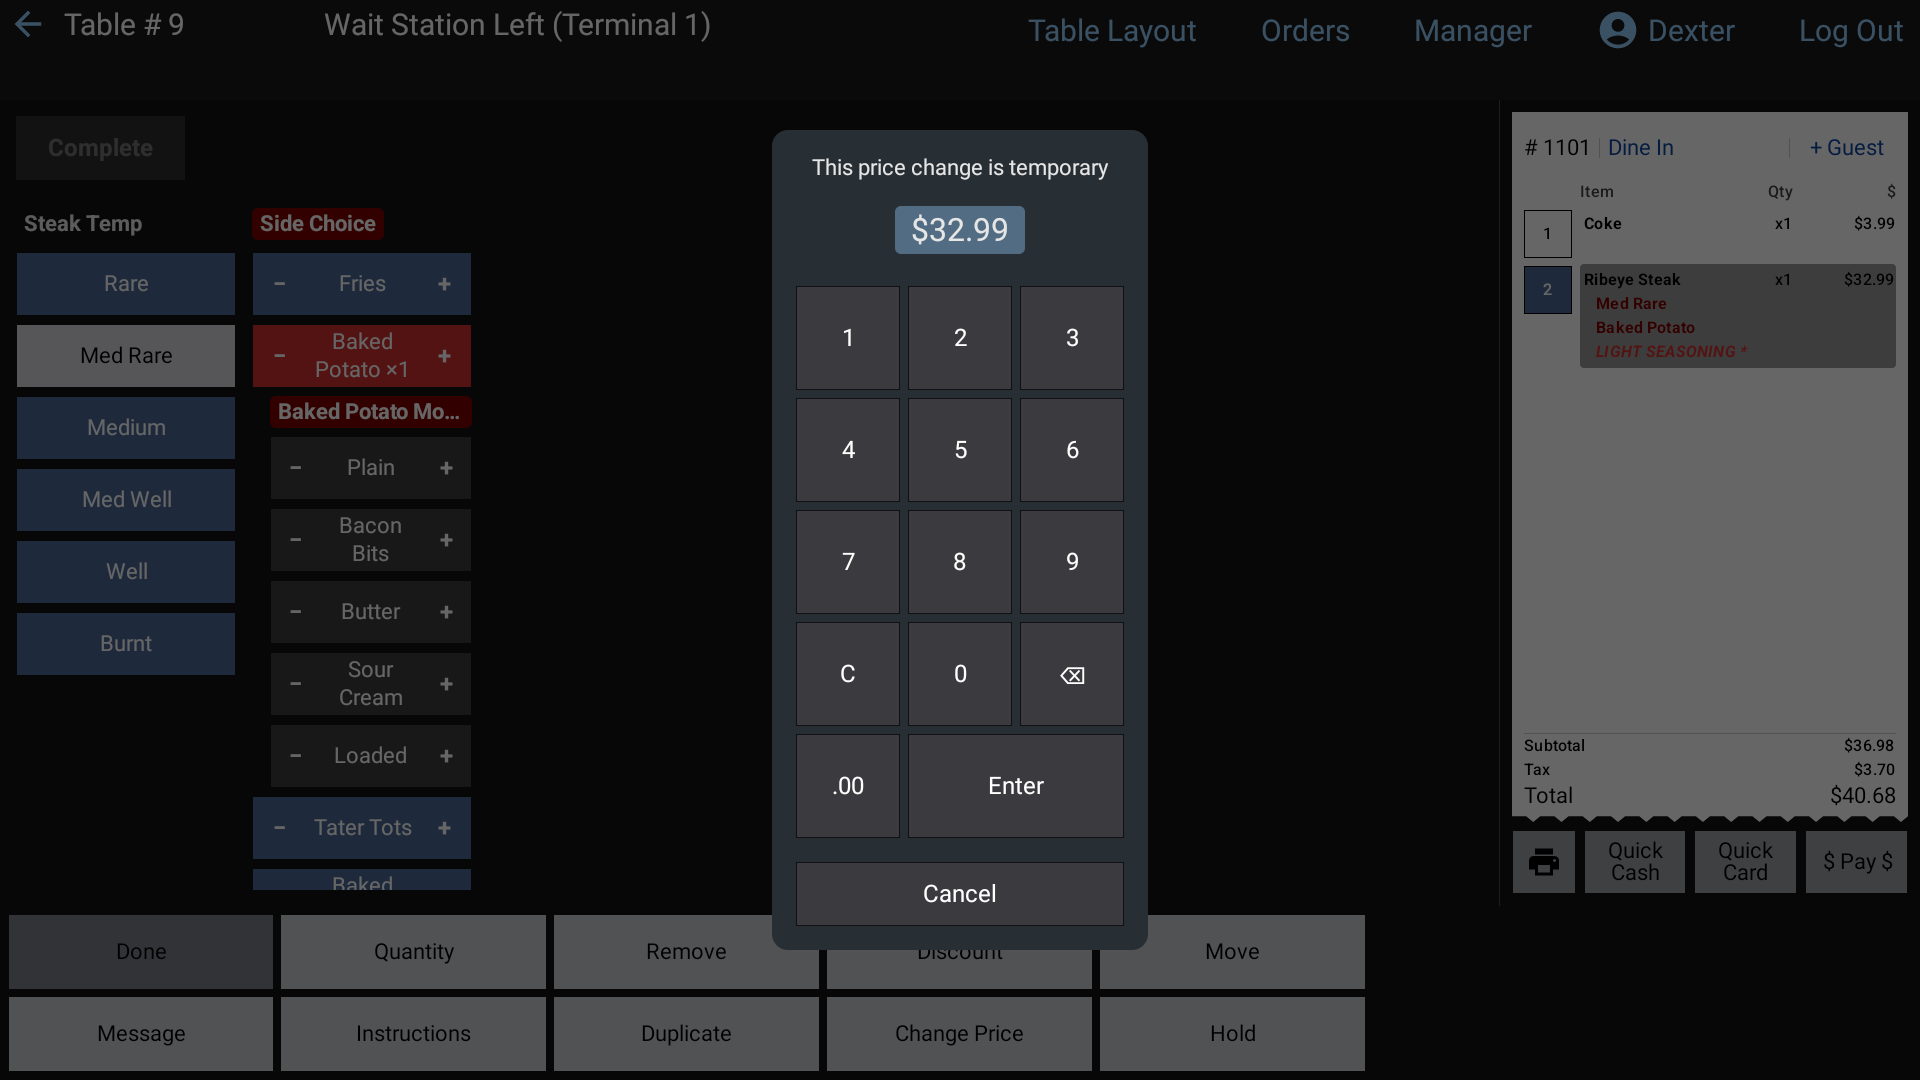 Change Price on one order line
#Open Price and Sold by Weight items
Some items ask for a number every time they're rung in. You turn these on per item in the back office. See Add and edit menu items.
- Open Price: the POS shows a keypad with the item's name. Staff type the price for this order.
- Sold by Weight: the POS asks for the weight in Lb. or Oz. and multiplies it by the item's price.
Neither one changes the menu price.
#Good to know
- You can also 86 and set stock from the back office item page (86, Disable 86, Disable Stock, Stock Count) and from Manager > Menu > Items on the POS. All three stay in step. A red 86 shows in the Stock column of the Items list.
- The long-hold window doesn't need a separate permission. Anyone who can open an order can use it, so make sure staff know when to use it.
- To take a single item off an order, staff use Void Item. See Void an item.
Design your table layout
Draw your dining room, bar and patio so the POS floor screen matches the real room.
The table layout is the map servers tap on the POS to open a table. You build it in the back office (login.realpos.net) under Table Layout. You can have more than one layout, for example "Dining Room", "Bar" and "Patio". Each one shows as its own tab on the POS floor screen.
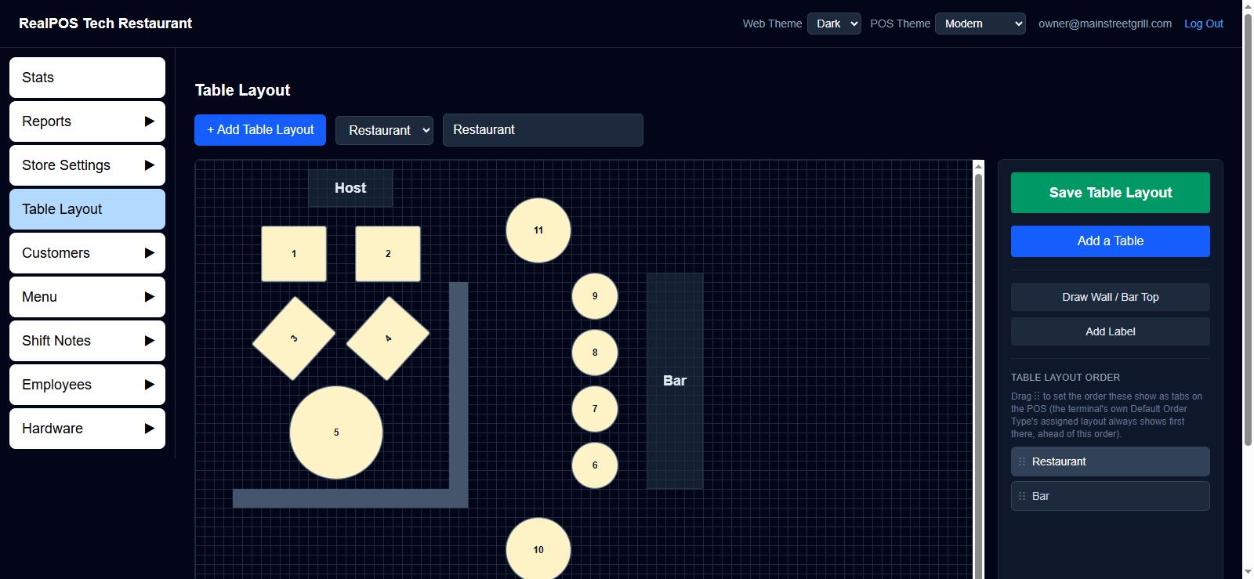 The Table Layout designer
#Add a layout
- In the back office, open Table Layout.
- Click + Add Table Layout.
- Type a name in Name this table layout and click OK.
The new, empty layout opens. To switch between layouts, use the drop-down next to + Add Table Layout. To rename the layout you're on, type in the name box beside the drop-down and click away (or press Enter). Two layouts can't share a name.
#Add and set up tables
- Click Add a Table. A square, 4-seat table appears, numbered after your highest table.
- Drag it where you want it.
- With the table selected, use the panel on the right:
- Table Name: the number or name servers see. It must be unique on the layout.
- Seats: tap − or + (1 to 50).
- Shape: square or round.
- Drag the blue dots to resize. On a square table, the green dots just outside the corners rotate it.
- Click Save Table Layout. Nothing changes on the POS until you save.
#Walls, bar tops and labels
- Draw Wall / Bar Top: click it, then click and drag on the canvas to draw. Walls can be resized and rotated like a square table.
- Add Label: click it, then click the canvas where the text should go and type, for example "Patio" or "Kitchen". Click a label later to change its text. A label can't sit on top of a table.
#Work with several items at once
Shift-click to select several items. Drag any of them to move the group together. When you've selected only tables, the panel shows Seats and Shape controls that set every selected table at once. Right-click the selection to Duplicate or Delete all of it.
#Choose the order of the POS tabs
When you have more than one layout, a Table Layout Order list appears in the right panel. Drag the ⋮⋮ handle to set the order the tabs appear on the POS.
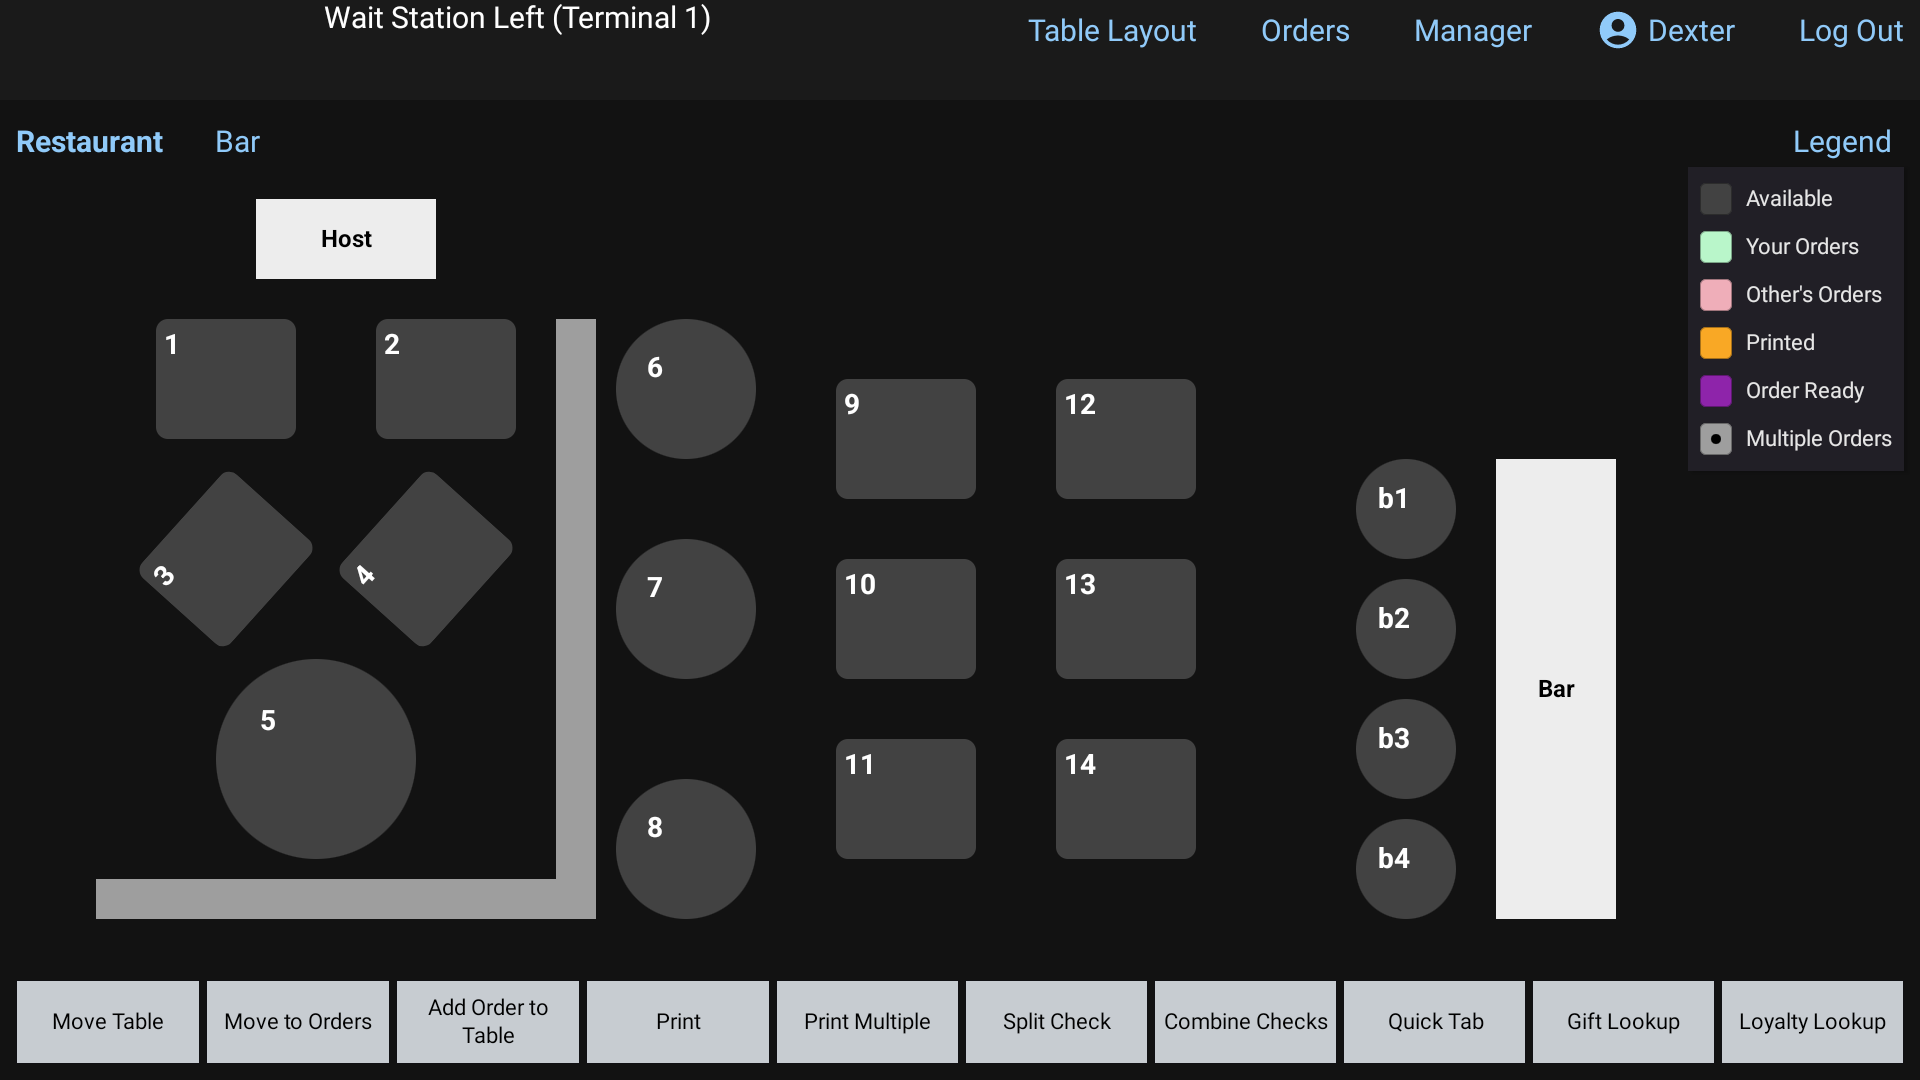 Layout tabs on the POS floor screen
#Good to know
- Click Save Table Layout before you leave the page. Moves, new tables and deletes are only kept once you save.
- Deleting a table on the layout removes it from the POS floor after you save.
- An order type can be tied to a layout under Menu > Order Types (the Table Layout setting), so starting that order type takes the server to the right room. See Order types.
Set up terminals
Name each POS terminal, pick its default order type and timeouts, and connect its receipt printer and card reader.
Every POS station is a terminal. Each one has its own settings: what staff see when they log in, how long it stays signed in, which receipt printer it uses and which card reader it talks to. You set these in the back office (login.realpos.net) under Hardware > Terminals, or on the POS under Manager > Hardware > Terminals.
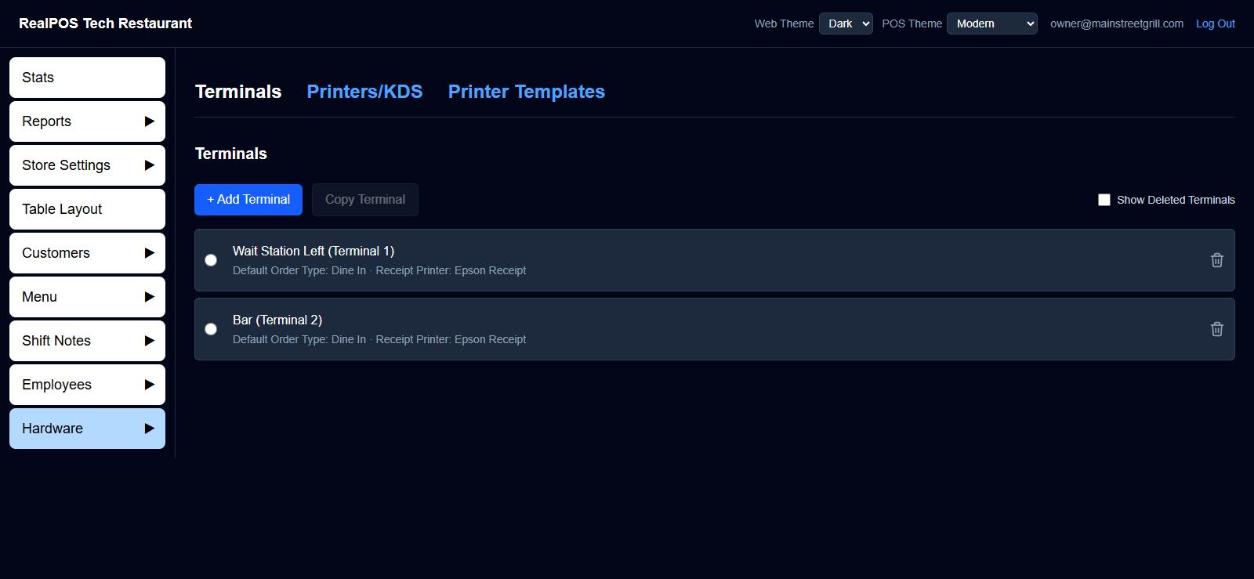 The Terminals list
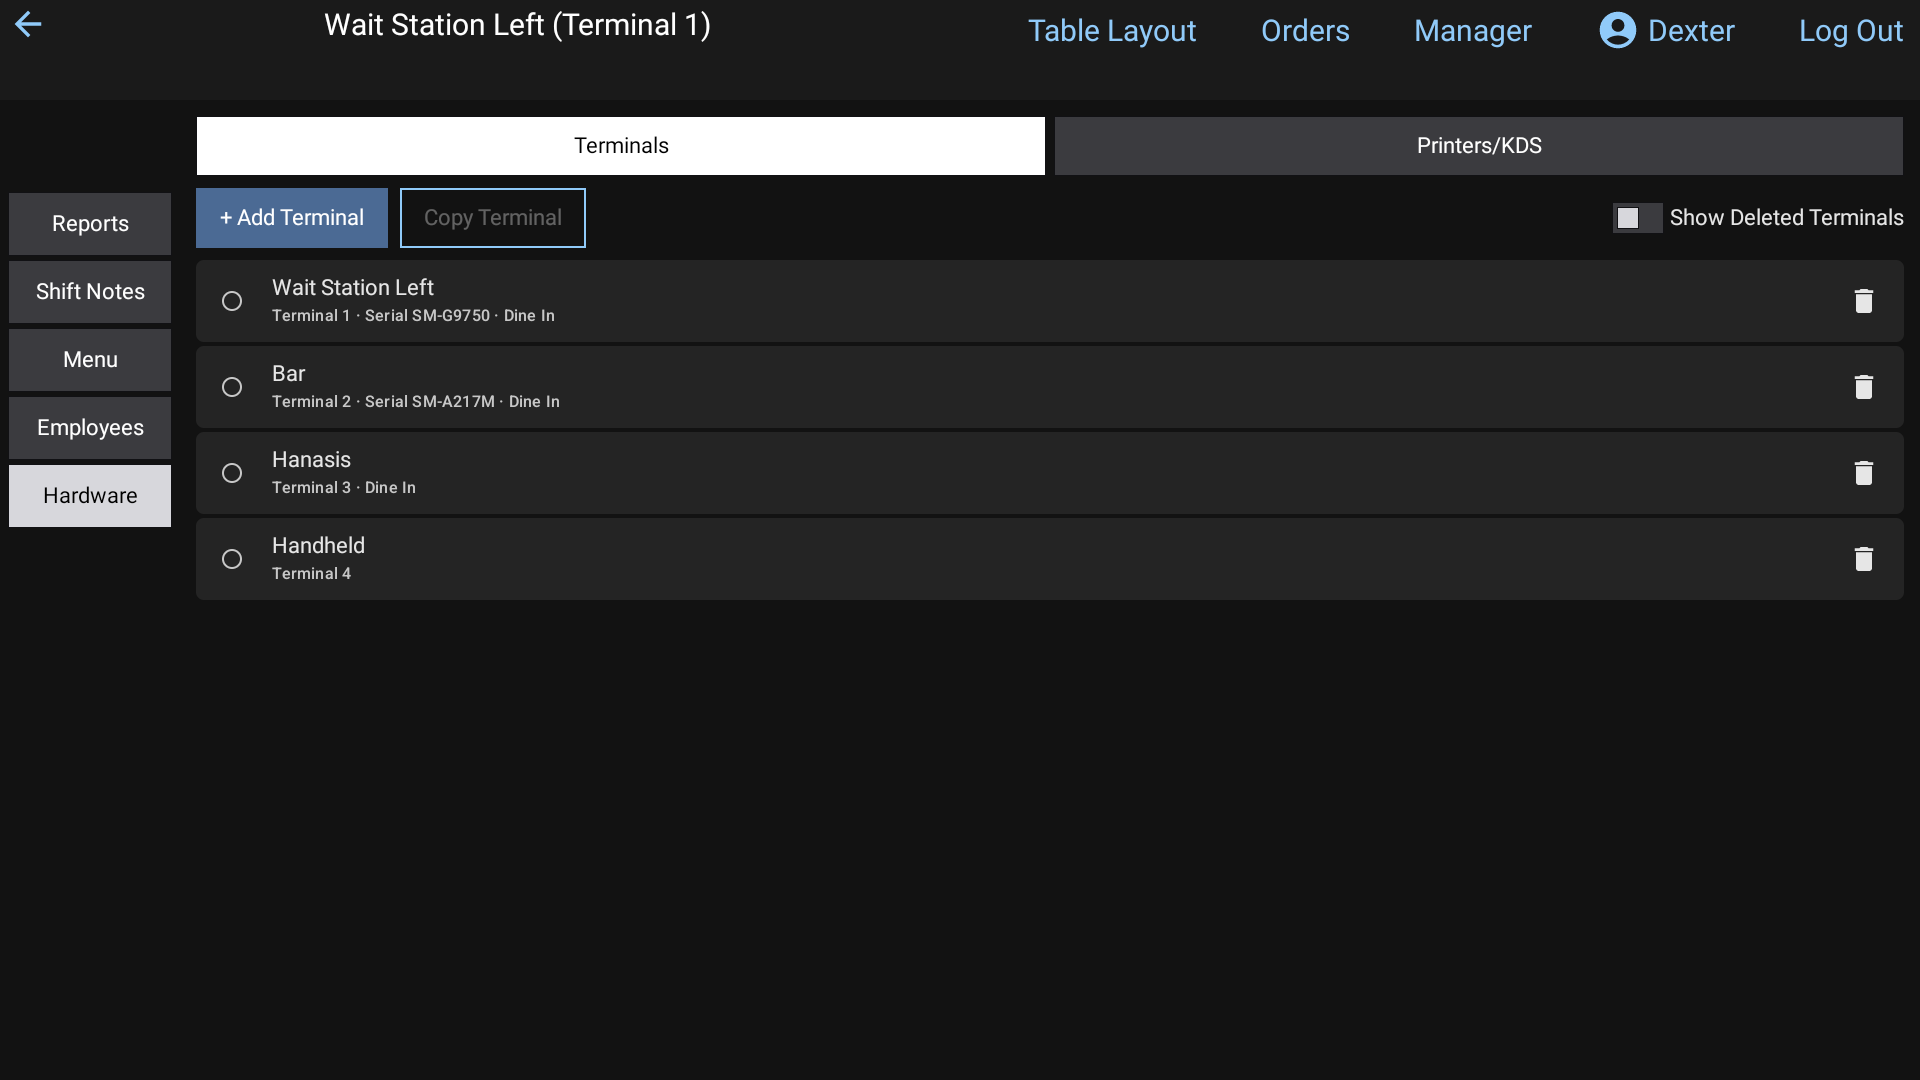 Manager > Hardware on the POS: the Terminals tab, with Printers/KDS beside it
#The Terminals list
- + Add Terminal creates a new terminal with the next default name and opens its settings.
- Copy Terminal copies the settings of the terminal you've selected (the round button on its row) onto a new terminal. The copy still gets its own new default name.
- The trash can removes a terminal. Tick Show Deleted Terminals to see removed ones: the green + brings one back, and the X deletes it for good.
Each row shows the terminal's name and a short summary, such as its Default Order Type and Receipt Printer.
#General Settings
Click a terminal to open it. The General Settings tab has:
- Default Name: the terminal's permanent name. It can't be changed.
- Custom Name: what staff see, for example "Bar Terminal".
- Serial Number: shown read-only. It's set by RealPOS support.
- Default Order Type: every order started on this terminal is tagged with this order type. When staff log in, the terminal goes straight to that order type's table layout if it has one, or to its Orders tab. Choose None — direct to Orders screen to log in to the Orders screen's All Orders view and tag nothing automatically.
- Use Quick Tab: logging in also opens the Default Order Type's Quick Tab screen. It needs a Default Order Type.
- Revenue Center: the group this terminal belongs to (set up under Store Settings > Revenue Centers).
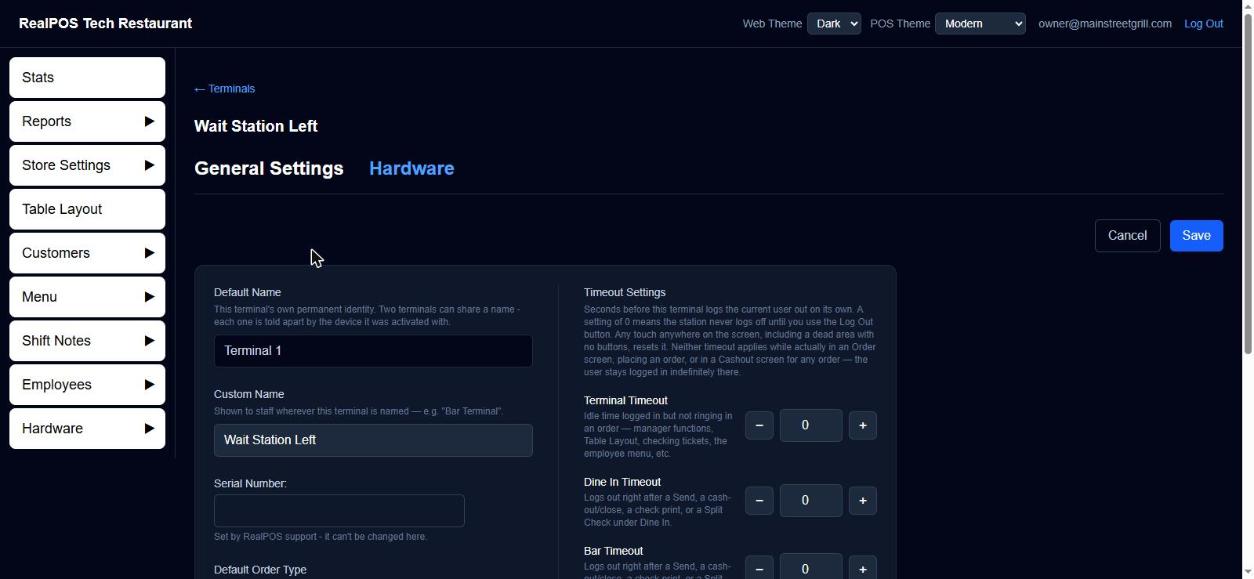 A terminal's General Settings
#Timeout Settings
These log the current user out on their own after a number of seconds. 0 means the terminal never logs out until someone taps Log Out. Any touch on the screen resets the timer.
- Terminal Timeout: idle time while logged in but not ringing in an order (manager functions, the table layout, the employee menu and so on).
- [Order type] Timeout: one per order type. It logs out right after a Send, a cash-out or close, a check print, or a Split Check under that order type.
Neither timeout applies while someone is on an Order screen or a Cashout screen.
Click Save when you're done. Cancel asks Do you wish to cancel? before throwing away changes.
#Hardware
The Hardware tab sets this terminal's own printer and card reader:
- Receipt Printer: the printer this terminal sends receipts to.
- Receipt Printer Type: USB or Network. For Network, type the printer's address on your local network.
- Check Template and Receipt Template: which layout this terminal prints checks and receipts with. See Printers and kitchen screens.
- Card Reader (Datacap): pick the Card Reader model, then enter its Card Reader IP Address (the Port fills in for you). With a reader set up, a Card payment is taken on the PIN pad. With none, a Card payment is just recorded.
The merchant account every reader charges to is shared by all terminals. It's set under Store Settings > Payments > Card. See Payment types.
#Push Parameters
The first time a card reader is set up or replaced, save the Hardware tab and then click Push Parameters. This sends Datacap's settings to the reader. The reader restarts and shows its Welcome screen again in about a minute. The terminal must be on and connected while you do this. When it's finished you'll see Done or Failed with the time.
#Terminal settings on the POS
On the POS, long-hold the terminal name at the top of the screen to open Settings. It shows who is signed in, the sync status, and buttons to Sync now and Sync settings from back office.
#Revenue centers
A revenue center is a named group of terminals, such as a Bar or a Patio. In the back office, open Store Settings > Revenue Centers, click + Add Revenue Center, give it a Name and tick the Terminals that belong to it. A terminal can be in only one revenue center.
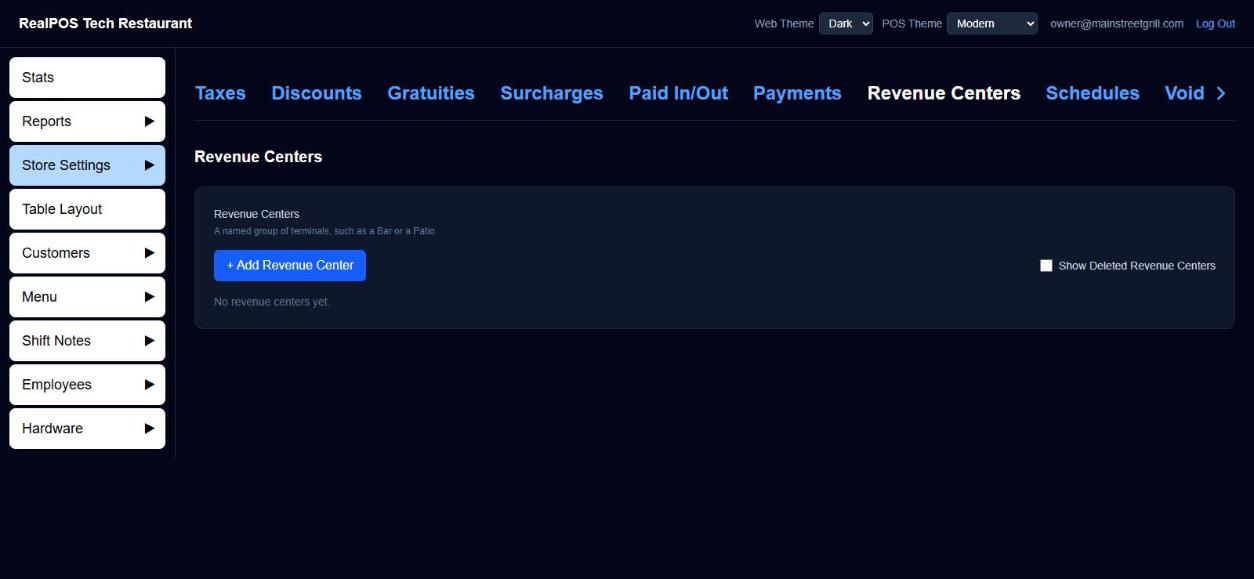 Revenue Centers
#Good to know
- Changes reach the terminals when they next sync.
- The terminal name turns pink on the POS while Store and Forward is taking cards with the internet down. See Payment types.
Printers and kitchen screens
Add kitchen and bar printers and kitchen display screens, choose which items go where, and design your printed tickets.
Kitchen printers, bar printers and kitchen display screens (KDS) are all set up in one list. Each item on your menu is sent to the devices you choose. You manage them in the back office (login.realpos.net) under Hardware > Printers/KDS, or on the POS under Manager > Hardware > Printers/KDS.
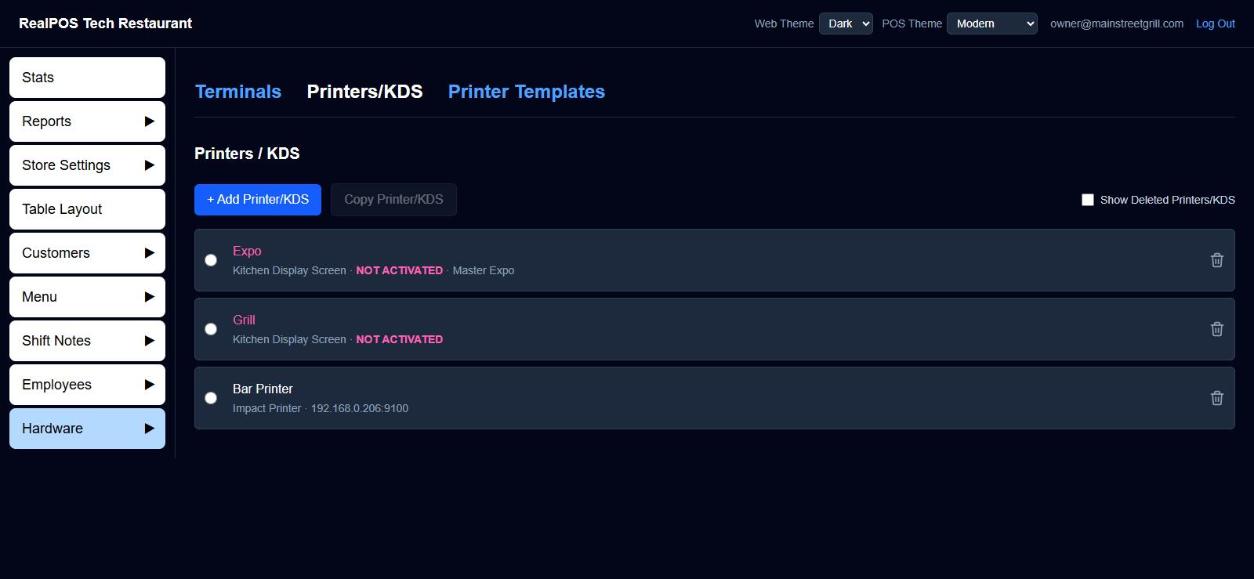 The Printers / KDS list
#Add a printer or screen
- Click + Add Printer/KDS. The new device opens.
- Pick the Device Type:
- Impact Printer: a dot-matrix kitchen printer such as the Epson TM-U220B. Plain text only.
- Thermal Printer
- Kitchen Display Screen
- Give it a Printer/KDS Name, for example Expo, Grill or Bar Printer.
- Enter its IP Address on your local network. Type just the address; the port is added for you.
- Fill in the rest (below) and click Save.
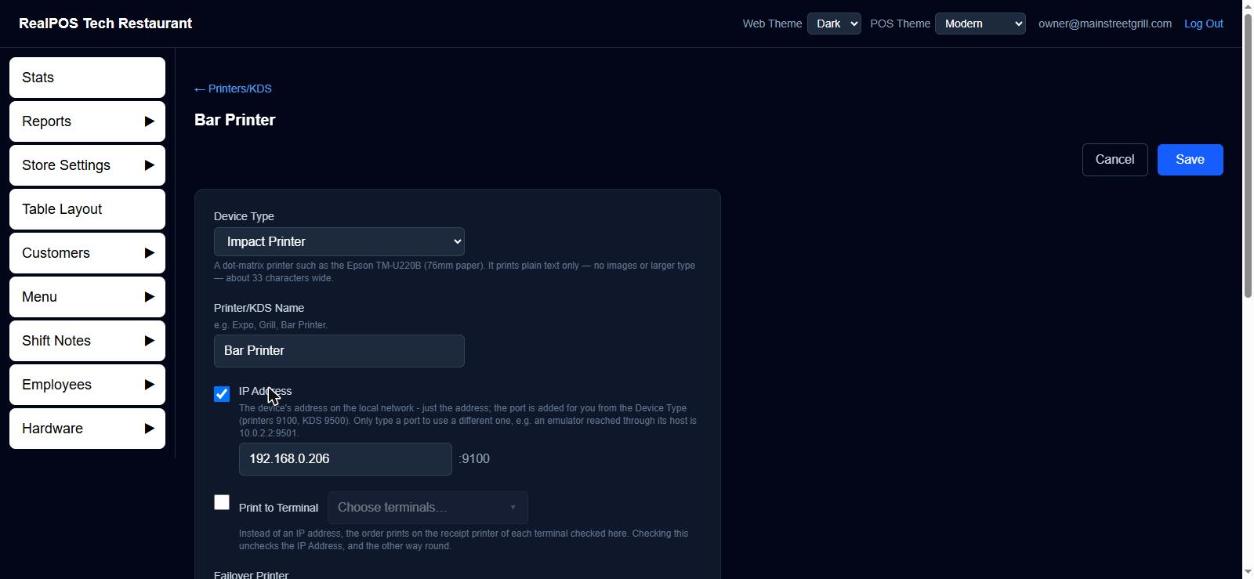 Editing a printer or screen
Copy Printer/KDS copies the selected device, including its item list, onto a new one. The copy's IP address is left blank because every device needs its own.
#Where a printer prints
A printer prints to its IP address (ticked by default) or, instead, to terminals' receipt printers:
- Print to Terminal: tick it and choose terminals. The ticket prints on the receipt printer of each terminal you check. Ticking this unticks the IP address, and the other way round.
#If a device is down
Failover Printer is where the order goes if this printer or screen is down. You can pick another kitchen or bar printer, a terminal's receipt printer, or another kitchen display. Left on the default, the order prints on the receipt printer of the terminal it was entered on.
#Choose which items go to a device
Under Items Assigned to this Device, click + Add, tick the items and click OK. Click Remove to take one off.
This works both ways: adding an item here also adds this device to that item's own Printer / KDS setting in Menu > Items. See Menu items.
#Kitchen display options
For a Kitchen Display Screen you also get:
- Master Expo: this screen receives every item sent to any other screen. Other screens bump item by item; this one bumps the whole order. A Master Expo screen doesn't use an item list.
- Ignore Master Expo: this screen doesn't report to the Master Expo. It works on its own, with a bump button on each ticket.
You can tick one or the other, not both.
#Connect a kitchen screen
The kitchen screen app needs no login. When it first opens it shows Kitchen Display - ready to connect and the tablet's own address.
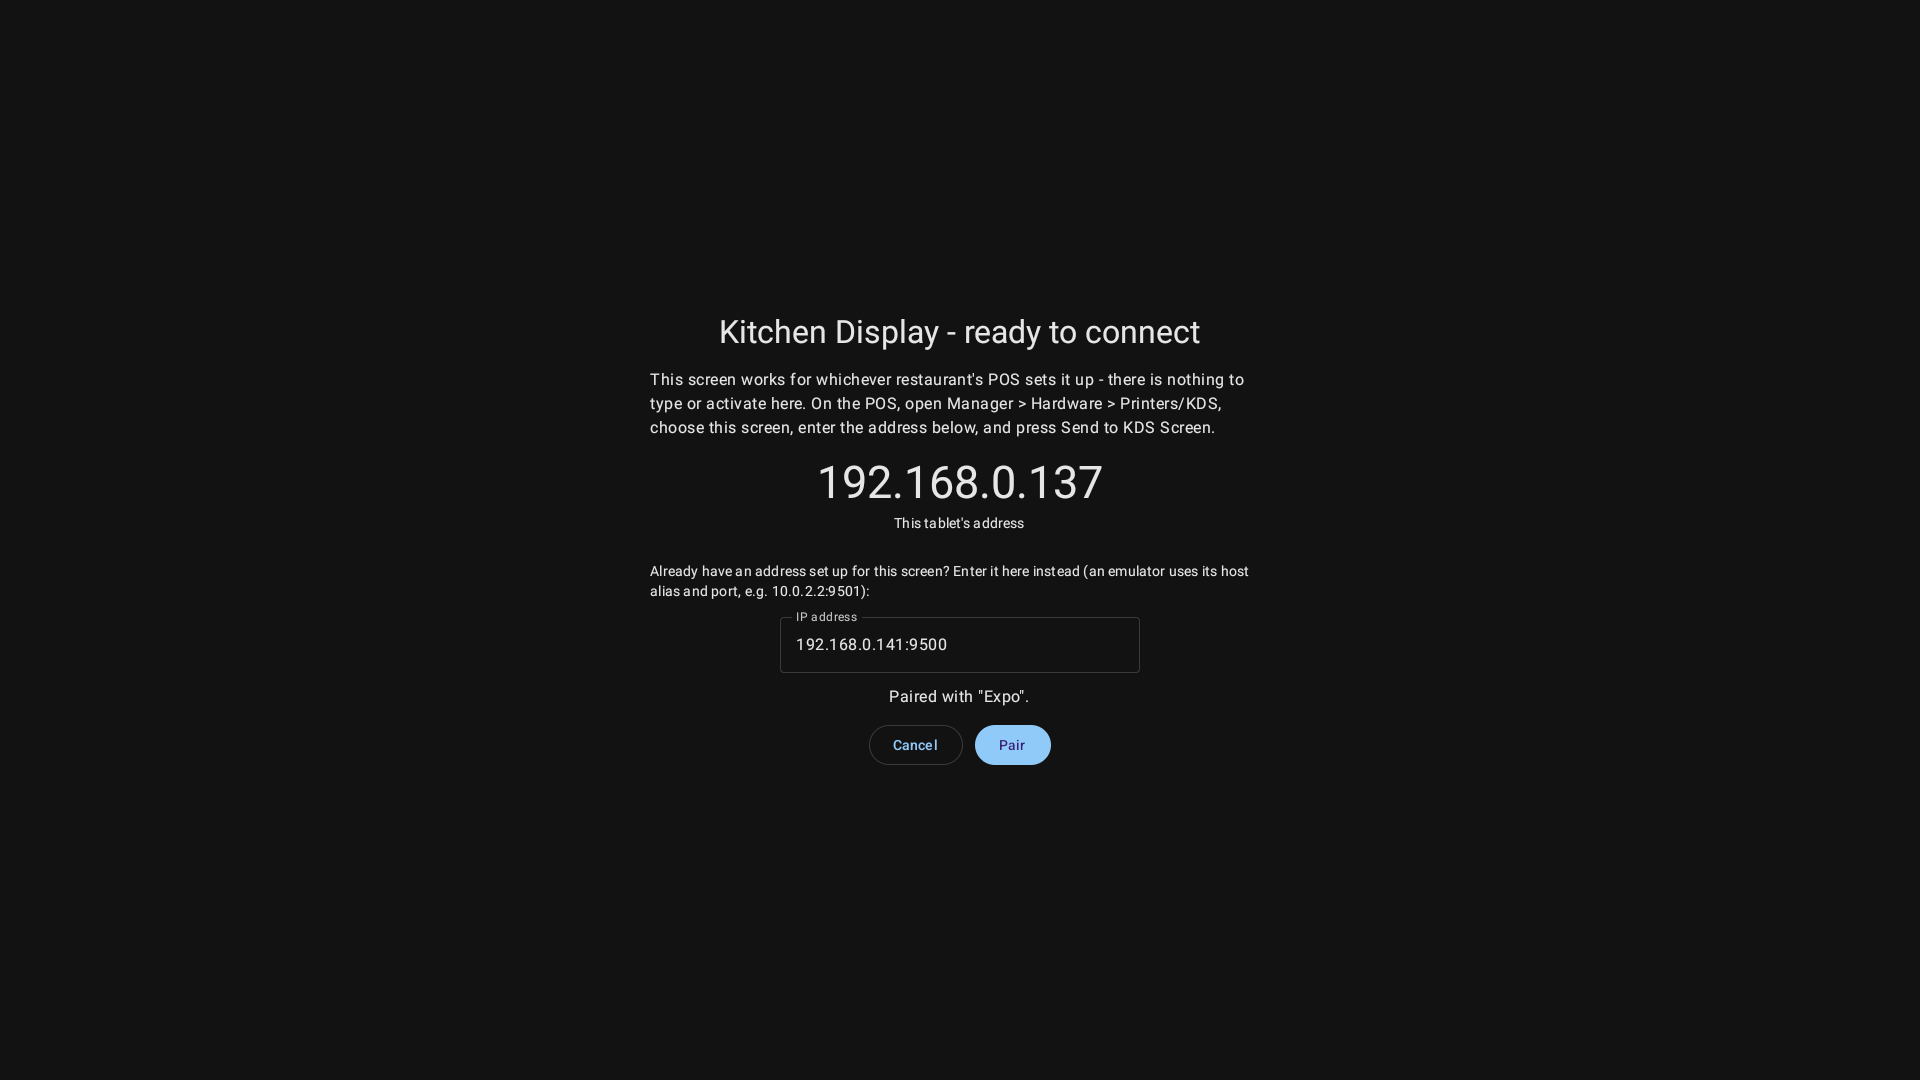 The kitchen screen waiting to connect
- In the back office, add the device as a Kitchen Display Screen with that address and save it.
- On a POS terminal in the restaurant, open Manager > Hardware > Printers/KDS and open that screen.
- Check the address and press Send to KDS Screen.
The screen then shows its kitchen view. Until a screen is connected, the Printers/KDS list shows it in pink as NOT ACTIVATED.
#Printer templates
Printer templates control what prints on checks, receipts and kitchen tickets. Open Hardware > Printer Templates. There are three system defaults that can't be deleted:
- Check Template: the check handed to the table. Shows cash and card prices.
- Receipt Template: the receipt after payment. Shows only the price of the payment type used.
- Kitchen/Bar Template: the ticket printed in the kitchen or at the bar. No prices.
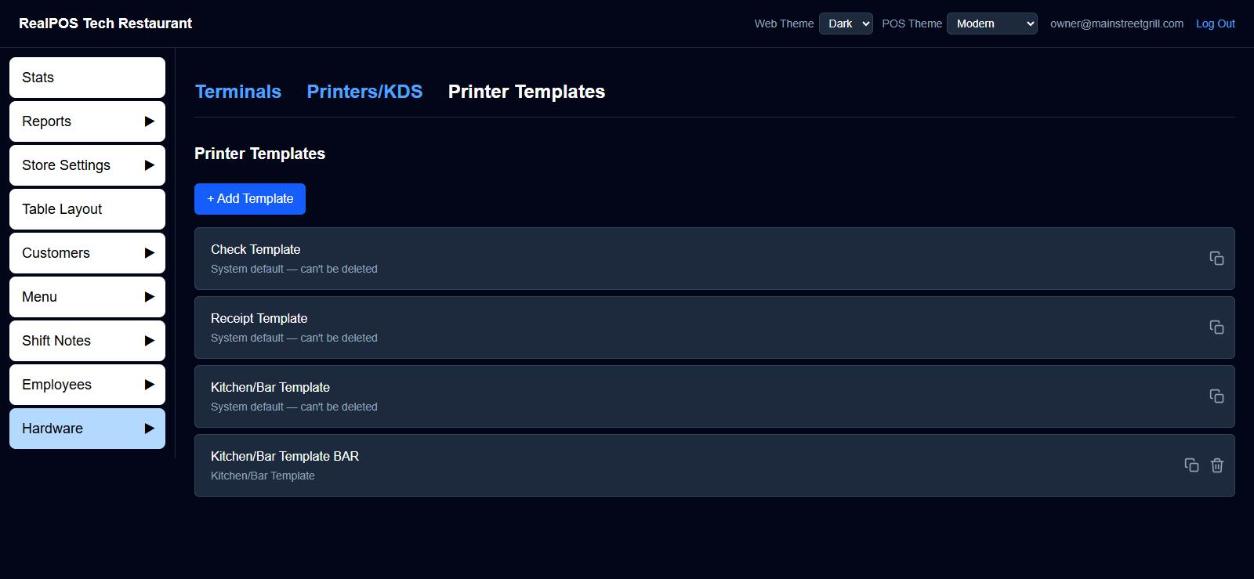 Printer Templates
To make your own, click + Add Template and pick the kind, or use the copy icon on an existing one. Give it a Template Name (the type is put in front of it, for example "Check Template Patio"). A Preview beside the settings shows how it will print.
Check and receipt templates have:
- Large Font, Print Modifier Prices, Combine Like Items as Qty and Print Barcode
- Header: tick Enable and Bold Font for lines such as Server, Guest Count, Table, Guest and Order Type. Order # always prints. Receipts also have Show Items.
- Recommended Gratuity: suggested tip percentages printed below the totals, calculated before or after discounts.
- Custom Footer: your own lines at the bottom, each with Bold Font.
Kitchen/Bar templates have Combine Like Items as Qty, Print Items by Seats, Print Separator Line, font sizes for the header, items and footer, and footers for order type, guest name and date/time.
Then choose which template to use:
- A terminal's checks and receipts: Hardware > Terminals, the terminal's Hardware tab. See Terminals.
- A kitchen or bar printer: the Printer Template setting on the printer.
Deleting a template sends any terminal using it back to the system default.
#Good to know
- The trash can on the list removes a device. Tick Show Deleted Printers/KDS to see removed ones and bring one back.
- A kitchen display screen doesn't use a printer template.
Payment types
Choose the tenders staff can take, who can use them, what prints, cash rounding, and your card merchant settings.
Payment types are the tenders offered on the POS Cashout screen and Pay button. Set them up in the back office (login.realpos.net) under Store Settings > Payments.
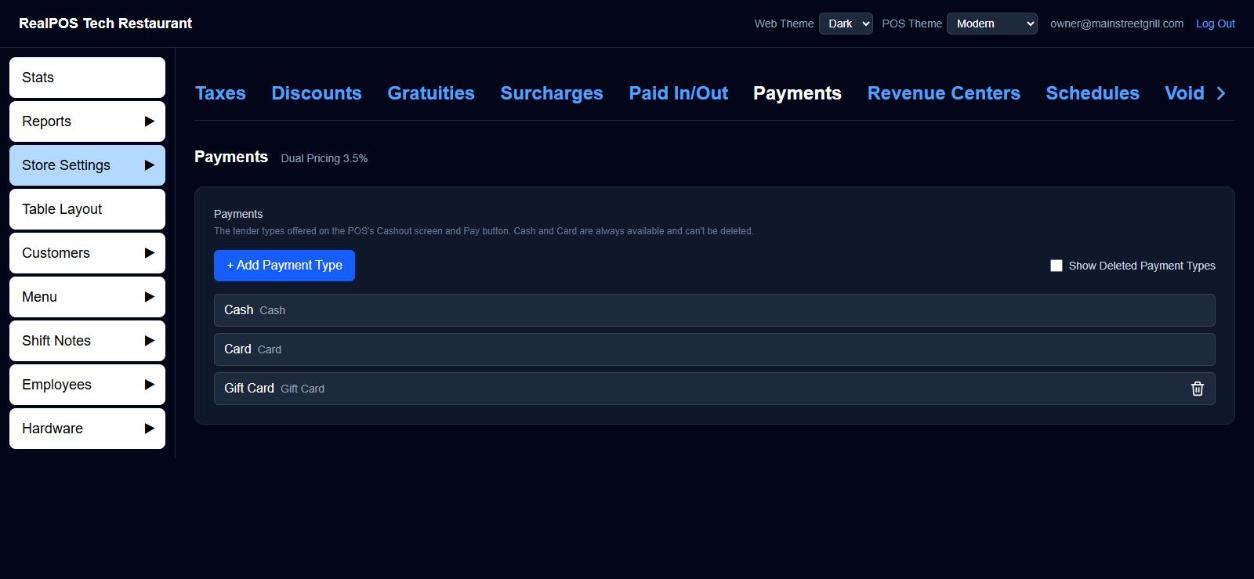 The Payments list
Every restaurant starts with Cash, Card and Gift Card. Cash and Card are always available and can't be deleted.
#Add a payment type
Use this for other tenders you accept, for example a house account or a delivery app.
- Click + Add Payment Type.
- Type a Name.
- Set the options below and click Save.
If you leave without saving, the new payment type isn't kept.
#Payment type settings
Click any payment type to open it.
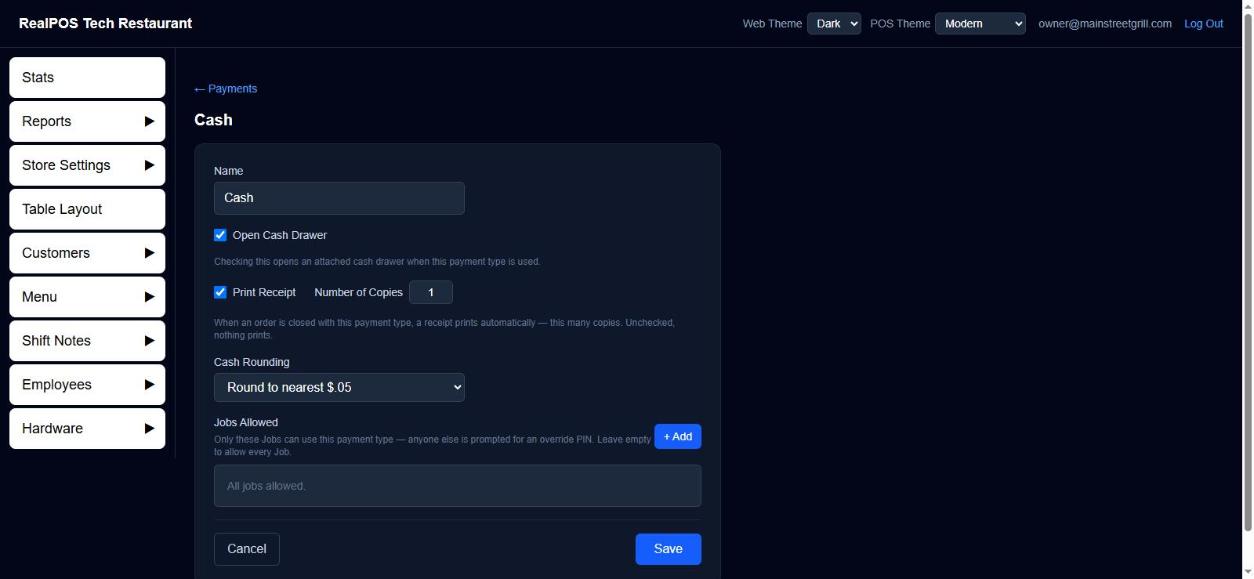 Editing a payment type
- Open Cash Drawer: opens an attached cash drawer when this payment type is used.
- Print Receipt and Number of Copies: when an order is closed with this payment type, a receipt prints automatically, this many copies (1 to 9). Unticked, nothing prints.
- Allow Tips (Card only): ticked, the card receipt prints a Tip and Total line, and the payment waits in the employee's menu for a tip to be added. Unticked, none of that.
- Cash Rounding (Cash only): No Rounding, Round to nearest $.05 or Round Down to nearest $.05.
- Jobs Allowed: click + Add to pick the jobs that can use this payment type. Anyone else is asked for an override PIN. Leave it empty to allow every job.
To hide a payment type, click Delete Payment Type on it, or the trash can on the list. Tick Show Deleted Payment Types and click + to bring one back.
#Card merchant settings
Open the Card payment type. Merchant Settings (Datacap) sits beside its other settings. These apply to every terminal's card reader. Each terminal's own reader is set under Hardware > Terminals (see Terminals).
- Datacap Merchant ID and Datacap Environment: Test (CERT) — no real charges or Live (PROD) — real charges.
- Suppress Amount Acknowledge: the reader skips its "SALE $x - OK?" screen and goes straight to asking for the card.
- Enable Pre Auth: adds a Pre Auth button to the order screen so a tab can be opened on a card. Set Amount is how much is held. $0.00 holds nothing; it checks the card and stores it to charge later on that order.
- Enable Store and Forward: when the internet is down, cards are still accepted and sent in once it's back. A stored card is approved without the card company checking it, so it can be declined later. The terminal name turns pink on the POS while this is happening. Datacap must also turn this on for your merchant account. Set the Largest card payment taken offline and Most card payments stored at once.
- Transaction Adjust Timeout: leave this blank on a live store.
Click Save under the merchant settings to keep them.
#Good to know
- The top of the Payments page shows how your cards are processed (for example Dual Pricing and its rate) when that's set up for your account.
- For taking a payment on the POS, see Take a payment.
Gratuities and surcharges
Set the gratuity percentages staff can add to an order, and named surcharges for the Payment screen.
A gratuity is a percentage added to an order, for example for a large party. A surcharge is an extra charge added on the Payment screen, as a percent or a dollar amount. You set the quick-pick choices for both in the back office (login.realpos.net) under Store Settings.
#Gratuity presets
- Open Store Settings > Gratuities.
- Type a percent in + Add percent (1 to 100) and click +.
- To remove one, click its trash can.
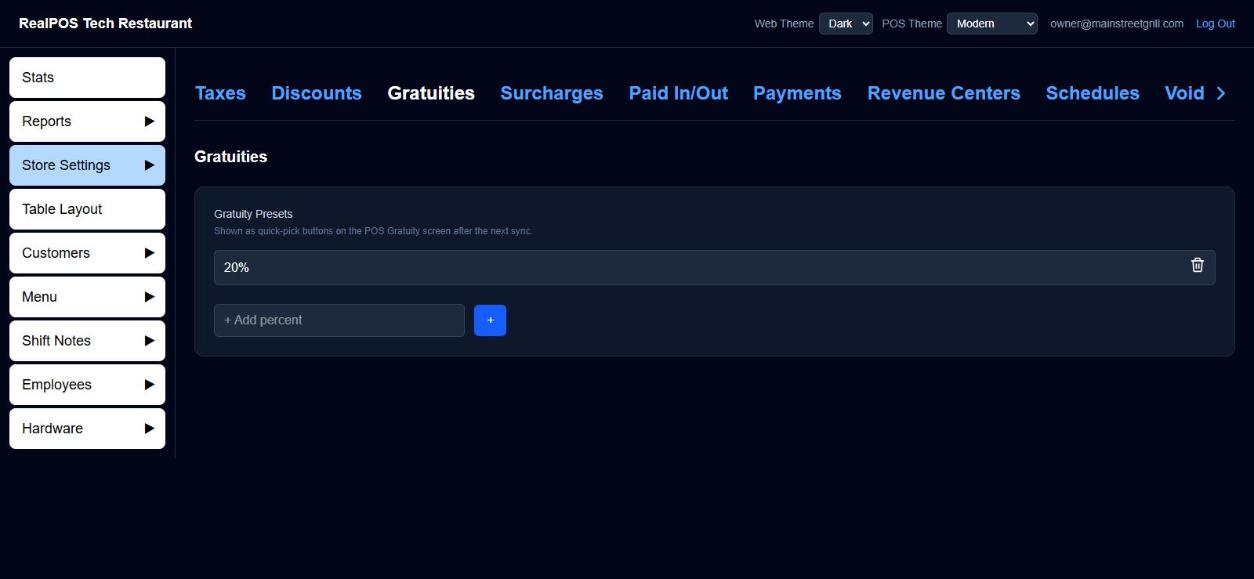 Gratuity presets
The list starts with 15%, 18%, 20% and 25%. The presets show as buttons on the POS after the next sync.
#Adding a gratuity on the POS
On the order screen, tap Gratuity and pick a percentage. The order shows a Gratuity (x%) line. To take it off, tap Gratuity again and tap Remove.
#Named surcharges
- Open Store Settings > Surcharges.
- Click + Add Surcharge.
- Enter a Surcharge Name.
- Under Amount, click the % / $ button to switch between a percent (whole numbers) and a dollar amount (up to 2 decimal places), then type the value.
- Optional: pick an Apply Tax. The surcharge is taxed at that rate on its own. Leave it blank for no tax.
- Click Save.
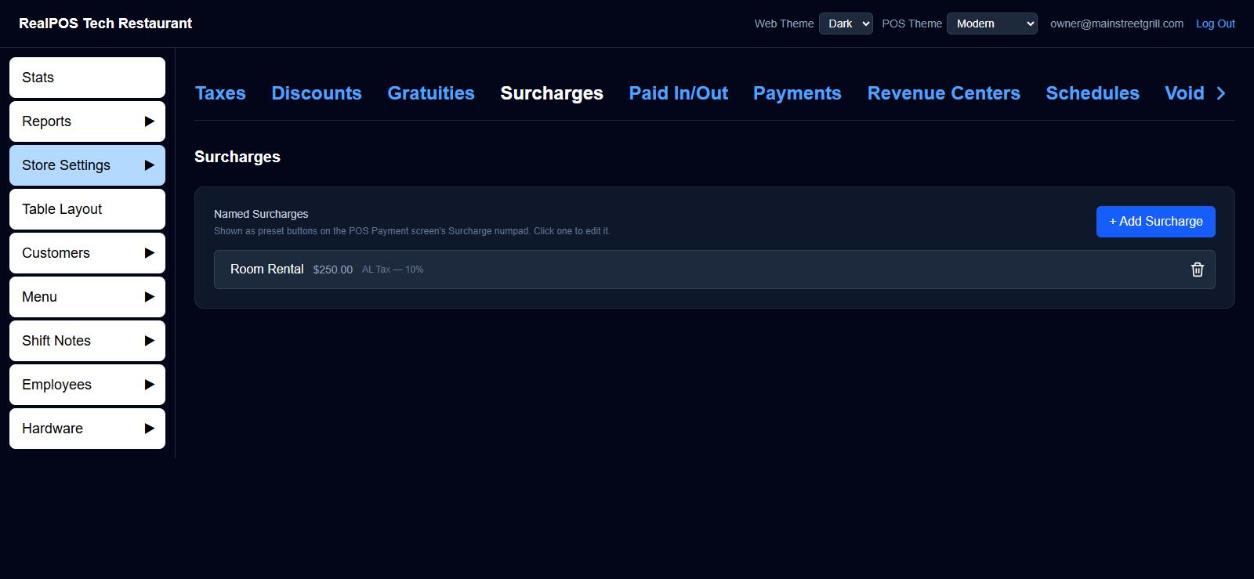 Named surcharges
Click a surcharge in the list to edit it, or its trash can to delete it.
#Adding a surcharge on the POS
On the Payment screen, tap Surcharge. Your named surcharges show as buttons; tap one to apply it with its own tax setting. Staff can also type a custom percent or amount. A custom one asks Is this surcharge taxable? with Non-Taxable and Taxable.
#Good to know
- A surcharge applies to the whole order, not a single item.
- Suggested tip percentages that print on checks are set in your check template, under Recommended Gratuity. See Printers and kitchen screens.
- Taxes are set up under Store Settings > Taxes. See Set your tax rate.
Void reasons
Set the list of reasons staff must choose from whenever they void an item or an order.
Every void on the POS needs a reason. Staff pick one from your list before the void goes through, so you can see later why food was voided. Set the list up in the back office (login.realpos.net) under Store Settings > Void Reasons.
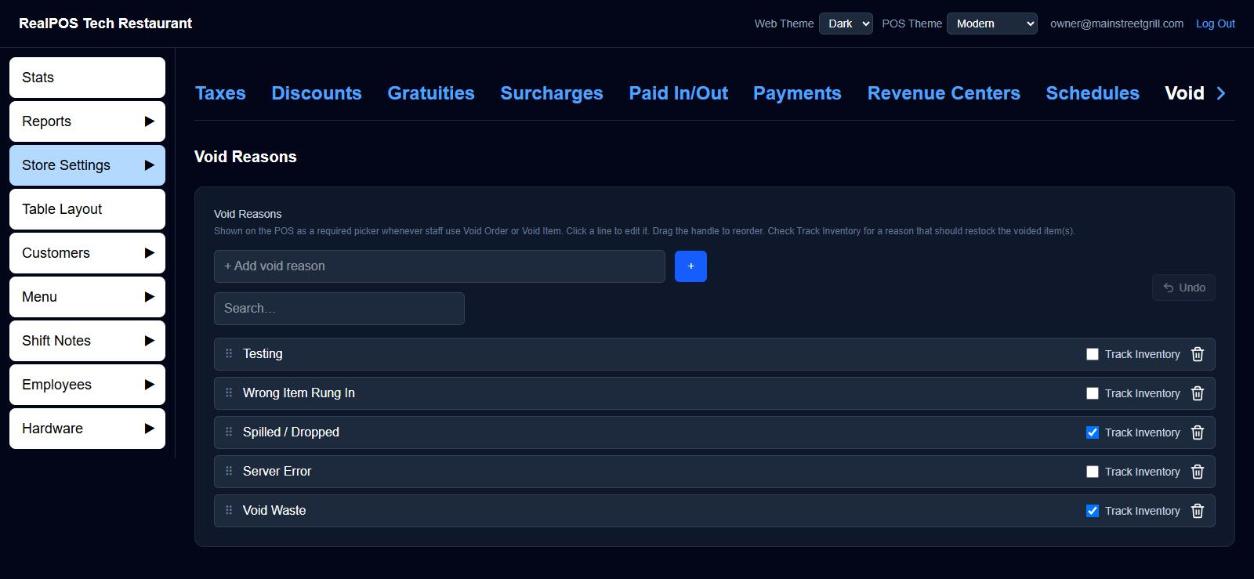 The Void Reasons list
#Add and edit reasons
- Type a reason in + Add void reason, for example "Rung in wrong" or "Guest changed mind".
- Click +.
- To change a reason, click its text, type, and click away.
- To change the order staff see them in, drag the ⠿ handle.
- To delete one, click its trash can.
- Track Inventory: tick it for a reason that should restock the voided items.
- Made a mistake? Undo reverses your last change.
Use Search… to find a reason in a long list. Two reasons can't have the same text.
#What staff see
When someone taps Void Item or Void Order on the POS, Select a reason comes up first with your list. A reason with Track Inventory ticked shows (Track Inventory) beside it. Tapping Cancel cancels the whole void.
If you haven't added any reasons yet, the POS says so and the void can't go ahead, so add at least one before you open.
#Good to know
- Voiding needs the "Allows voiding an item" or "Allows voiding an entire order" permission, or a manager override. See Jobs and security.
- The reason is saved with each void. See who voided what, and why, in the Void and discount reports.
- How staff void: Void an item.
Fix and add timeclock punches
See who is clocked in, correct a missed or wrong punch, and add a shift someone forgot to clock.
The timeclock list shows every clock-in for the dates you pick. Use it to fix a punch when someone forgets to clock out, clocks in under the wrong job, or never clocks in at all. Changes here flow straight into the Payroll report.
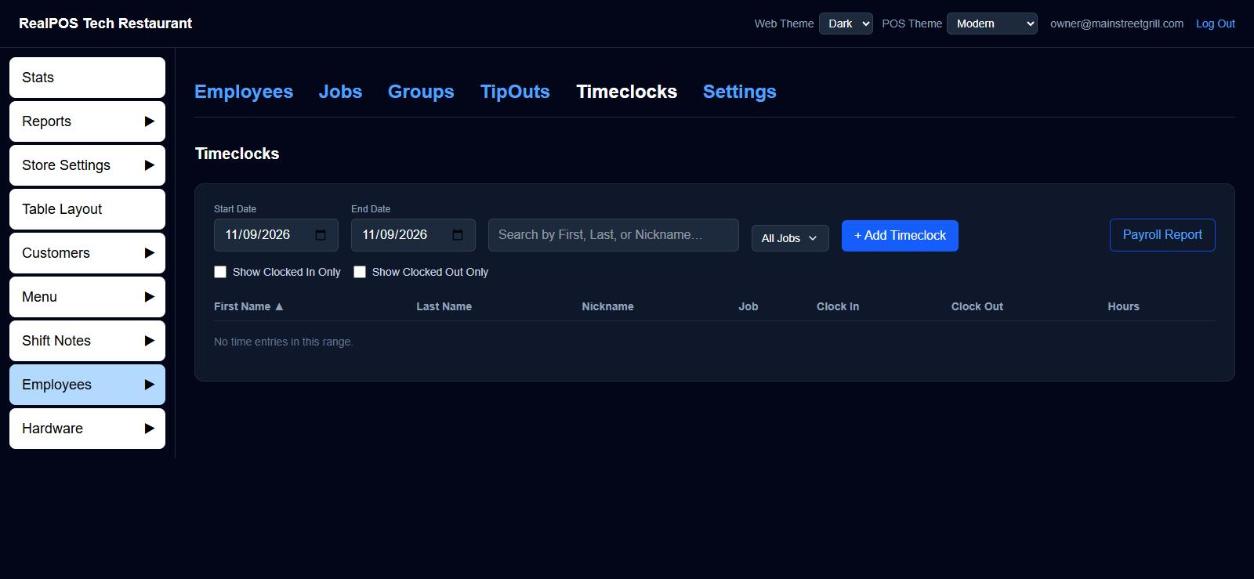 The Timeclocks page in the back office
#See the punches
- In the back office (login.realpos.net), go to Employees > Timeclocks.
- Pick a Start Date and End Date. The list opens on today.
- Narrow it down if you need to:
- Type in Search by First, Last, or Nickname…
- Use the Jobs filter to show one or more jobs.
- Tick Show Clocked In Only to see who is on the clock right now, or Show Clocked Out Only for finished shifts.
- Click any column heading (First Name, Last Name, Nickname, Job, Clock In, Clock Out) to sort. Click it again to reverse.
Hours shows the length of each shift. For someone still on the clock it counts up to now.
#Fix a punch
- Click the employee's row. Edit Time Entry opens.
- Change what's wrong:
- Job: pick another of that employee's jobs.
- Clock In / Clock Out: type over the date and time, or click the calendar icon to pick a date and set the hour, minute and AM/PM, then OK.
- Still clocked in: tick it to reopen the shift (no clock-out time).
- Click Save.
To remove a punch completely, click Delete Entry. It's gone straight away, with no undo.
#Add a missing shift
- Click + Add Timeclock.
- Search for the employee and click their name. If they have only one job it's picked for you; otherwise choose the Job.
- Set Clock In and Clock Out.
- Click Save.
#Pink rows: clocked out by the system
If Clockout all employees on system close is turned on (see Store Close), anyone still clocked in at the End of Day Time is clocked out automatically at that time. Those rows show pink so you can spot who forgot.
The system also leaves a Manager Note listing who it clocked out (see Shift notes).
Open a pink row and set the real clock-out time. Once you change the clock-out time, the pink flag clears because someone has checked it.
#On the POS
The same list is on the terminal under Manager > Employees > Timeclocks, with its own + Add Timeclock button and the same pink rows for system clock-outs.
Manager > Employees on the POS
#Good to know
- Two shifts for the same person can't overlap. If they would, you'll see "This overlaps another time entry for this employee." Fix the other shift first.
- The clock-out has to be after the clock-in.
- Payroll Report (top right of the page) opens the payroll PDF for the same dates.
- You can also fix a shift's times, job and cash tips right on the Payroll report.
- Pay period, overtime rules and tip settings are on Employees > Settings. See Run payroll.
Run payroll
Set up your pay week and overtime rules, then run the Payroll report for hours, pay and tips.
The Payroll report shows each employee's shifts for the dates you pick, with hours, overtime, pay and tips, a paycheck line, and a summary by job. You can fix a shift right on the report.
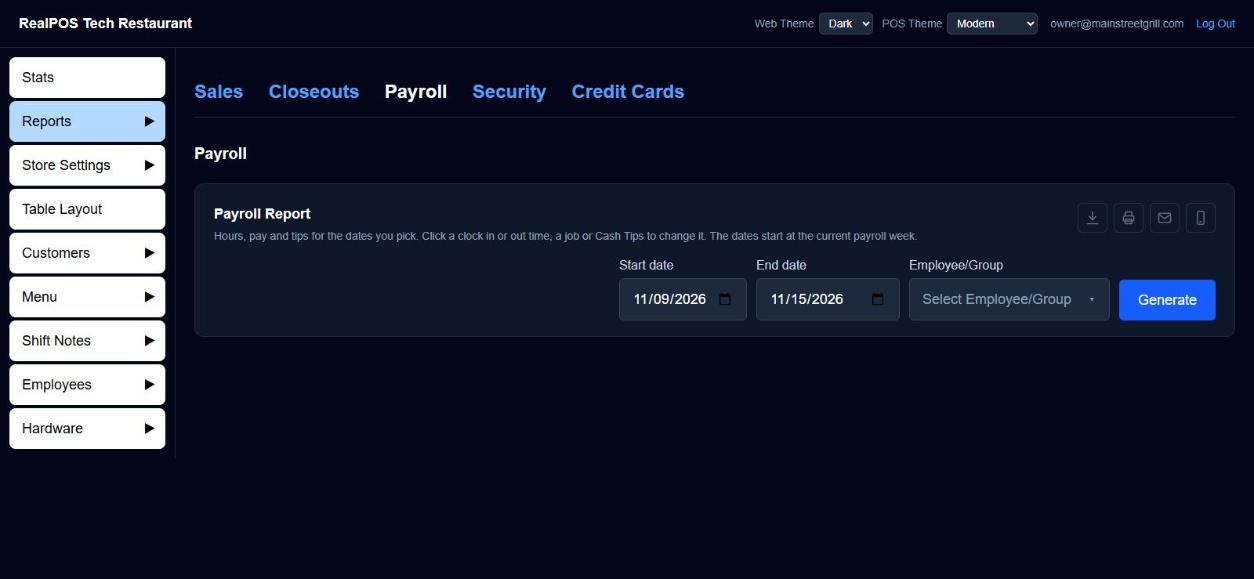 The Payroll report in the back office
#Set up payroll first
Do this once, in the back office (login.realpos.net) under Employees > Settings (the Payroll Settings page).
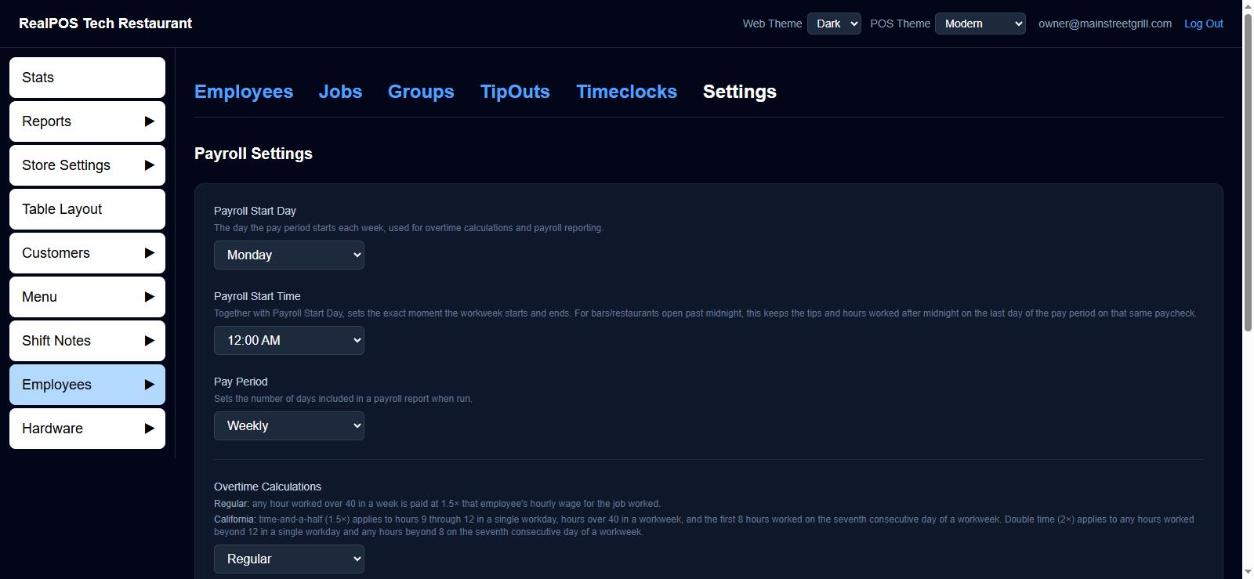 Payroll Settings
- Payroll Start Day: the day your pay week starts. Used for overtime and payroll reporting.
- Payroll Start Time: the exact time the week starts and ends. If you're open past midnight, this keeps tips and hours worked after midnight on the last night of the period on the same paycheck.
- Pay Period: Weekly, Bi-Weekly or Monthly.
- Overtime Calculations:
- Regular: hours over 40 in a week are paid at 1.5 times the wage for the job worked.
- California: 1.5 times for hours 9 to 12 in a day, hours over 40 in a week, and the first 8 hours on the seventh day in a row; 2 times for hours over 12 in a day and over 8 on the seventh day in a row.
- Credit Card Tip/Gratuity Reduce %: the share of card processing fees taken out of each employee's card tips and gratuities. Leave at 0 to take nothing.
- High Tip % Warning: card tips above this percent of the payment are highlighted dark blue on the POS. 0 turns it off.
- Tips Paid as Wages: ticked, card tips (less the reduce %) go on the paycheck. Unticked, employees take their card tips home at the end of their shift.
- Gratuities Paid as Wages: the same choice for card gratuities. Cash gratuities are always treated like cash tips.
Click Save.
#Run the report
- Go to Reports > Payroll.
- The dates start on the current pay week. Change Start date and End date if you need to.
- To run it for some people only, open Select Employee/Group. Tick groups (shown first, in bold) and/or employees. Nothing ticked means everyone. Clear unticks them all.
- Click Generate.
Each employee gets a box with their Payroll ID and one row per shift: Time In, Time Out, Job, Rate, Reg Hrs, OT Hrs, Total Hours, Hours Pay, Charge Tips, Gratuities, Tip Reduce, Total Tips/Grats and Cash Tips. With California overtime you also get Daily OT and Double OT. A bi-weekly or monthly run adds a total line after each week (Week 1 Total, Week 2 Total and so on).
Under the shifts:
- Paycheck: Hours Pay Total, Tips Total, Gratuities Total, Tip Outs (only if you use TipOuts), Total Pay and Payroll Tips. Tips or gratuities show PAID when they aren't paid as wages (the employee already took them home).
- Metrics: Sales, % Store Sales, Tip %, Avg Order and Avg Guest.
At the bottom, Summary totals hours and pay by job, with Labor Sales as a percent of total sales.
#Fix a shift from the report
Click the underlined values:
- A Time In or Time Out opens the same edit window as Timeclocks.
- A Job lets you pick another of that employee's jobs.
- Cash Tips opens a keypad to type the amount they declared.
The report runs again for the same dates and stays open.
A Time Out in pink means the system clocked that person out at store close. Check it and set the real time.
#Save, print, email or text
Use the icons at the top right:
- Save: PDF, Excel (.xlsx) or CSV.
- Print.
- Email: pick the format, then the address.
- Text: sends a link to the file.
Collapse hides the shifts, Expand brings them back and Close clears the report.
#On the POS
The same report is under Manager > Reports > Payroll, with the same Select Employee/Group picker and tap-to-fix times, jobs and cash tips.
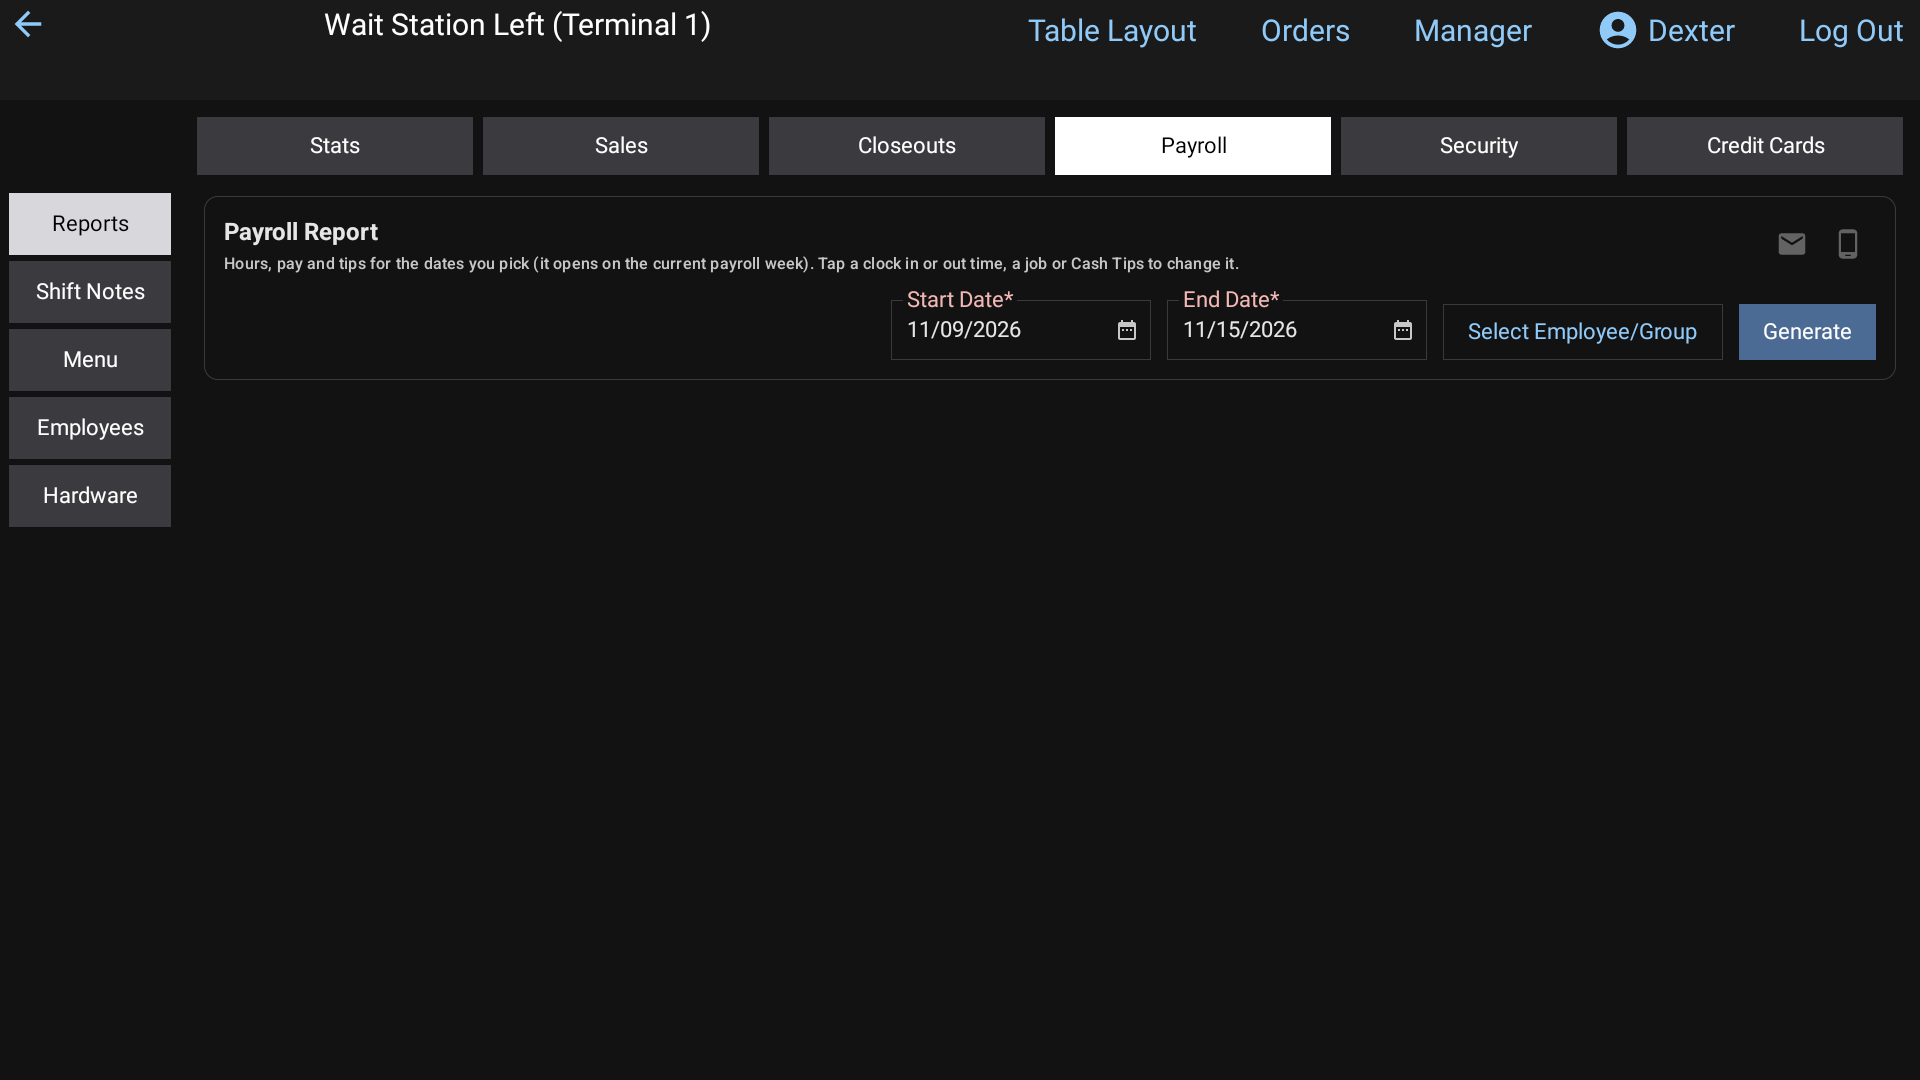 Manager > Reports > Payroll on the POS, with Select Employee/Group beside the dates
#Good to know
- Total Pay includes card tips and gratuities only when they're paid on the paycheck. It never includes cash tips.
- Payroll Tips is card tips and gratuities less the card fee, plus declared cash tips, plus or minus To Payroll tip outs.
- Tip Reduce only affects card tips and gratuities, never cash gratuities.
- To filter by front of house or back of house, set up Employee groups.
Set up tip-outs and tip pools
Have servers tip out the bar or bussers, or pool tips between bartenders, worked out automatically from each shift.
TipOuts works out who owes whom at the end of each shift. You set the rules once; every time an employee closes out, their share is worked out from their own shift and split among the people who worked with them.
TipOuts is set up in the back office only (login.realpos.net).
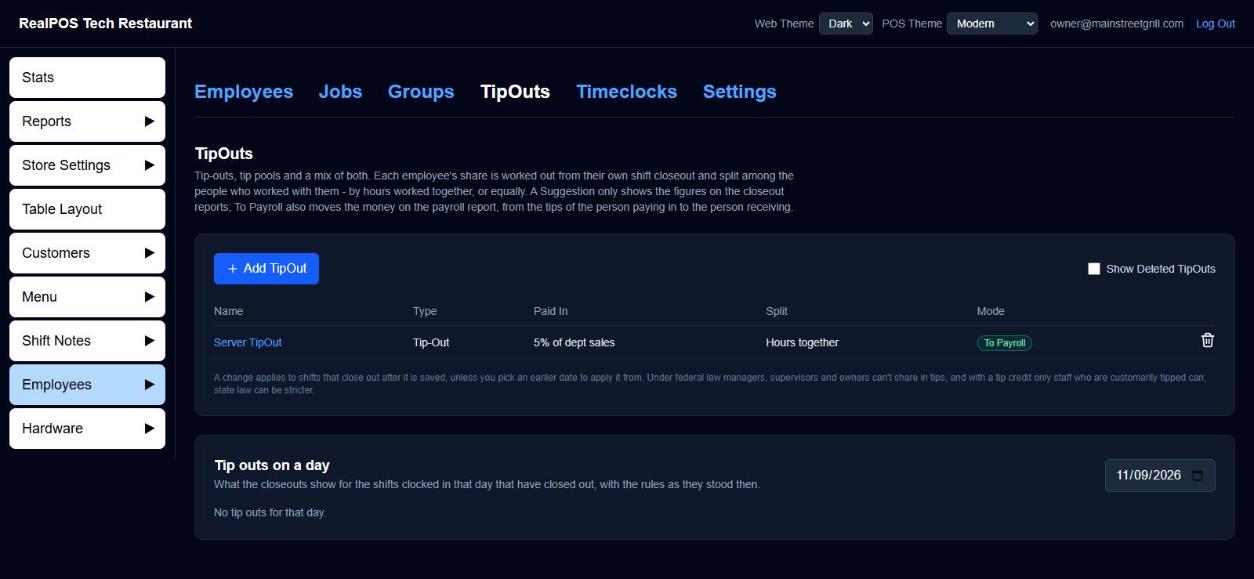 Employees > TipOuts
#Two kinds of rule
- Tip-Out: one set of people (the funders) pays a percent to others (the recipients). For example, servers tip out the bartenders 5% of liquor sales, or bartenders tip out the host 2% of all sales.
- Tip Pool: one list of members shares everything they end up with: their own tips, plus tip-outs they received, less tip-outs they paid. Two bartenders ringing everything under one number still split it.
#Suggestion or To Payroll
Every rule has a Mode:
- Suggestion: the figures show on each employee's closeout report only. Nothing is taken out of anyone's tips.
- To Payroll: the money moves on the Payroll report, out of the tips of the person paying in and into the tips of the person receiving.
Starting with Suggestion is a safe way to check the numbers before you switch a rule to To Payroll.
#Add a rule
- Go to Employees > TipOuts and click Add TipOut.
- Give it a Name, for example "Busser Tip-Out".
- Pick the Type: Tip-Out or Tip Pool.
- Pick the Mode: Suggestion or To Payroll.
- Pick the Split:
- Weighted by hours worked together: someone who worked 6 hours alongside the person paying in gets twice the share of someone who overlapped for 3.
- Equal split: everyone who worked alongside them gets the same, however long they overlapped.
- Set what each person pays in, as a percent:
- Of tips: tick Card tips & gratuities (after the card fee) and/or Declared cash tips.
- Or of sales (Tip-Out only): pick Gross Sales or Net Sales, and pick departments to take it from just those (for example liquor), or none for all sales.
- Choose who pays in (Who pays in (funders), or Pool members for a pool). You can pick by job (Clocked in as), by Employee groups, or name Employees one by one.
- For a Tip-Out, choose Who receives it (recipients) the same way. To split it between several groups (for example Bar 50%, Hosts 25%, Bussers 25%), click Add another group of recipients and set each group's share. The shares should add up to 100%.
- Under Applies to, choose Shifts that close out from now on, or Shifts closed out from a date to apply it to earlier shifts too.
- Check the plain-English sentence under the form, then click Save.
#Change or delete a rule
- Click the rule's name to edit it. A change applies to shifts that close out after you save, unless you pick an earlier date.
- Click the trash icon to delete it from now on. Shifts already closed out keep it. Tick Show Deleted TipOuts to see deleted rules and restore one.
#Check a day
Tip outs on a day at the bottom of the page shows what the closeouts show for one day: each person's net To Payroll and Suggested amounts, and a card for each shift that paid in, with who got what. Pick a date to look at another day.
#Where tip-outs show up
- On each employee's shift report when you reprint it from Reports > Closeouts (see Closeouts), under Tip Outs - To Payroll and Suggested Tip Outs.
- On the Payroll report, as Tip Outs on the paycheck line (To Payroll rules only).
#Good to know
- Money is shared out when the person paying in closes out, among the people whose shifts overlapped theirs. If nobody overlapped, they keep it.
- A Tip-Out never pays the funder themselves. A pool includes the member's own shift.
- A To Payroll pool only counts To Payroll tip-outs.
- Under federal law managers, supervisors and owners can't share in tips, and with a tip credit only customarily tipped staff can. State law can be stricter. Check before you set up a pool.
Group employees (FOH, BOH)
Put employees into groups like front of house and back of house so you can filter payroll and labor reports.
Groups let you run payroll and labor numbers for part of your team, such as FOH (front of house) or BOH (back of house). An employee can be in as many groups as you like.
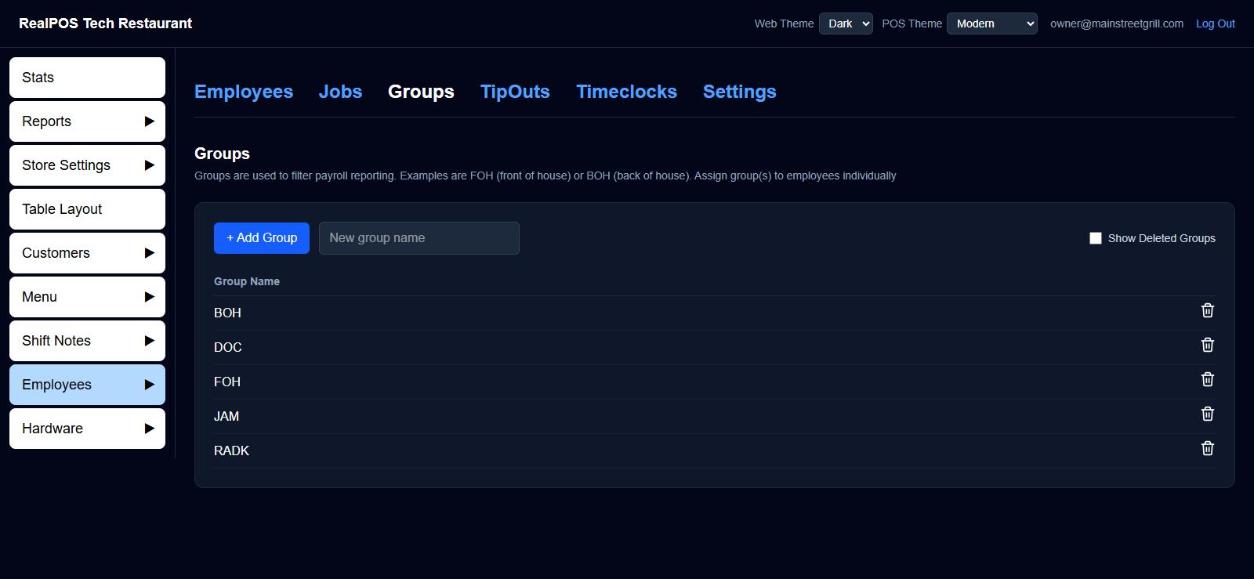 Employees > Groups
#Add a group
- In the back office (login.realpos.net), go to Employees > Groups.
- Type the name in New group name.
- Click + Add Group.
On the POS it's the same: Manager > Employees > Groups, type in New group name, then tap + Add Group.
#Put employees in a group
- Open the employee (see Enter your employees).
- Click the Group box. It shows No group until you pick one.
- Tick every group they belong to.
- Save the employee.
The Employees list has a Group column. Use the arrow beside it to show only certain groups.
#Use groups in reports
- Reports > Payroll: open Select Employee/Group and tick a group. See Run payroll.
- Reports > Sales > Labor Sales Report: use the Group picker to see hours and pay for those groups only.
- Employees > TipOuts: pick Employee groups as funders or recipients. See Tip-outs and tip pools.
#Delete or restore a group
Click the trash icon beside a group. Deleting is safe: employees keep the group, it just leaves the pickers.
To bring it back, tick Show Deleted Groups and click the restore icon beside it (on the POS, turn on Show Deleted Groups and tap Restore).
#Good to know
- Group names must be different. If you try to add a name that was deleted, you'll be told to restore it instead.
- An employee in several groups shows up when any one of their groups is picked.
Leave shift notes
Leave notes for other managers, for the whole staff on the login screen, or for one employee to read when they next sign in.
Shift notes are a shared notepad. There are three kinds:
| Kind | Who sees it |
|---|---|
| Manager Notes | Only visible to managers. |
| Staff Notes | Visible to all employees on the login screen. |
| Employee Notes | Visible to a specific employee on next login. |
You can write and manage notes on the POS or in the back office. They're the same notes in both places.
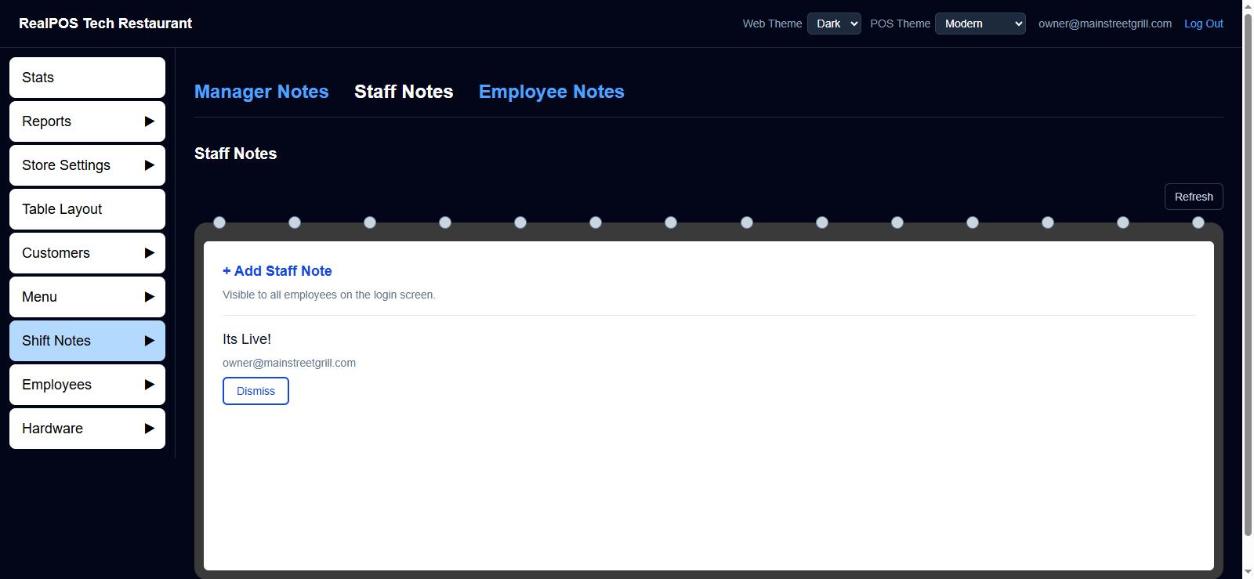 Shift notes in the back office
#Add a note on the POS
- Go to Manager > Shift Notes.
- Pick the tab: Manager Notes, Staff Notes or Employee Notes.
- Tap + Add Manager Note, + Add Staff Note or + Add Employee Note.
- For an Employee Note, pick the person under Send to which employee?
- Type the note. Tap Write to write it with your finger instead (it's turned into typed text), or Keyboard to go back to typing.
- Tap Save.
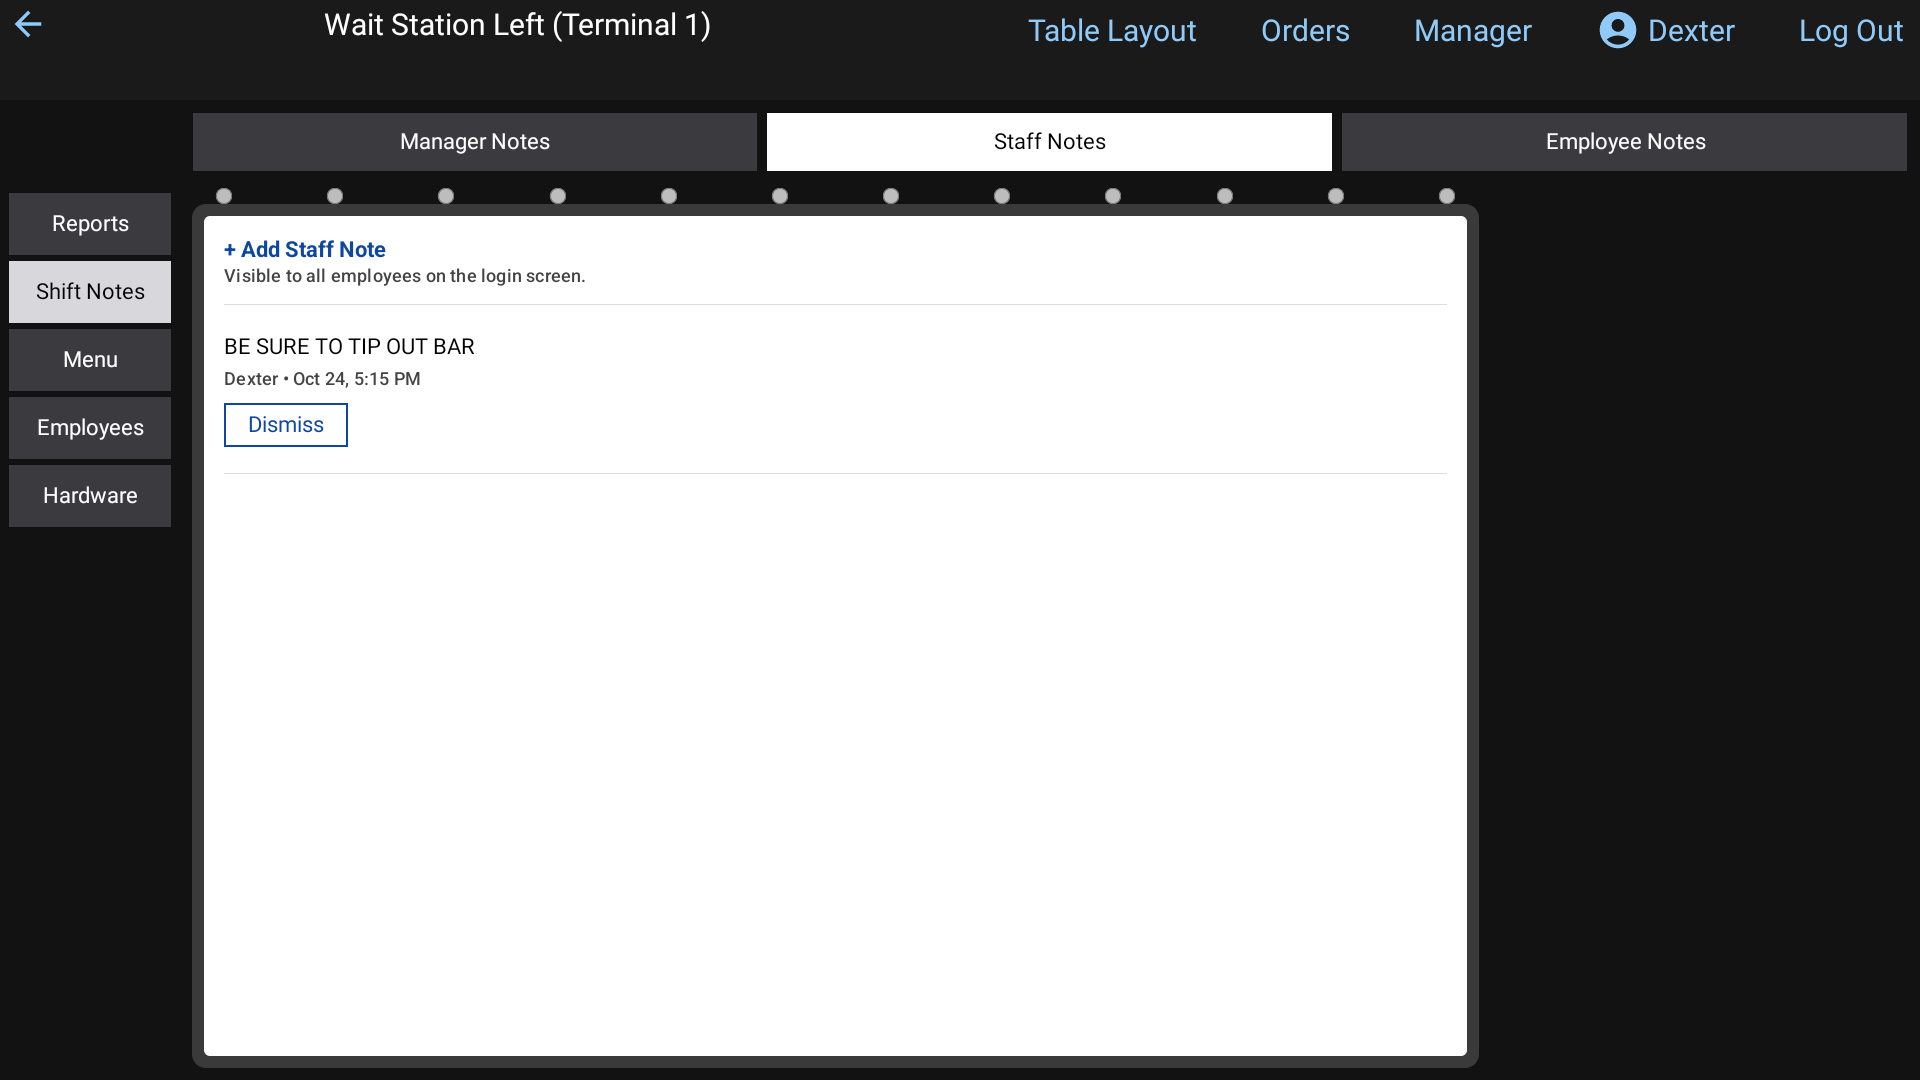 Manager > Shift Notes on the POS
#Add a note in the back office
- In the back office (login.realpos.net), open Shift Notes and pick Manager Notes, Staff Notes or Employee Notes.
- Click the + Add line at the top of the notepad.
- For an Employee Note, pick who it's for.
- Type the note and click Save.
Click Refresh to see notes someone has just added from a terminal.
#What employees see
- Staff Notes show on the Shift Notes notepad on the POS login screen, for everyone.
- An Employee Note pops up after that employee enters their PIN, titled "Note from" whoever wrote it. They can't skip it: Dismiss only works after a few seconds. If they have several, each one shows in turn before they're signed in.
On the Employee Notes tab each note shows Read or Unread, so you know whether it was seen.
#Edit, dismiss or relist
- Tap (or click) a note's text to edit it.
- Dismiss deletes the note after you confirm with Yes.
- Relist (Employee Notes that were already read) marks it unread again so it pops up at that person's next login.
#Good to know
- When the system clocks people out at store close, it leaves a Manager Note naming who it clocked out. See Fix and add timeclock punches.
- A note dismissed in the back office may still show on a terminal that already downloaded it.
Run sales reports
Find the sales reports, pick dates, break the numbers down, and save, print, email or text any report.
Every report lives in the back office under Reports, and the same reports are on the POS under Manager > Reports. This page covers the sales reports and how every report works. The Daily report has a page of its own.
#Stats: today at a glance
In the back office, Stats is the first page you see. On the POS it's Manager > Reports > Stats.
It shows one day: Gross Sales, Net Sales, Labor $, labor as a share of sales, Voids, Discounts, Refunds, gift cards, Paid Outs, Guest Count, averages per guest and per check, and Average Ticket Time. Under it are a Labor table by job and the Clocked In Employees for that day.
Use the arrows to go back a day or forward again, or click the date to pick one. The back office page updates itself every 15 seconds while it's open.
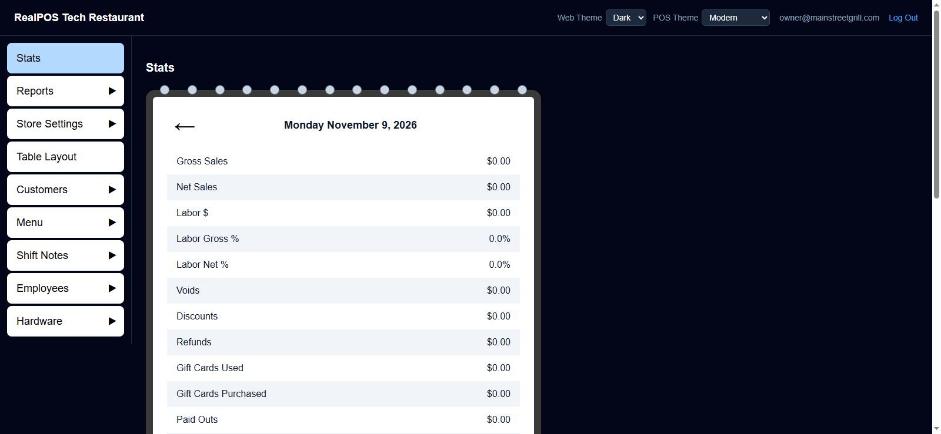 Stats in the back office
#Run a report
In the back office, go to Reports > Sales. Each report is a box on the page. They all work the same way:
- Pick a Start date and End date. Both start on today.
- Click Generate.
- Read the report in the box. Collapse folds it away, Expand opens it again, and Close puts it away so you can pick new dates.
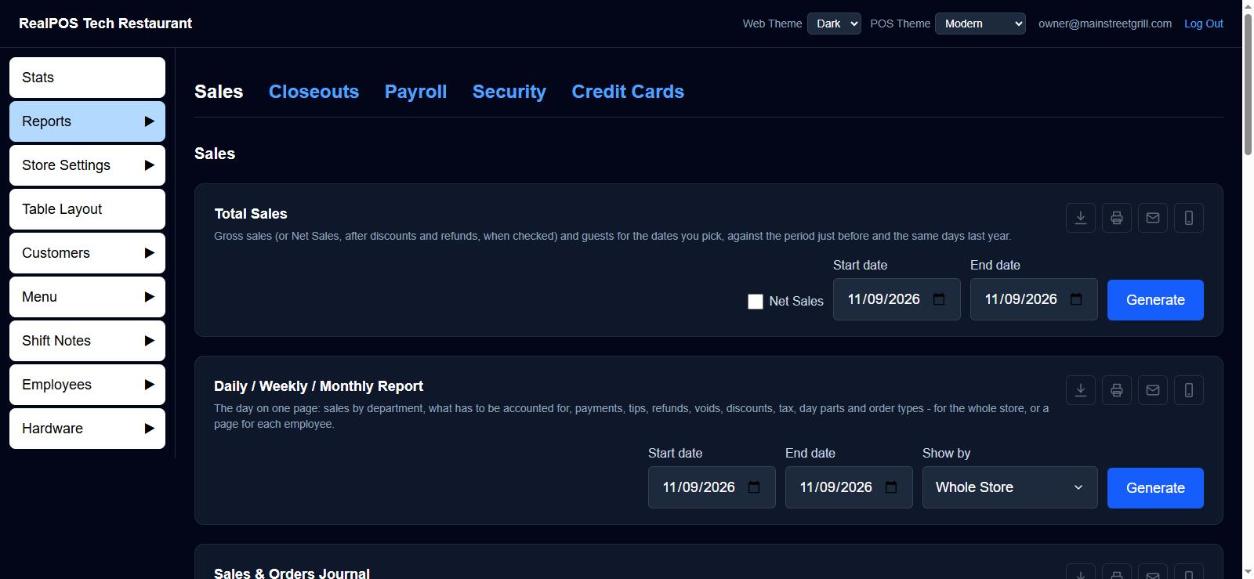 Reports > Sales in the back office
The icons at the top right of each report:
- Export (down arrow): save it as PDF, Excel (.xlsx) or CSV.
- Print.
- Email: pick the file type, then type the address.
- Text: pick the file type, then type a phone number. The text has a link to the report that works for 7 days.
On the POS, Total Sales and the Daily / Weekly / Monthly Report can be emailed or texted but not printed.
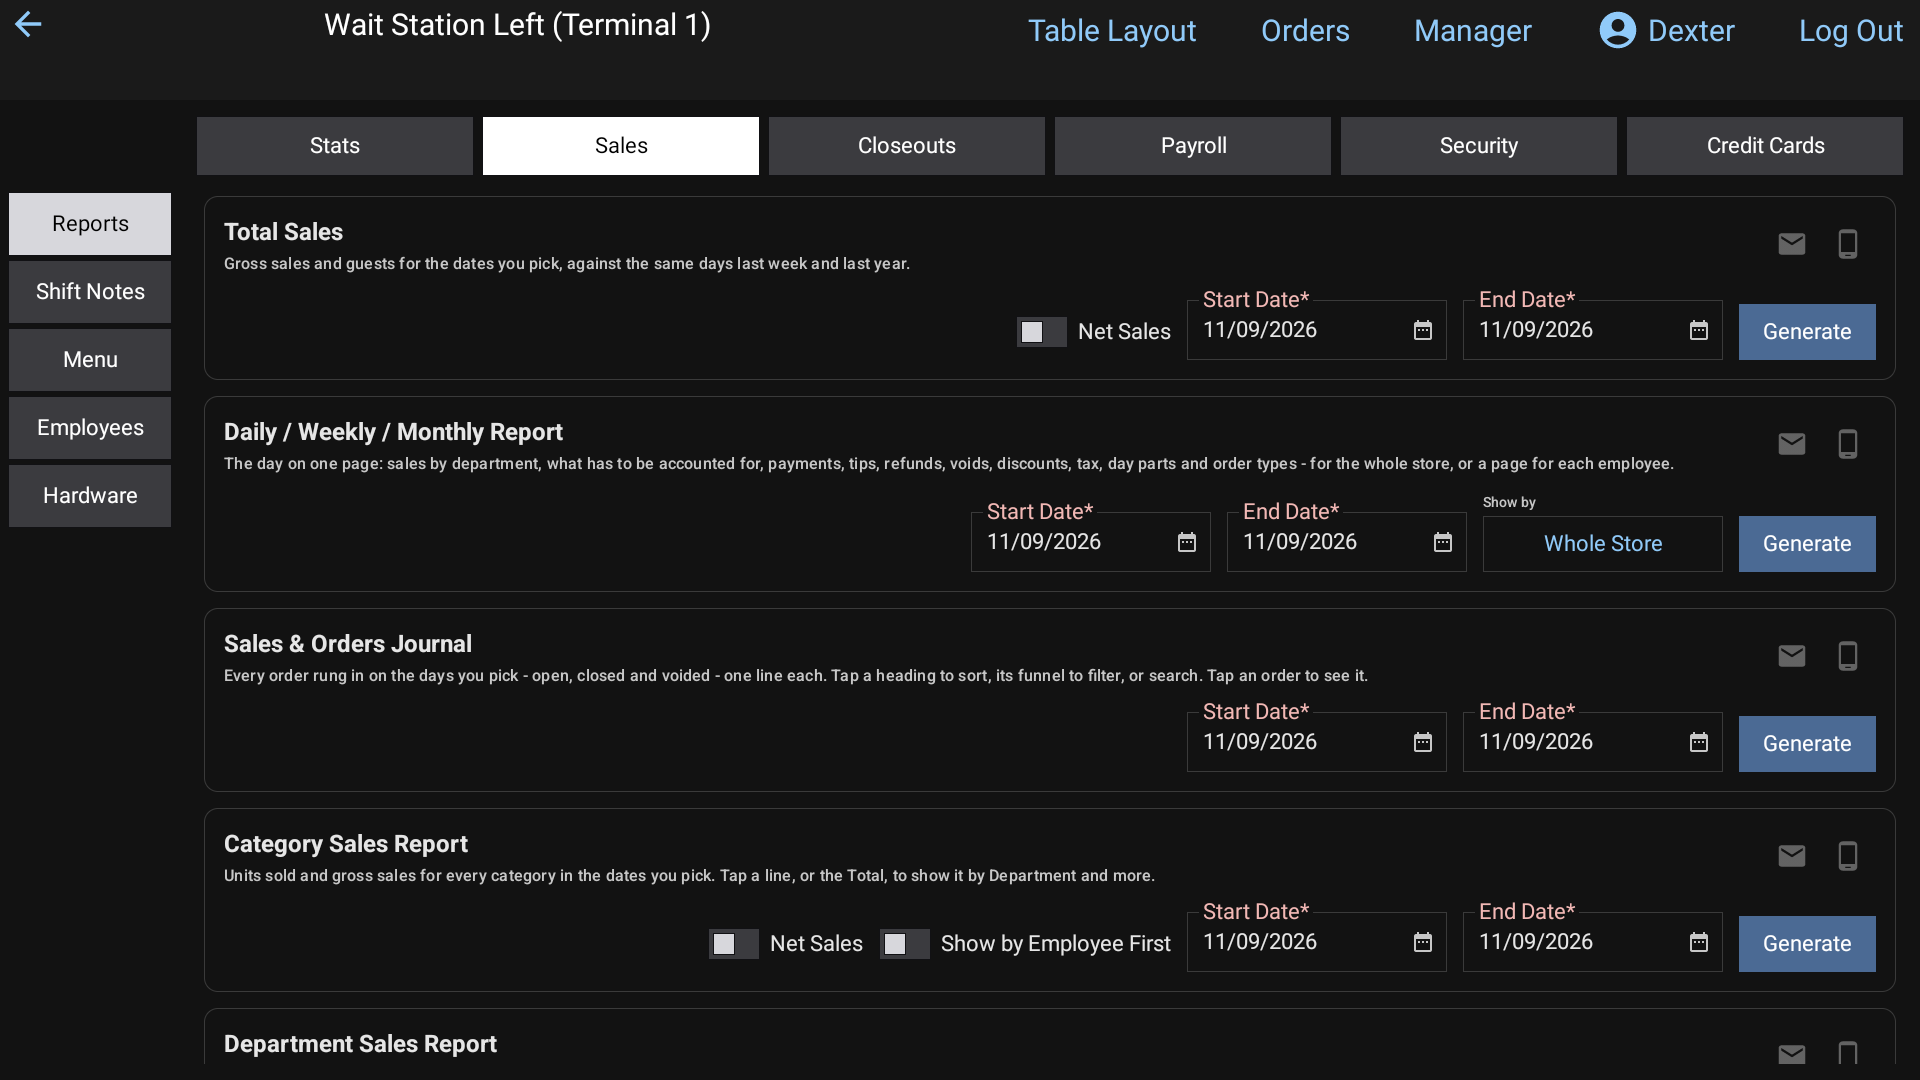 Manager > Reports > Sales on the POS: each report has its dates, Generate, and email and text icons
#The sales reports
| Report | What it shows |
|---|---|
| Total Sales | Gross sales and guests for your dates, beside the period just before (Last Week(s)) and the same days last year, with the percent change. |
| Daily / Weekly / Monthly Report | The day on one page. See Daily report. |
| Sales & Orders Journal | Every order rung in on your dates, one line each. See below. |
| Category Sales Report, Department Sales Report, Item Sales Report | Units sold and sales for each category, department or item. |
| Labor Sales Report | Hours and pay by job, as a share of sales. Pick one or more Group to see just those employees. See Employee groups. |
| Best / Worst Sellers Report | Every item on the menu, sold or not, best sellers first. Click a column heading to sort it; low to high shows the worst sellers. |
| Tax Exempt Sales Report | Every order marked Tax Exempt, with the message typed with it. |
| Non Taxed Items Sales Report | Every sale of an item marked Non Taxable. Click an item to open it. |
#Net Sales
Total Sales and the category, department and item reports have a Net Sales box. Tick it to see sales after discounts and refunds instead of the gross rung in. Refunds then show on a line of their own, taken off the Total.
#Break the numbers down (Show by)
On Total Sales, click your restaurant's line (or the Total) to open Show by, then pick Revenue Center, Order Type, Hour, Day Parts, Day, Categories, Departments, Items or Modifiers. Click any row to break it down again, for example Departments, then a department by Items.
- Click a level's own Total line to break down every row of that level at once.
- Undo steps back one choice at a time.
- Once you show by Categories, Departments or Items, the guest columns count units sold (Qty) instead.
Day parts come from your schedules. See Schedules and day parts.
#The Sales & Orders Journal
This lists every order on your dates, open, closed and voided, one line each: Order #, Date, Order Type, Status, Subtotal, TIPS/GRATS, Total, PayType, Last4, Guest#, Employee, Open Date/Time, Closed Date/Time and Guest Name.
- Click a column's name to sort by it. Click its funnel to show only some of its values.
- Type in the search box to find an order by anything on its line: order number, employee, card last 4, guest name.
- Clear filters shows everything again.
Click an order to see it as a receipt. Under it:
- Refund: tick the items (and the tip, if you want) and click Refund. A terminal with the card reader runs the refund back to whatever paid and prints the slip. See Refunds.
- Print, Text, Email: send the guest a copy of the receipt.
- + Add Tip: add or change the tip on a card payment. A terminal with the card reader runs it.
On the POS, the journal is under Manager > Reports > Sales, and an order opened there can go straight to Refund Order.
#Good to know
- Subtotal in the journal is what the items sold for after discounts. Total is what was collected (a card's charge with its dual pricing and tip, cash with its rounding). For an order not paid yet, it's the subtotal with surcharge and tax.
- Orders rung in before your terminals were tracked by revenue center show under "No revenue center" in Total Sales.
Read the Daily Report
Run the Daily / Weekly / Monthly Report for the whole store or each employee, and know what every table on it means.
The Daily / Weekly / Monthly Report puts the day on one page: sales by department, everything that has to be accounted for, how it was paid, tips, the cash to deposit, refunds, voids, discounts, tax, day parts and order types. Run it for one day, a week, a month, or any dates you like.
#Run it
- In the back office, go to Reports > Sales and find Daily / Weekly / Monthly Report. On the POS, it's under Manager > Reports > Sales.
- Pick a Start date and End date.
- Under Show by, pick who the report is for:
- Whole Store: one page for the restaurant.
- All Employees: a page for each employee who rang in sales on those dates.
- Or untick both and tick the employees you want. Each one gets a page.
- Click Generate.
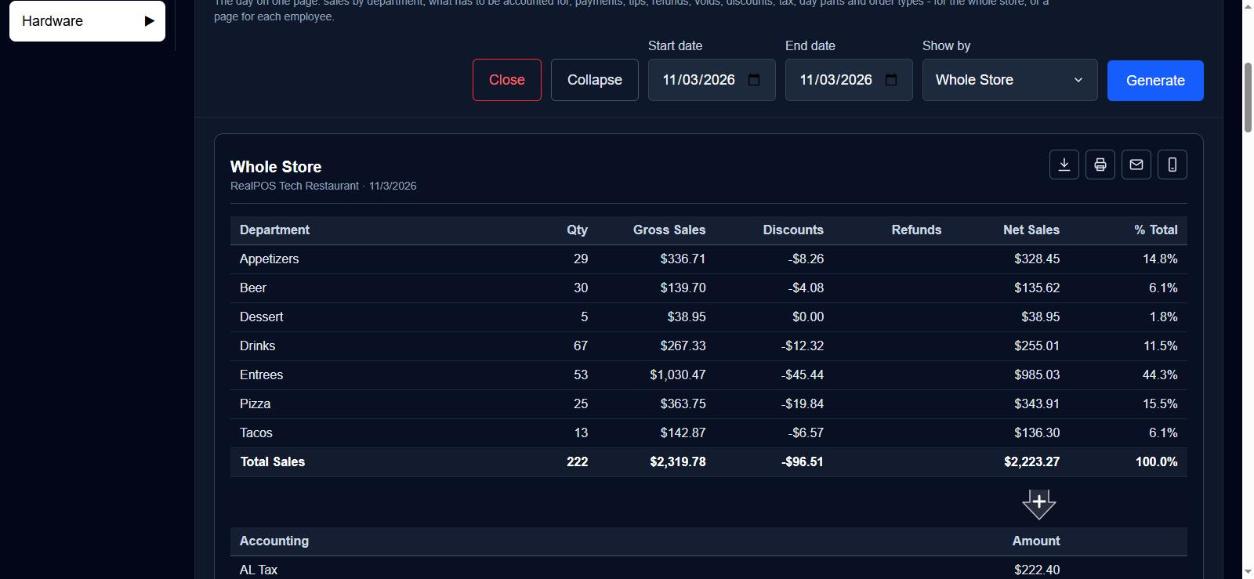 The Daily / Weekly / Monthly Report
Each page is a card of its own, with its own export, print, email and text icons, so you can send one server their page. The icons at the top of the report send every page in one file. If you change Show by while a report is open, it runs again for the same dates.
An employee's page covers their own orders, the payments taken on them, and the refunds they made.
#What each table means
The tables come in this order.
| Table | What it tells you |
|---|---|
| Department | Qty, Gross Sales, Discounts, Refunds and Net Sales for each department, and each one's % Total. The Total Sales line is the day's sales. |
| Accounting | Everything on top of net sales that has to be accounted for: each tax, Dual Pricing Fees, Credit Card Tips / Grats Collected, Cash Gratuities, Gift Card Sales, Surcharges, Cash Rounding and Net Paid Ins / Outs. Total Accounting adds them to the net sales above. |
| Payments | How it was paid, by tender (cash, credit, gift card and your other payment types): Count, Sales/Tax/Etc Amt, Refunds, Tips/Grats and Total Collected. Total Collected lines up under the Accounting Amount so you can compare them. |
| Payments on Previous Day(s) Orders | Only shows when someone paid on these dates for an order rung in earlier. Its sales are in the earlier day's report. Click a Count to see the orders behind it. |
| Open Sales | Only shows when orders from these dates aren't paid yet: each one's date, Order #, Employee and what it will come to. |
| Tips | Credit Card Tips, Credit Card Gratuities, the Credit Tips/Grats Reduce, Cash Gratuities, Cash Tips Claimed and Net Tips / Grats. |
| Cash | Adjusted Cash after Tips/Grats Paid (Deposit): the cash you should have to deposit. |
| Credit Cards | Each card brand's count and amount (tip and fee included), with card refunds as negative lines. |
| Refunds | Order Refunds and General Refunds, with count and amount. |
| Voids | Items voided, by void reason. |
| Discount | Each discount's count and amount. |
| Tax | Sales and tax amount for each tax, then Tax Total and Non Taxable Total. |
| Day Parts | Sales, guests, orders and averages for each day part. |
| Order Type | The same, for each order type. |
Some headings are blue links (for example Sales/Tax/Etc Amt, and Non Taxable Total in the Tax table). Click one for a short list of what goes into it. On a saved, printed or emailed copy those are marked with * or ** and explained at the bottom of the page.
#Good to know
- Non Taxable Total is all discounts, items with no tax, and orders that were tax exempt.
- The Credit Tips/Grats Reduce and the Deposit line follow your payroll settings: the tip reduce percent, and whether tips and gratuities are paid as wages or paid out in cash. The deposit is the cash taken, less cash refunds and any tips and gratuities paid out in cash, plus cash Paid Ins and less cash Paid Outs. See Run payroll and Paid In and Paid Out.
- Gift cards sold are not sales. They show as Gift Card Sales in the Accounting table, not in the Department table.
- An order counts in the day part it was first rung in. Orders outside every day part show as "Outside day parts". See Schedules and day parts.
- For each employee's cash-out at the end of a shift, use their shift closeout instead. See Closeouts.
Check credit card transactions
See every card charge and card refund, fix a tip, and pull the day's credit card log when a charge needs looking into.
Use the Credit Cards report to answer "did this card go through?", find a charge by its last 4 digits, or fix a tip after the guest has gone.
In the back office, go to Reports > Credit Cards. On the POS, it's Manager > Reports > Credit Cards.
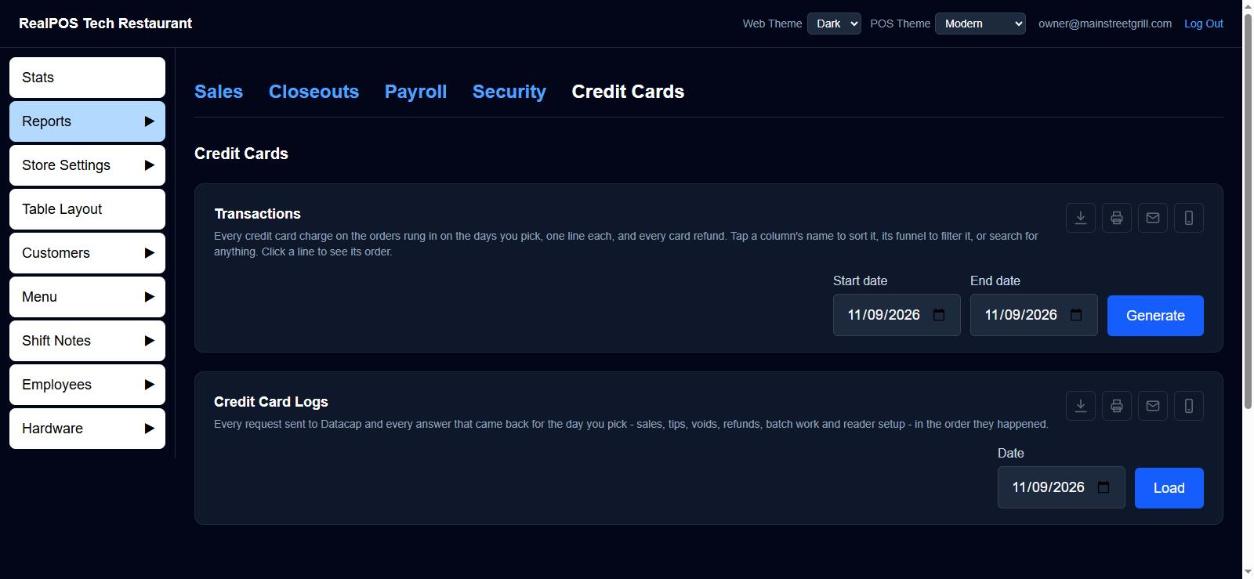 Reports > Credit Cards
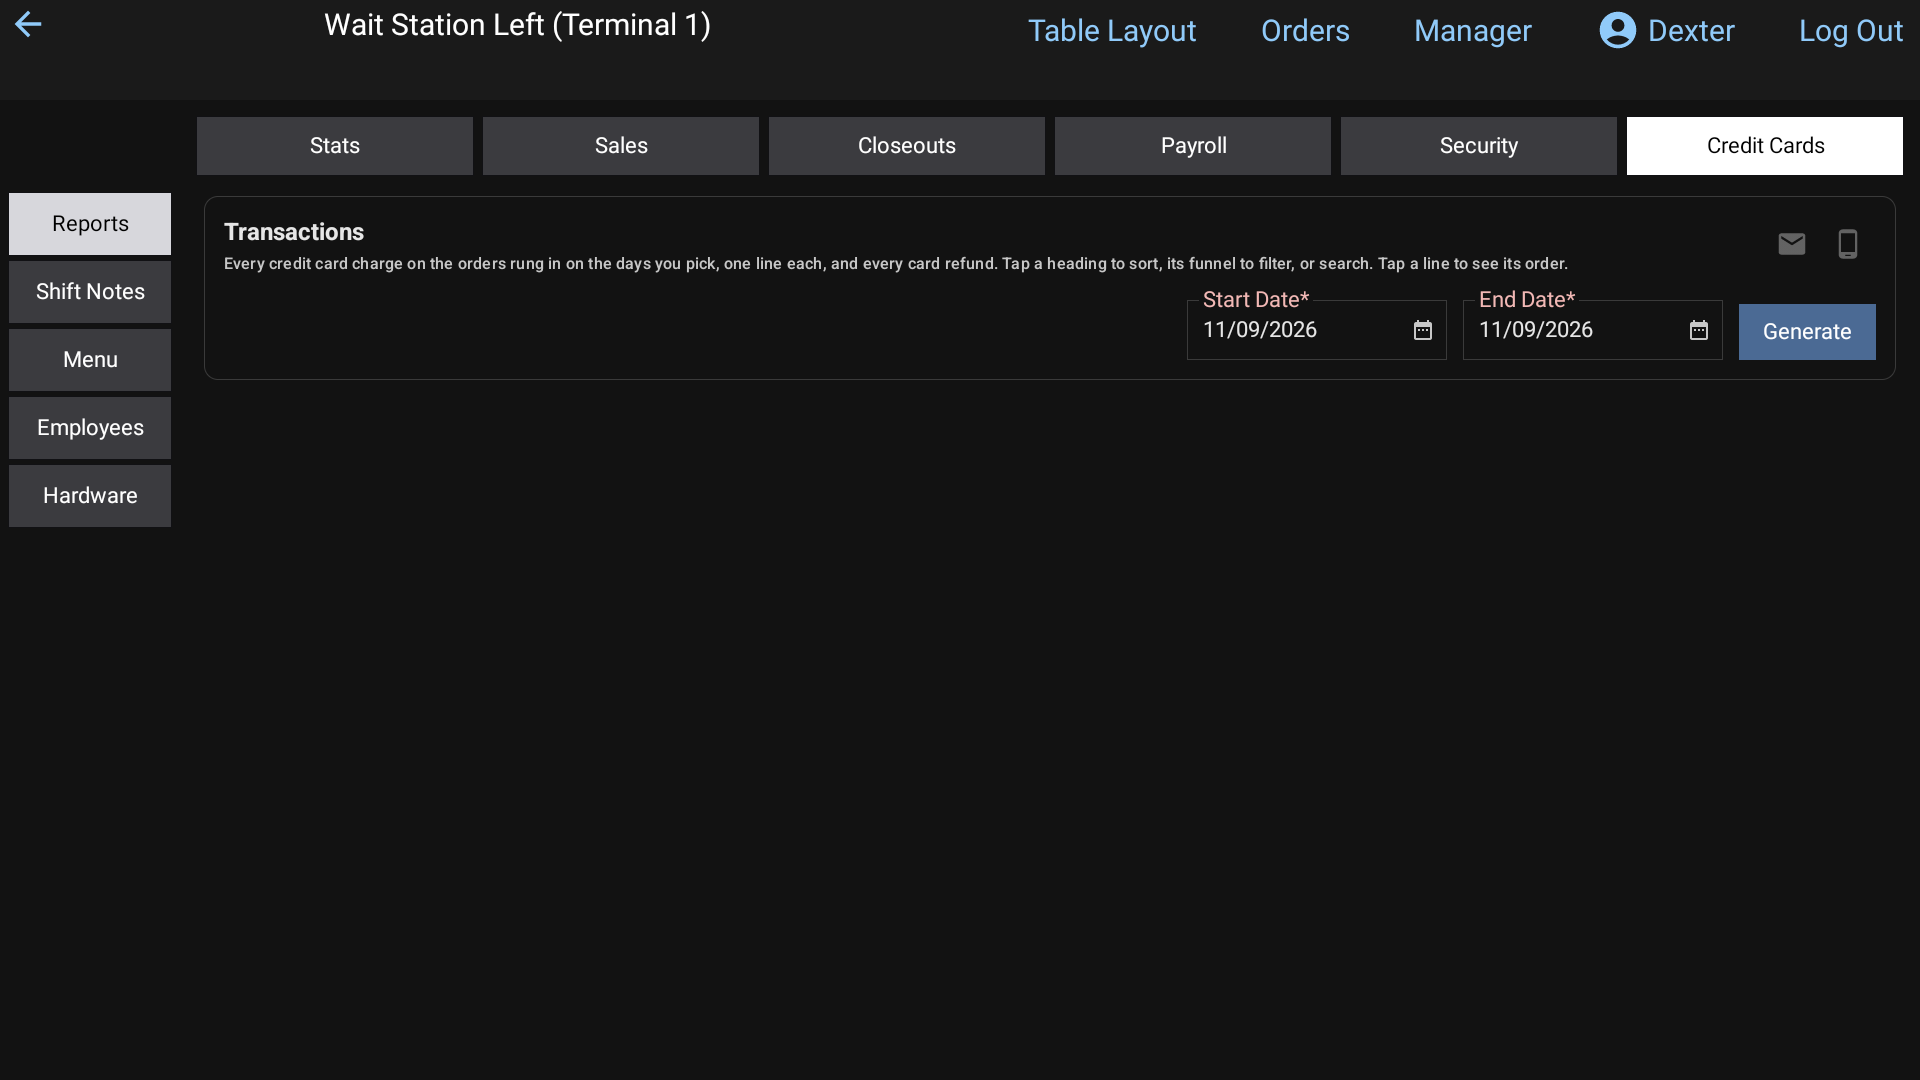 Manager > Reports > Credit Cards on the POS: Transactions with its dates and Generate
#Transactions
Transactions lists every credit card charge on the orders rung in on your dates, one line each, and every card refund as a negative line.
- Pick a Start date and End date.
- Click Generate.
The columns are Order #, Date, Order Type, Status, Subtotal, TIPS/GRATS, Total, PayType, Last4, Guest#, Employee, Open Date/Time, Closed Date/Time and Guest Name.
- Subtotal is what went on the card before dual pricing, gratuity and tip.
- TIPS/GRATS is the tip plus any auto-gratuity.
- Total is the card's whole charge.
- Closed Date/Time is when the card was run.
To find a charge, type in the search box (the last 4 digits, an order number, an employee), or click a column's funnel to show only some of its values. Click a column's name to sort by it.
#Fix a tip or refund a card
In the back office, click a line to see its order as a receipt. Under it:
- + Add Tip: choose the card if there's more than one, type the Tip $ and click Save.
- Refund: tick the items (and the tip, if you want) and click Refund. See Refunds.
From the back office, a terminal with the card reader runs the tip or refund and sends back the result. The window shows Processing... until it's done.
#Credit Card Logs
In the back office, below Transactions, Credit Card Logs shows every request sent to the card processor and every answer that came back for one day: sales, tips, voids, refunds, batch work and card reader setup, in the order they happened. It's useful when a charge needs looking into.
- Pick the Date.
- Click Load.
The log shows 25 lines at a time; scroll inside it for the rest. The icons save it as a .txt file, print it, email it, or text a link to it.
#Good to know
- The Daily / Weekly / Monthly Report also has a Credit Cards table with each card brand's total. See Daily report.
- Every card payment also shows in the Sales & Orders Journal. See Reports.
Check voids and discounts
Use the Void Report and Discounts Report to see every void and discount, whose order it was, and which manager allowed it.
The Security reports show every void and every discount, with the employee whose order it was and the manager whose security allowed it. Check them regularly: they're the quickest way to spot comps and voids that don't add up.
In the back office, go to Reports > Security. On the POS, it's Manager > Reports > Security. There are two reports, the Void Report and the Discounts Report.
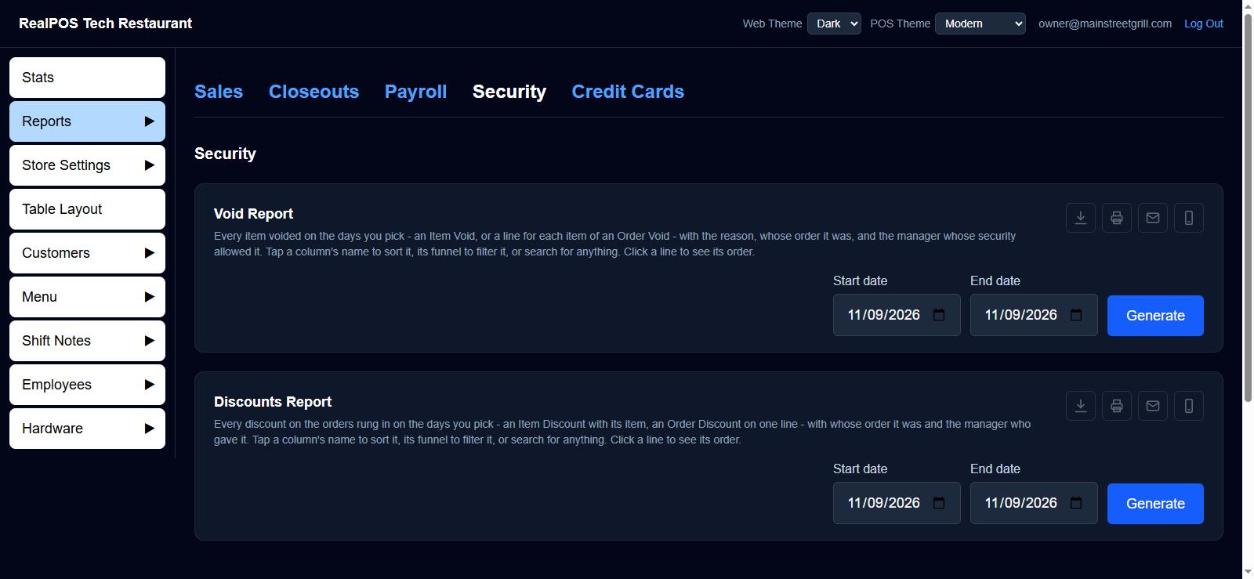 Reports > Security
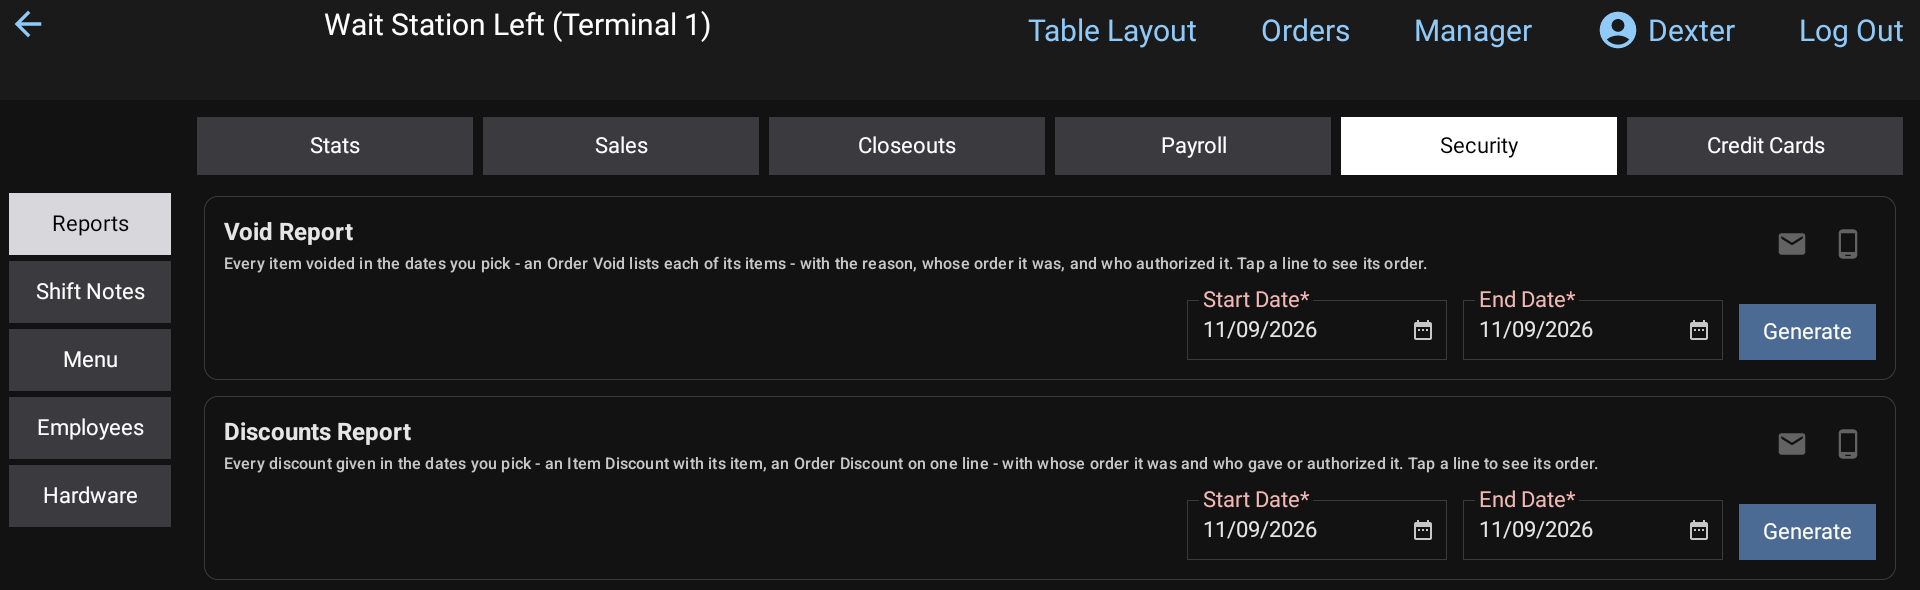 Manager > Reports > Security on the POS: the Void Report and the Discounts Report
#Run a report
- Pick a Start date and End date.
- Click Generate.
Each line has the Date, Order #, the type, Items, the reason or discount, Amount, Employee and Manager.
- Click a column's name to sort by it. Click its funnel to show only some of its values.
- Type in the search box to find lines by anything on them: order number, item, reason, employee, manager.
- Click a line to see the whole order as a receipt, and print, text or email it.
Export, print, email and text work like every other report. See Reports.
#Void Report
Every item voided on your dates, by when it was voided.
- Void Type is Item Void (one item taken off) or Order Void (the whole order, with a line for each of its items under the same order number).
- Void Reason is the reason picked on the POS. See Void reasons.
- Amount is what the item would have sold for, with its modifiers, after any item discount.
#Discounts Report
Every discount on the orders rung in on your dates. Voided orders are left out.
- Discount Type is Item Discount (a line for the item) or Order Discount (one line for the order, no items).
- Discount is the discount's name.
- Amount is the discount in dollars. For an Order Discount, it's what came off the order's items.
#Who allowed it
Employee is whose order it was. Manager is the person whose security allowed the void or gave the discount. When it says Override used, someone typed another employee's override PIN to get past a permission they didn't have. Those lines are highlighted.
#Good to know
- The Daily / Weekly / Monthly Report has Voids and Discount totals too. See Daily report.
- Older discounts, given before the POS started recording it, don't show who gave them.
- Set up the discounts themselves under Store Settings > Discounts. See Discounts.
Refund a guest
Give money back on the POS, either against a paid order (Refund Order) or as a stand-alone amount (General Refund).
There are two ways to give money back, both from Closed Orders on the POS:
- Refund Order: pick items from a paid check. The money goes back to the way the guest paid (card, cash or gift card). It works for orders from past days too, and the card doesn't need to be there.
- General Refund: type an amount and pick how to pay it back. It isn't tied to any order.
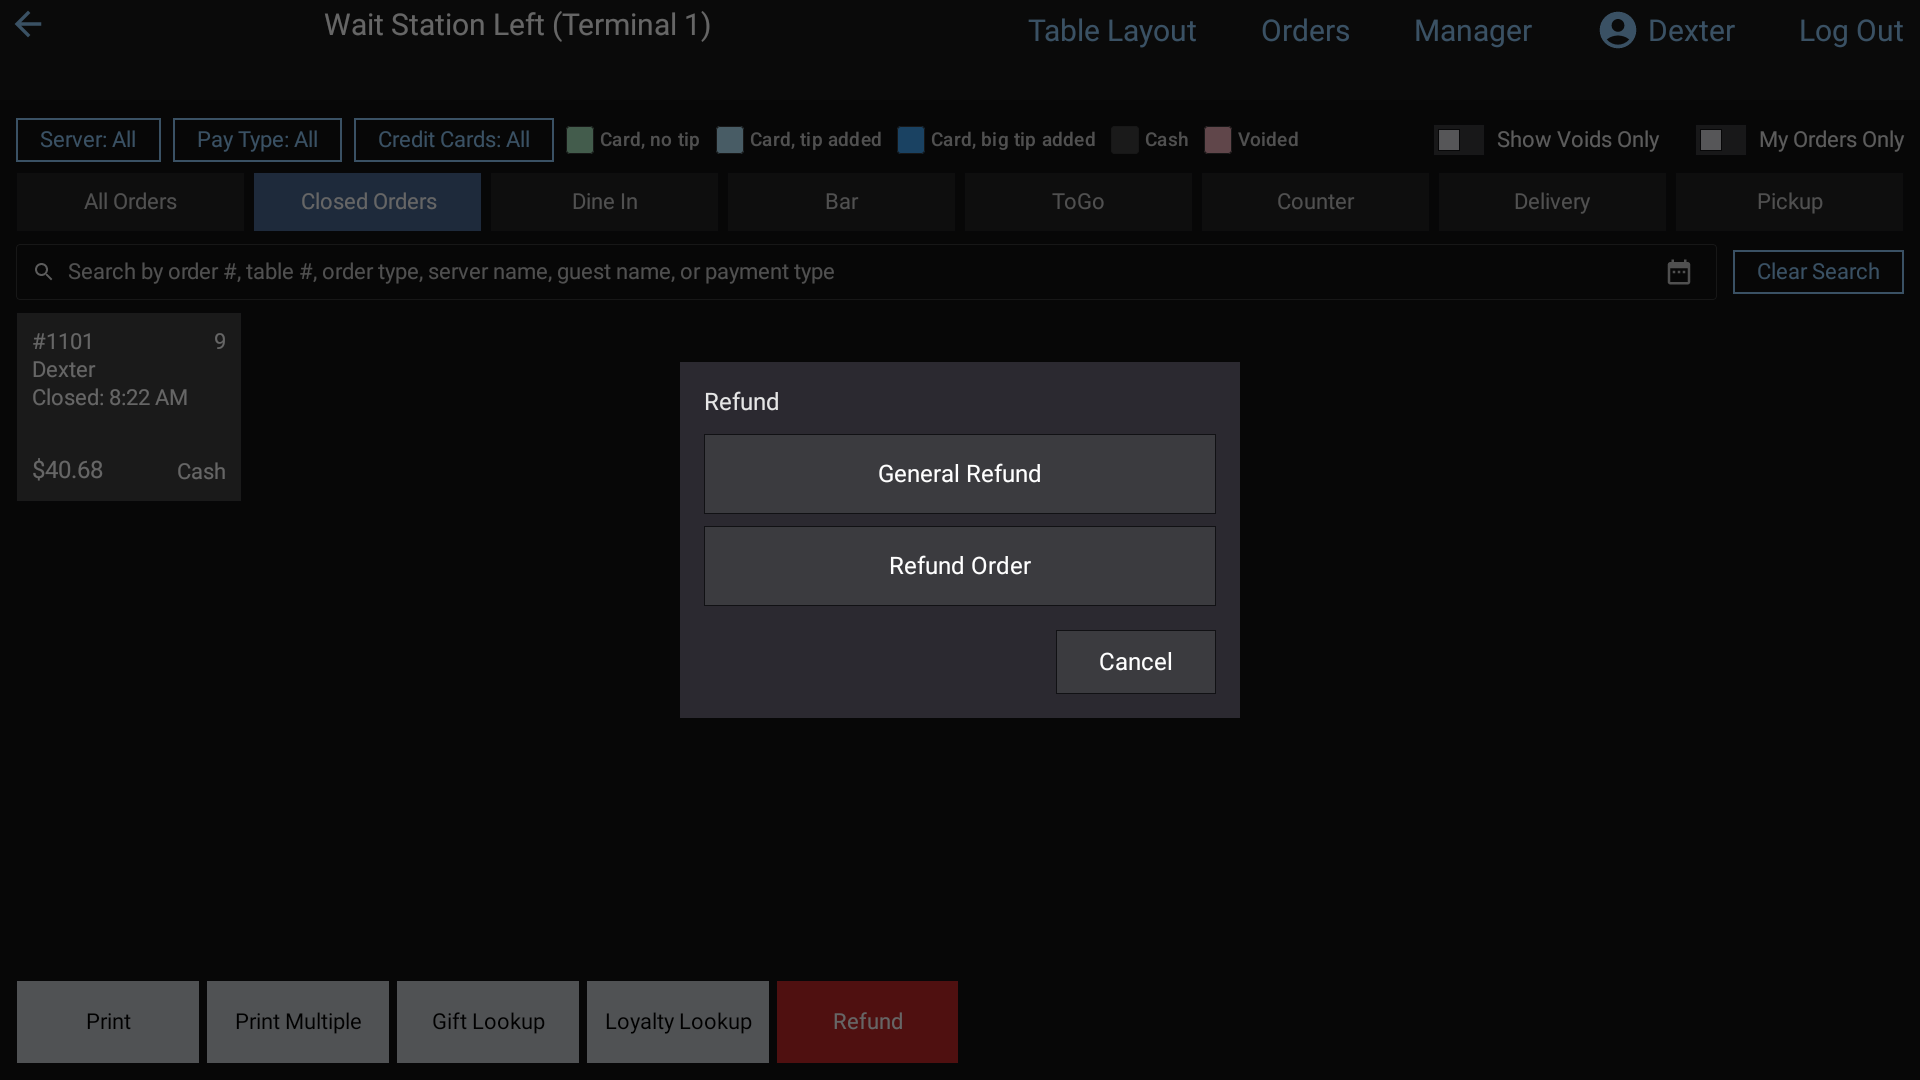 Tapping Refund on Closed Orders asks which kind: General Refund or Refund Order
#Find the order
- On the POS, tap Orders, then the Closed Orders tab.
- For an order from another day, tap the calendar icon and pick the date. You'll see "Showing closed orders from" that day. Tap Back to Today to return.
- Use the search, or the Server, Pay Type and Credit Cards filters, to find it.
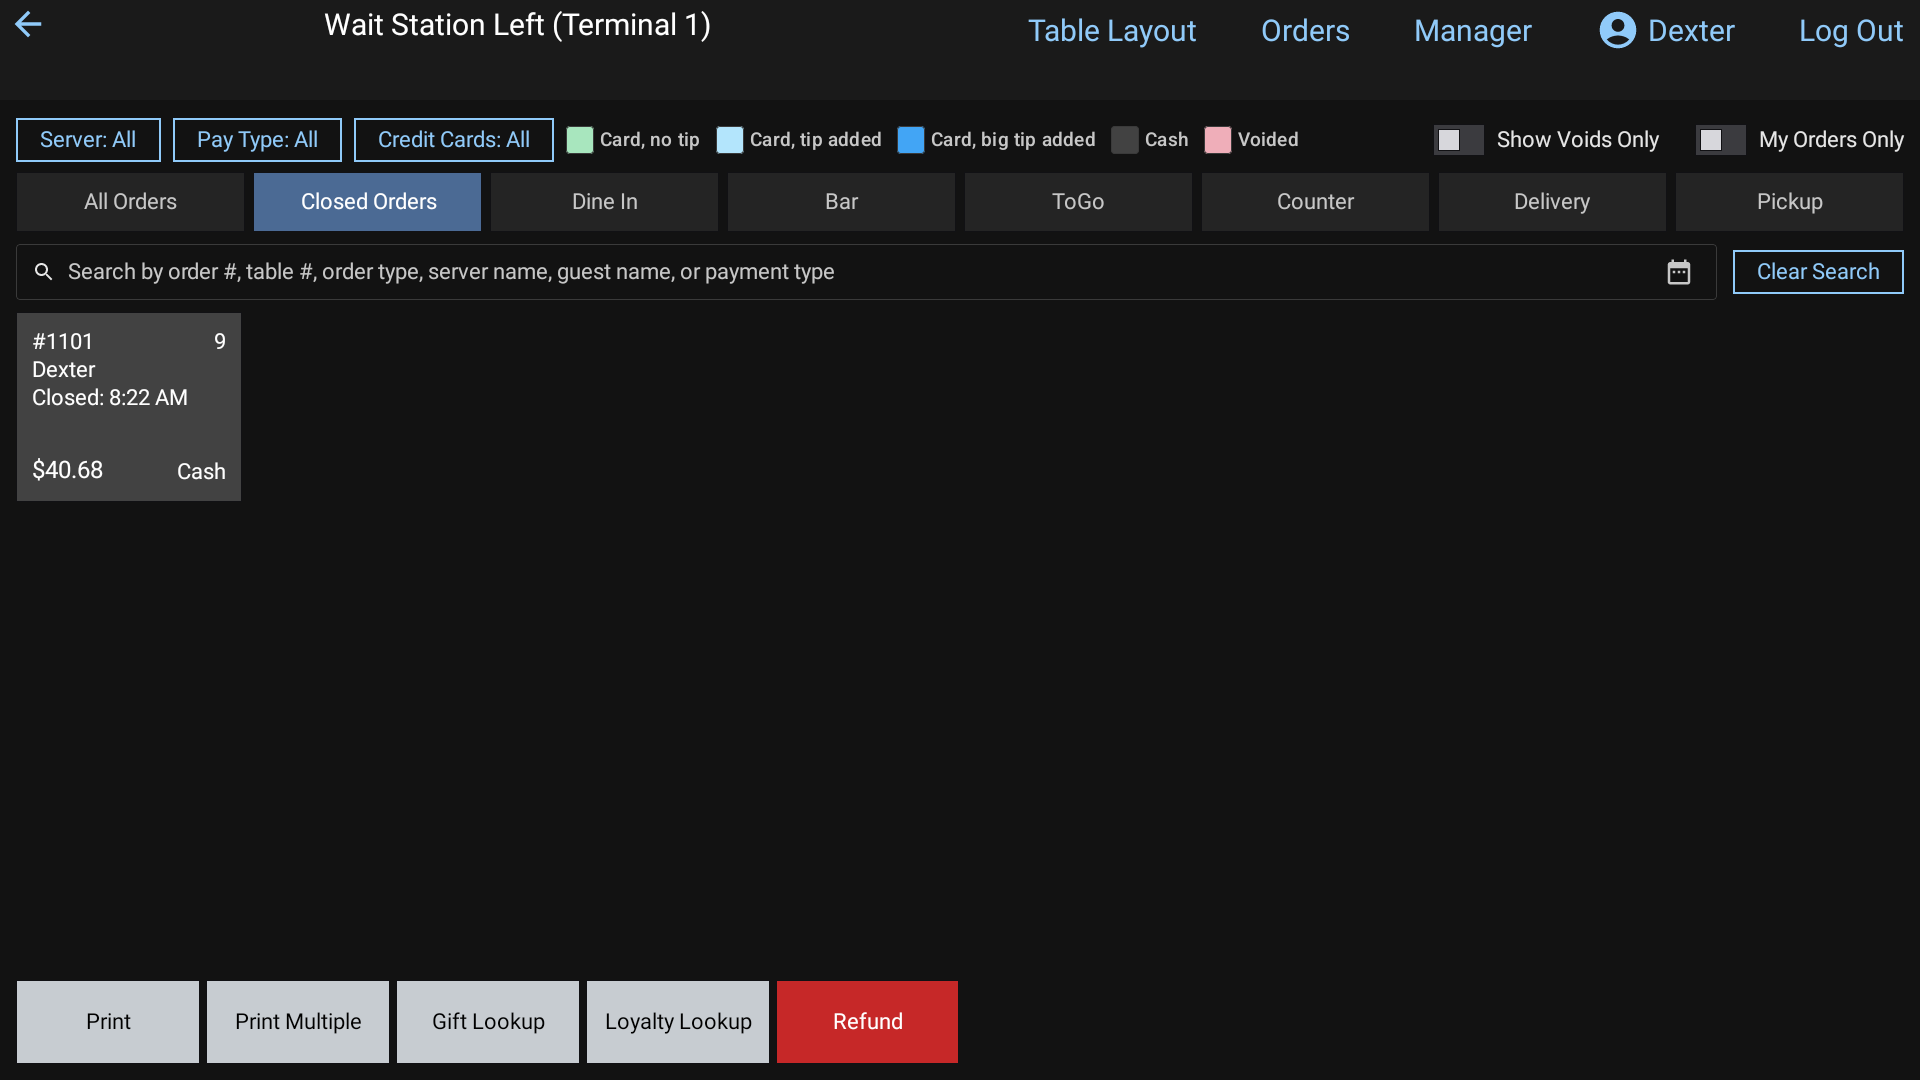 Closed Orders
#Refund items from an order
Tap Refund on the bottom bar, then Refund Order. The button turns orange and reads Tap order to refund.
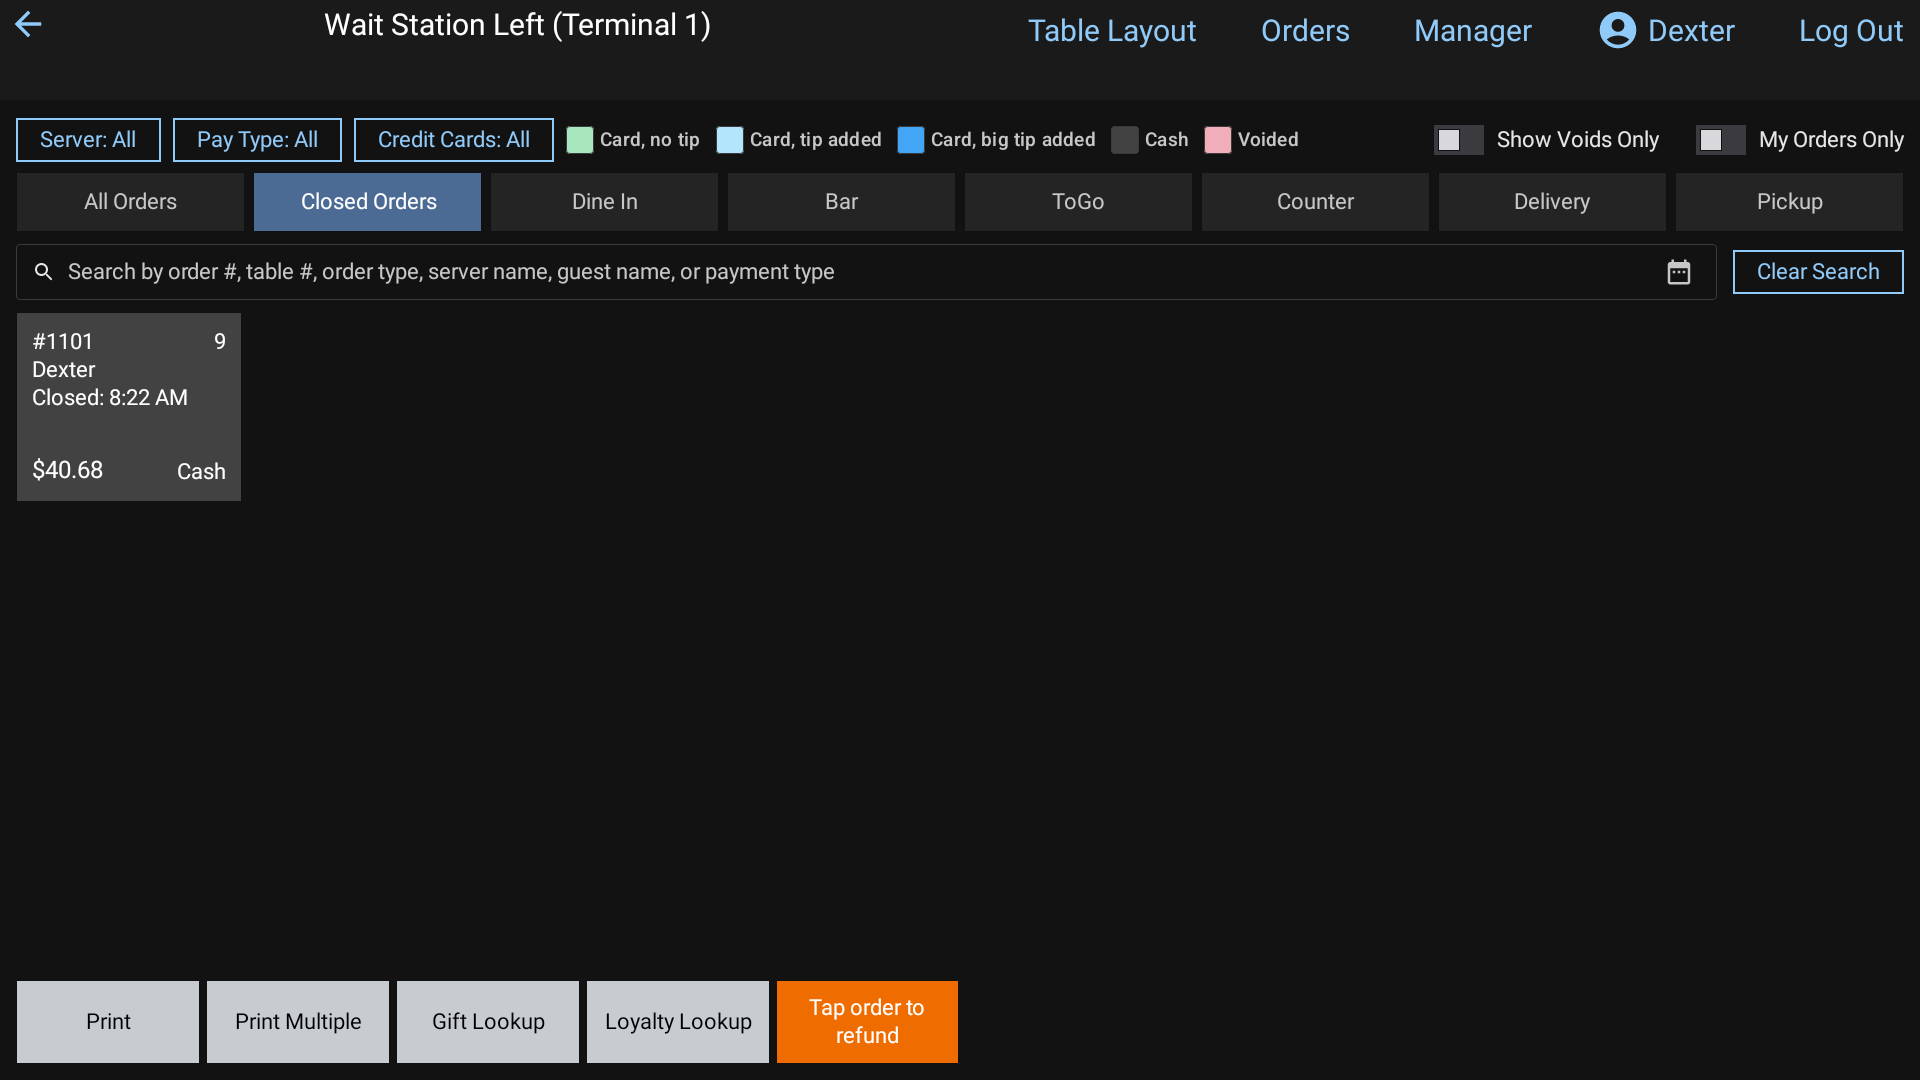 The orange Tap order to refund button: now tap the paid order
Tap the paid order. (You can also long-press a closed order and tap the red Refund button on its preview.)
Tap the items to refund, or Select All. Items already refunded are shown but can't be picked again.
If the check had a card tip, tap the Tip line to refund it too. The card's tip goes back to $0.00. You can refund just the tip by picking it alone.
The right side shows Items, Tax, any Dual Pricing fee, and the Total refund, with Goes back to listing each tender and how much returns to it.
Tap Refund.
When it's done you'll see Refund complete with what went back to which tender. A card refund prints a slip.
#How the amount is worked out
- Each item is refunded at what the guest really paid: after its own discount and its share of any order discount, plus its tax.
- If the guest paid by card with Dual Pricing, the card fee on those items goes back too.
- If the check was paid with more than one tender, the refund goes back to the last one first.
- Refunding every item that's left returns everything left on the check, to the cent.
#Refund an amount (General Refund)
- On Closed Orders, tap Refund, then General Refund.
- Type the amount under Enter Refund Amount and tap Enter.
- Pick how to pay it back:
- Cash: comes out of your drawer. The drawer opens if the Cash payment type is set to.
- A card type: the guest inserts, taps or swipes their card on the reader.
- Card Manual Entry: key the card number on the reader instead.
- Gift card: type the gift card number. The value goes back on the card.
- You'll see Refund complete when it's done.
#Good to know
- Cash refunds come out of the drawer of whoever does the refund, not the server who owned the order. They show as Cash Refunds on that person's closeout. See Closeouts.
- Refunded items are tagged "(Refunded)" on the ticket, and the closed order square shows the amount refunded.
- If a card payment has no card token saved, it can't go back to the card automatically. You'll be told to use General Refund with the card present.
- Card refunds need a card reader set up on that terminal.
- You can also start a Refund Order from an order in the Sales & Orders Journal (Manager > Reports > Sales).
Paid In and Paid Out
Record cash put into or taken out of the drawer outside a sale, like a deposit or a grocery run, with a reason.
Use Paid In/Out when money goes into or out of the drawer without a sale: a change deposit, a vendor paid in cash, a quick grocery run. Each one is recorded with a reason and shows on the employee's closeout, so the drawer still balances.
#Set up the reasons
Staff pick from a list of reasons you set up in the back office (login.realpos.net).
- Go to Store Settings > Paid In/Out.
- Under Paid Ins (deposits etc.), click + Add Paid In. Under Paid Outs (grocery and expenses), click + Add Paid Out.
- Type the Reason and click Save.
To rename a reason, click into it, type the new name and click away. To take one off the list, click Remove.
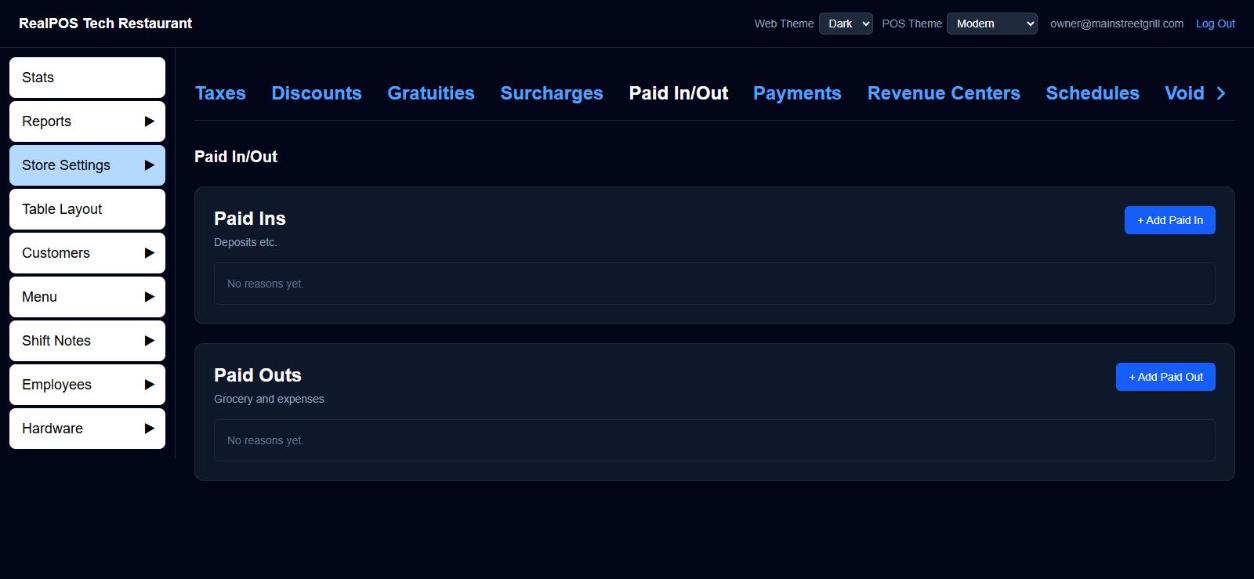 Store Settings > Paid In/Out
#Record one on the POS
- Tap Orders. Paid In/Out is on the bottom bar of every tab except Closed Orders.
- Tap Paid In/Out, then Paid IN or Paid OUT.
- Under Select a reason, tap the reason.
- Type the amount and tap Enter.
What happens next:
- Paid IN: the Pay screen opens on a one-line ticket for that amount. Take it like any payment (cash, card and so on).
- Paid OUT: it's paid out in cash straight away. The drawer opens (if the Cash payment type is set to open it) and a Paid Out receipt prints with the reason, amount and employee. You'll see "Paid OUT recorded:" and the reason.
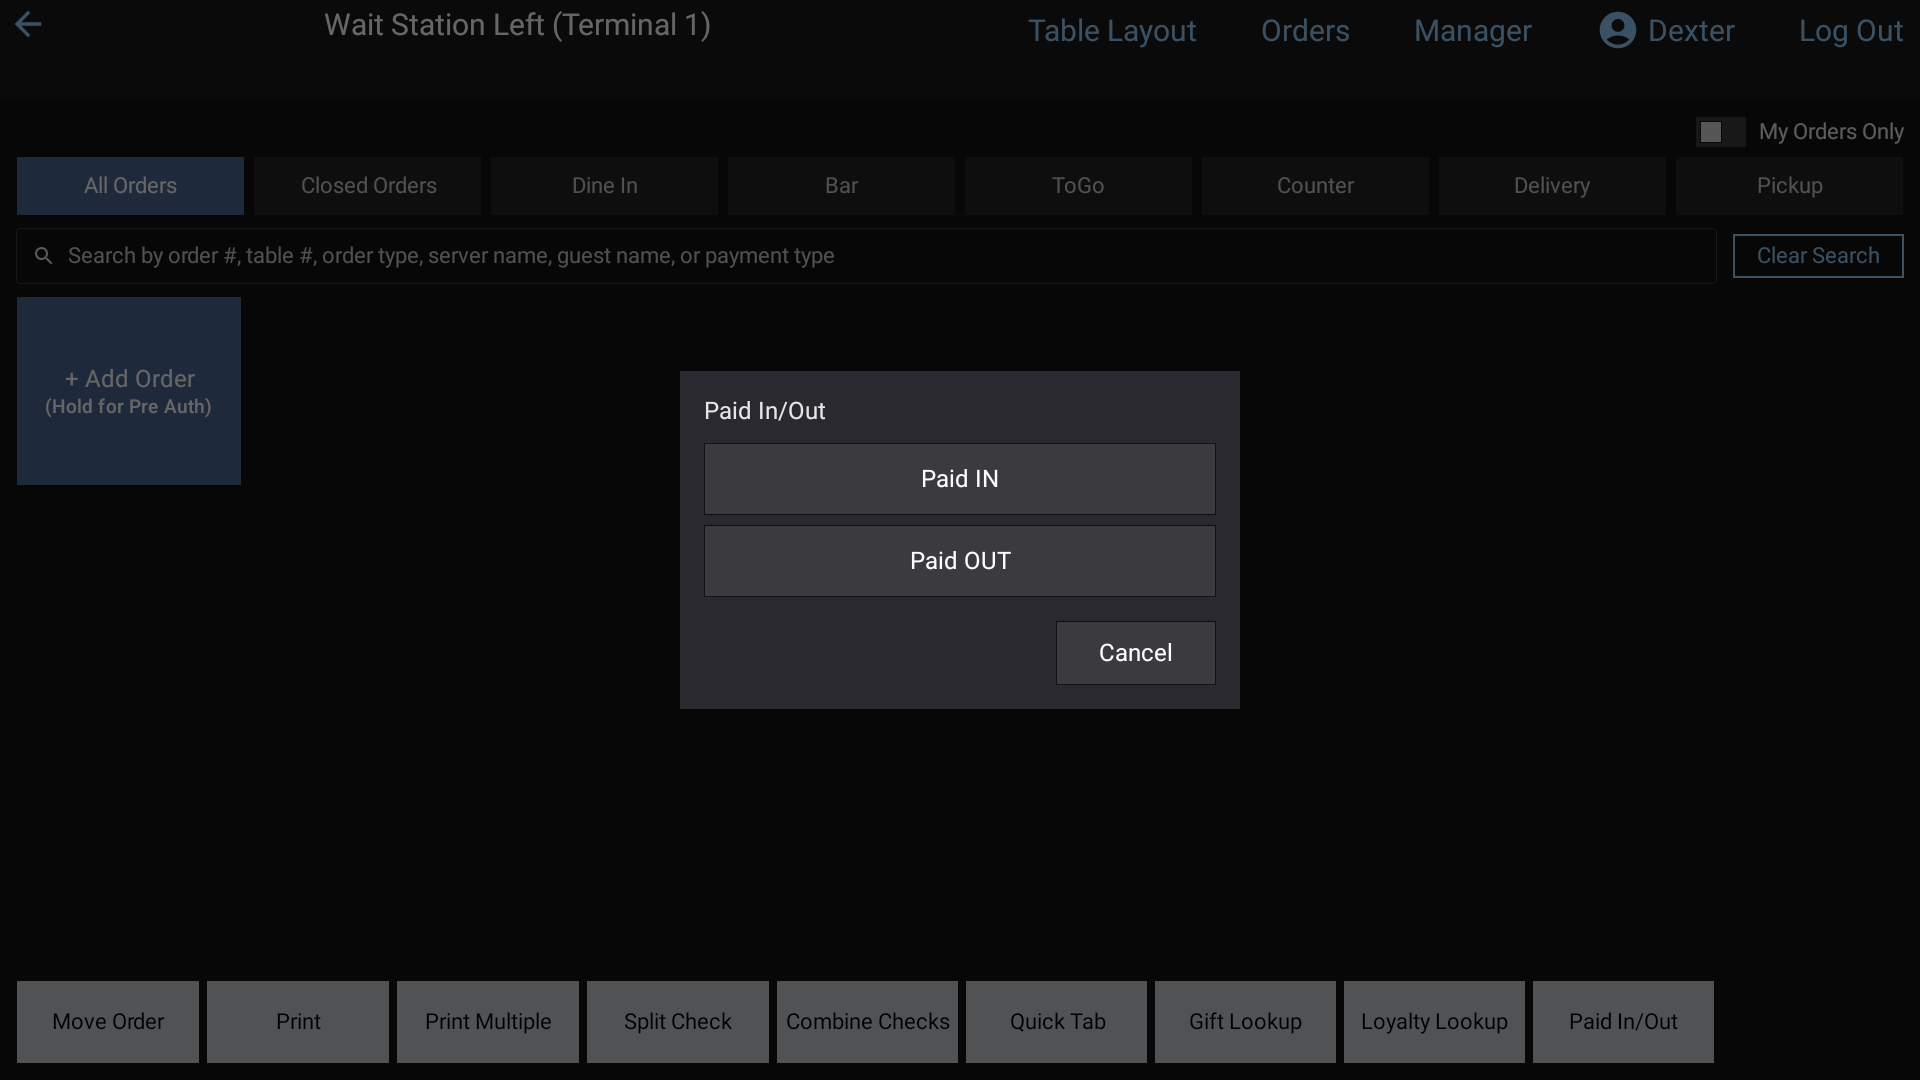 Paid In/Out on the POS
#Where it shows up
- On the employee's closeout, as Paid IN or Paid OUT lines with the reason and how it was paid, then Total Paid Ins, Total Paid Outs and Net Paid Ins/Outs. Paid Outs come off the cash to drop. See Closeouts.
- Paid Ins and Outs are never sales. They stay out of Closed Orders, Gross and Net Sales and the sales reports.
#Good to know
- A Paid OUT can only be paid out in cash.
- If no reasons are set up, the POS tells you to add some under Store Settings > Paid In/Out.
- The POS fetches the latest list each time Paid In/Out opens, and keeps the last list so it still works if the internet is down.
- Gift cards sold also show as Paid INs on the closeout, not as sales. See Gift cards and loyalty.
Shift closeouts and cash drops
How employees close out their shift, what the closeout report shows, and how to reprint shift reports or a whole day's closeout.
A closeout is the end-of-shift report: what the employee sold, how it was paid, their tips, and the cash they owe the restaurant (or the restaurant owes them). Every shift starts from $0 at clock-in.
#How an employee closes out
On the POS the employee taps their name in the top bar to open their employee menu.
- Print Shift Closeout and Clock Out stay locked until all their own checks are closed and all their card tips are entered. If they still have open checks, the button reads You Have Open Orders and takes them to their orders.
- They tap Print Shift Closeout, type their cash tips, and tap Print Shift Closeout again.
- The report shows on screen. They tap Print to print it.
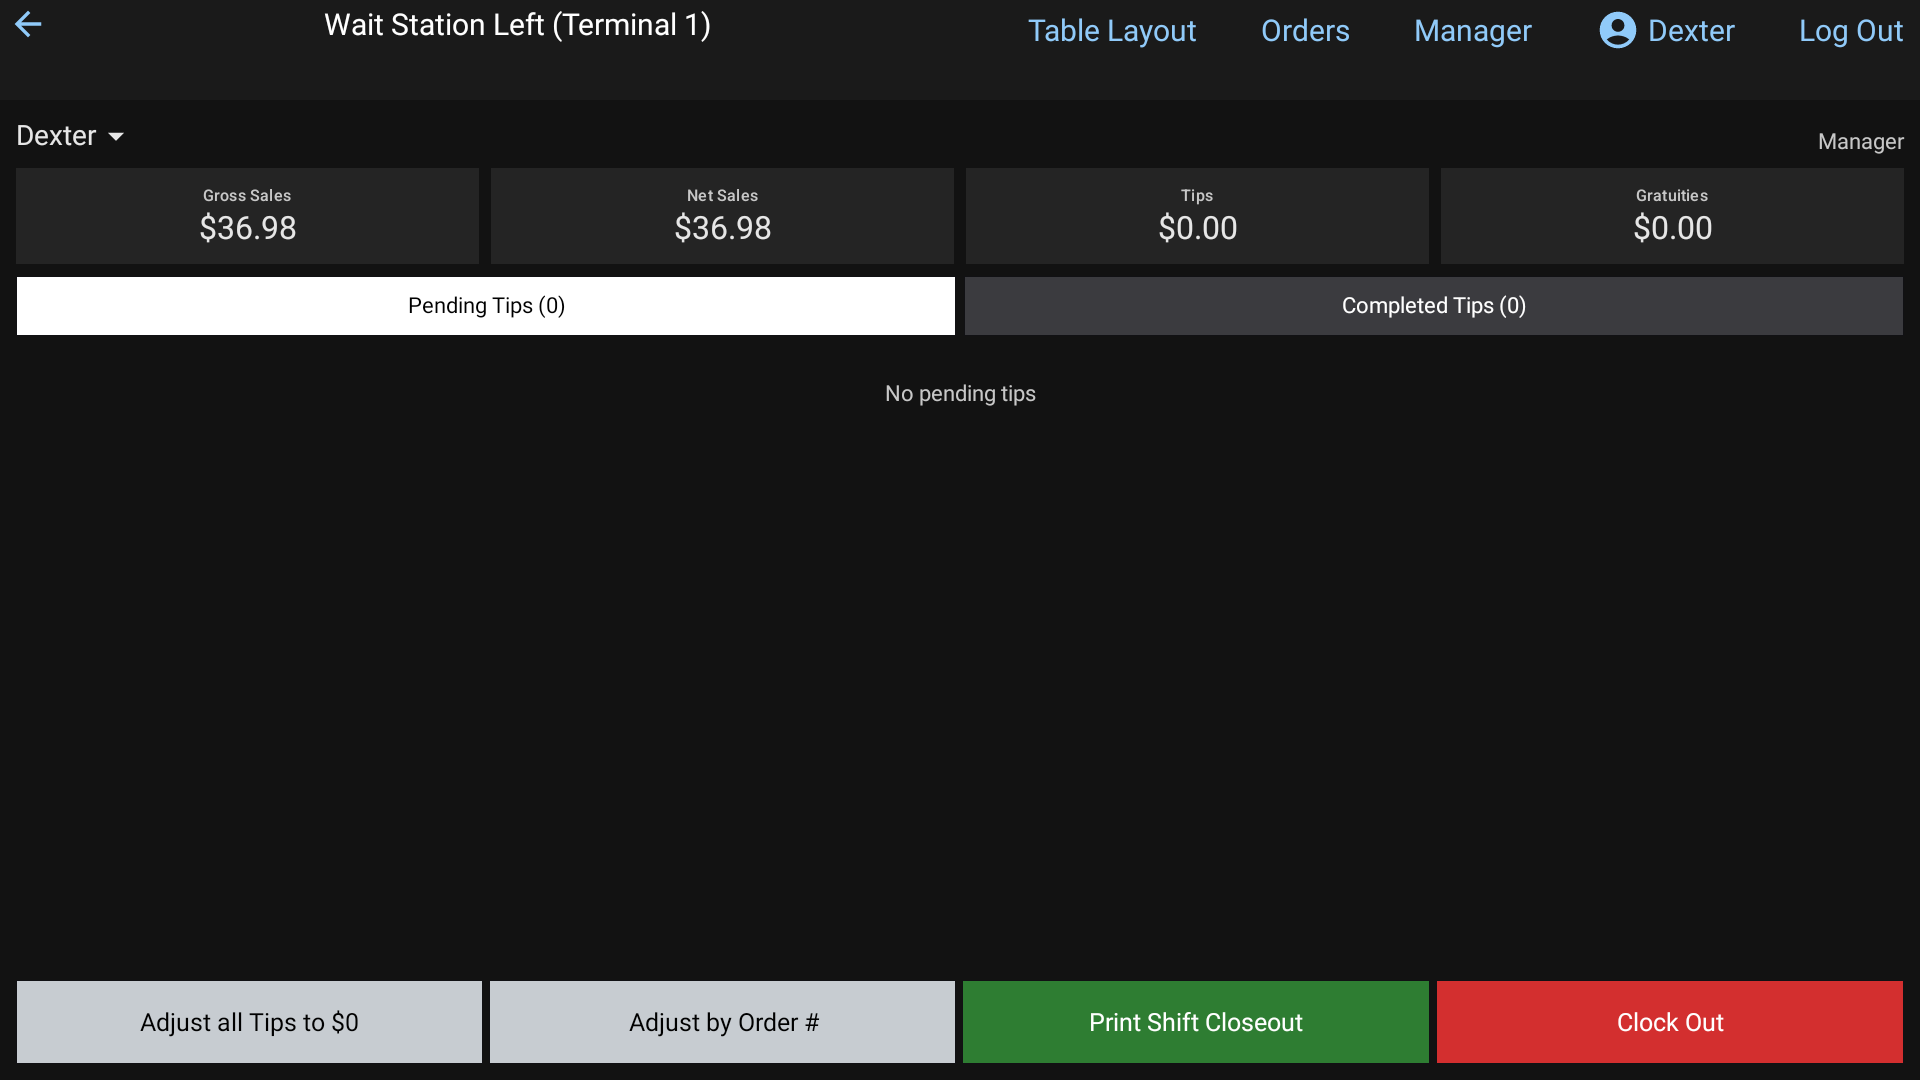 The shift closeout report on the POS
#What's on the report
From top to bottom, the closeout shows (sections only appear when they have something in them):
- The employee, job and date, then sales by department and Gross Sales.
- Discounts, Refunds and Net Sales.
- Card sales by brand and Total Credit Cards.
- Surcharges, voids by reason (Total Voids) and Paid Ins and Outs (Net Paid Ins/Outs). See Paid In and Paid Out.
- Tax Details and Non Taxable.
- Open Orders, if any are still open.
- Payments Summary: Cash Payments, Total Credit Cards, Gift Cards Used and Total Payments Collected.
- Cash Breakdown: Payments on Orders in cash, plus cash surcharges and Paid Ins (Cash), less Credit Tips/Grats Paid out of the drawer, Cash Gratuities Paid, Cash Refunds and Paid Outs.
- Tips & Grats Detail: Credit Card Tips, Credit Card Gratuities, Credit Tips/Grats Reduce, Cash Gratuities and Net Tips / Grats.
- Employee Cash Tips: their Declared Cash Tips.
- Total Cash To Drop, printed big. If it's positive, the employee owes the restaurant that cash. If it's negative, the restaurant owes the employee.
Whether card tips are paid out in cash at closeout or on the paycheck depends on Tips Paid as Wages and Gratuities Paid as Wages, and the reduce % comes from Credit Card Tip/Gratuity Reduce %. Both are on Employees > Settings. See Run payroll.
#Reprint a shift report
In the back office (login.realpos.net):
- Go to Reports > Closeouts.
- Under Employee Shift Reports, pick a Start Date and End Date and click Generate.
- You get one row per clock-in: First Name, Last Name, Nickname, Shift Open Time, Shift Close Time, Open/Closed and Gross Sales $. Click a heading to sort.
- Click Reprint Report on a row to see that shift's closeout. Click Print to print it on your office printer, or Close.
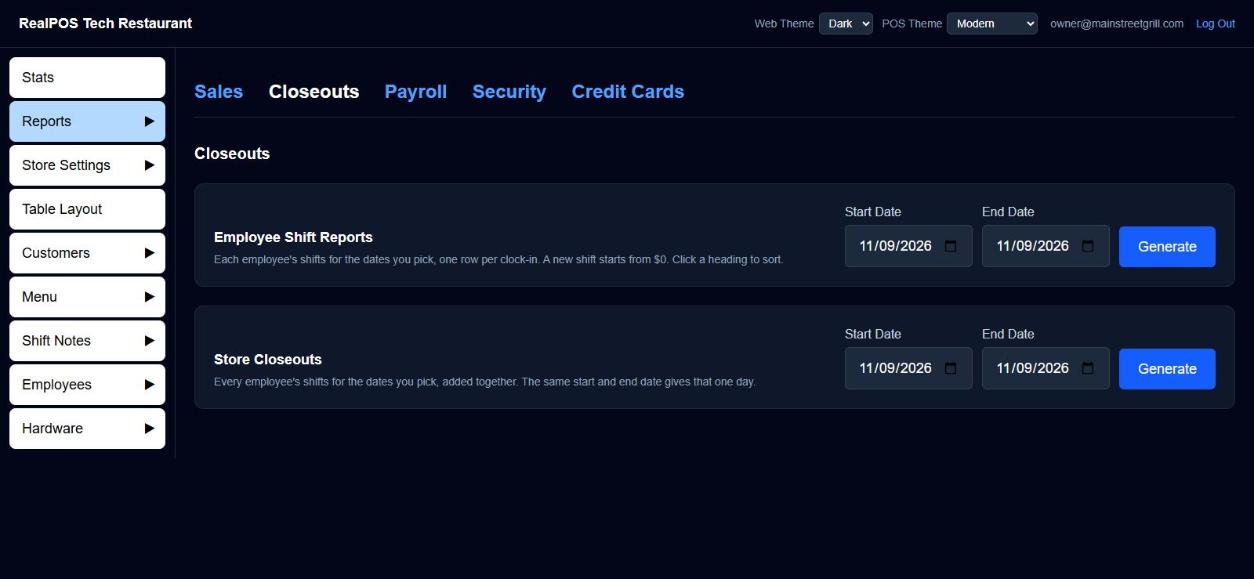 Reports > Closeouts
A reprint from the back office also shows any tip-outs for that shift. See Tip-outs and tip pools.
#A whole day (or range) at once
Under Store Closeouts, pick a Start Date and End Date and click Generate. Every employee's shifts are added together into one report ("All Employees"). Use the same start and end date for a single day.
#On the POS
The same two reports are under Manager > Reports > Closeouts. On the POS you can also close someone's bank from Employee Shift Reports:
Generate the list for today.
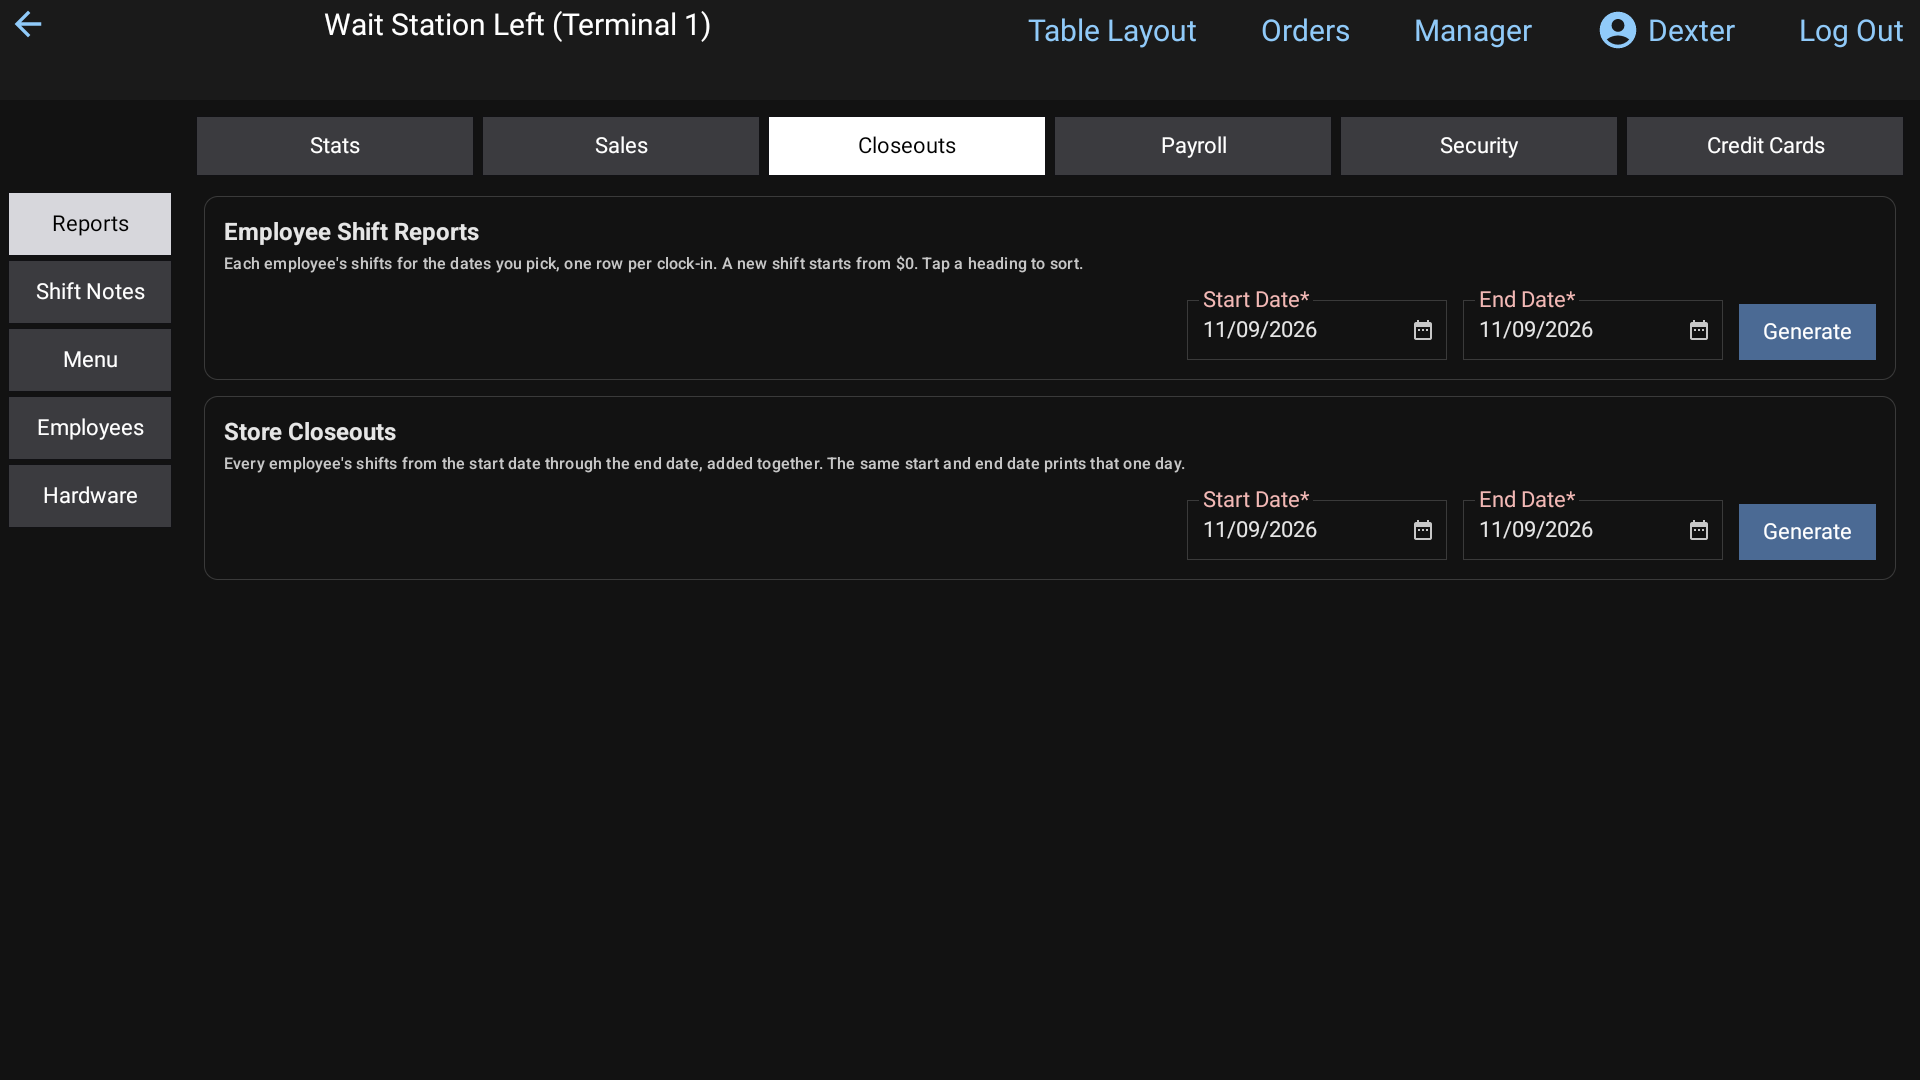 Manager > Reports > Closeouts on the POS: Employee Shift Reports and Store Closeouts
Tap the green Open on their row.
At Do you wish to close this employee's bank?, tap Yes. Their shift report prints and the bank closes. They stay clocked in.
If they still have open orders you'll see "This employee still has (N) open orders." Tap Show Orders to deal with them first.
#The Closeout Wizard
Manager > Reports > Stats has a Closeout Wizard beside the day's stats. Each button is red until that step is done and green when it is:
- Open Tickets / NO Open Orders
- Pending Tips / NO Pending Tips
- Open Banks / NO Open Banks
- Employees Clocked In / NO Employees Clocked In
- Print Store Close: gray until there are no open tickets, pending tips or open banks. It then shows every shift worked today added together, ready to print.
Tap a red button to jump to what needs doing. For the automatic end-of-day steps, see Store Close.
#Good to know
- Cash refunds come out of the drawer of whoever did the refund. See Refund a guest.
- Card tips above the High Tip % Warning (on Employees > Settings) are highlighted dark blue on the employee menu, with their tip %.
Store close and end of day
Set when your business day ends, what RealPOS closes out automatically, and how to check everything is closed before you go home.
At the end of every business day, RealPOS closes the day out for you: it settles waiting tips, closes banks, clocks out anyone still on the clock and closes the card batch. You choose when that happens in the back office (login.realpos.net) under Store Settings > Store Close. Before you leave, the Closeout Wizard on the POS shows you what's still open.
#Set the end of day
- In the back office, open Store Settings > Store Close.
- Pick the End of Day Time. This is when the business day rolls over. Pick a time after your last guest leaves, for example 4:00 AM for a late bar.
- Pick your Timezone. RealPOS uses this everywhere, including on the POS, instead of each device's own clock.
- Tick Clockout all employees on system close to clock out anyone still clocked in at the End of Day Time.
- Click Save.
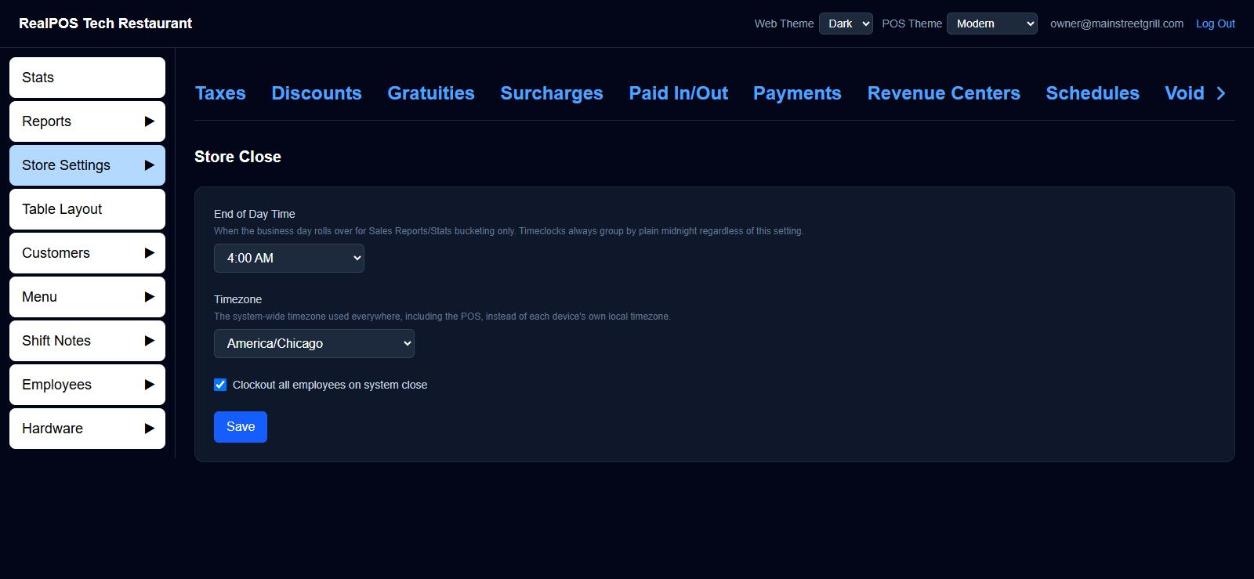 Store Close settings
#What happens at the End of Day Time
One terminal that's on and online runs the close, in this order:
- Every card tip still waiting is set to $0, and adjusted at Datacap.
- Paid pickup orders still waiting are cleared. Closed Orders, the pickup tab and every employee's shift report start fresh for the new day.
- Every open bank is closed.
- Everyone still clocked in is clocked out.
- The card batch is closed, last, once every tip is final.
When it's done, a Manager Note lists what was done and every order still open (no payment, or part paid) with its owner and amount. Read it in Shift notes.
Orders with no payment, or only part paid, stay open and carry over to the next day.
#Before you go home: the Closeout Wizard
On the POS, open Manager > Reports. The Stats tab has the Closeout Wizard on the right: five buttons, red until that step is done and green when it is.
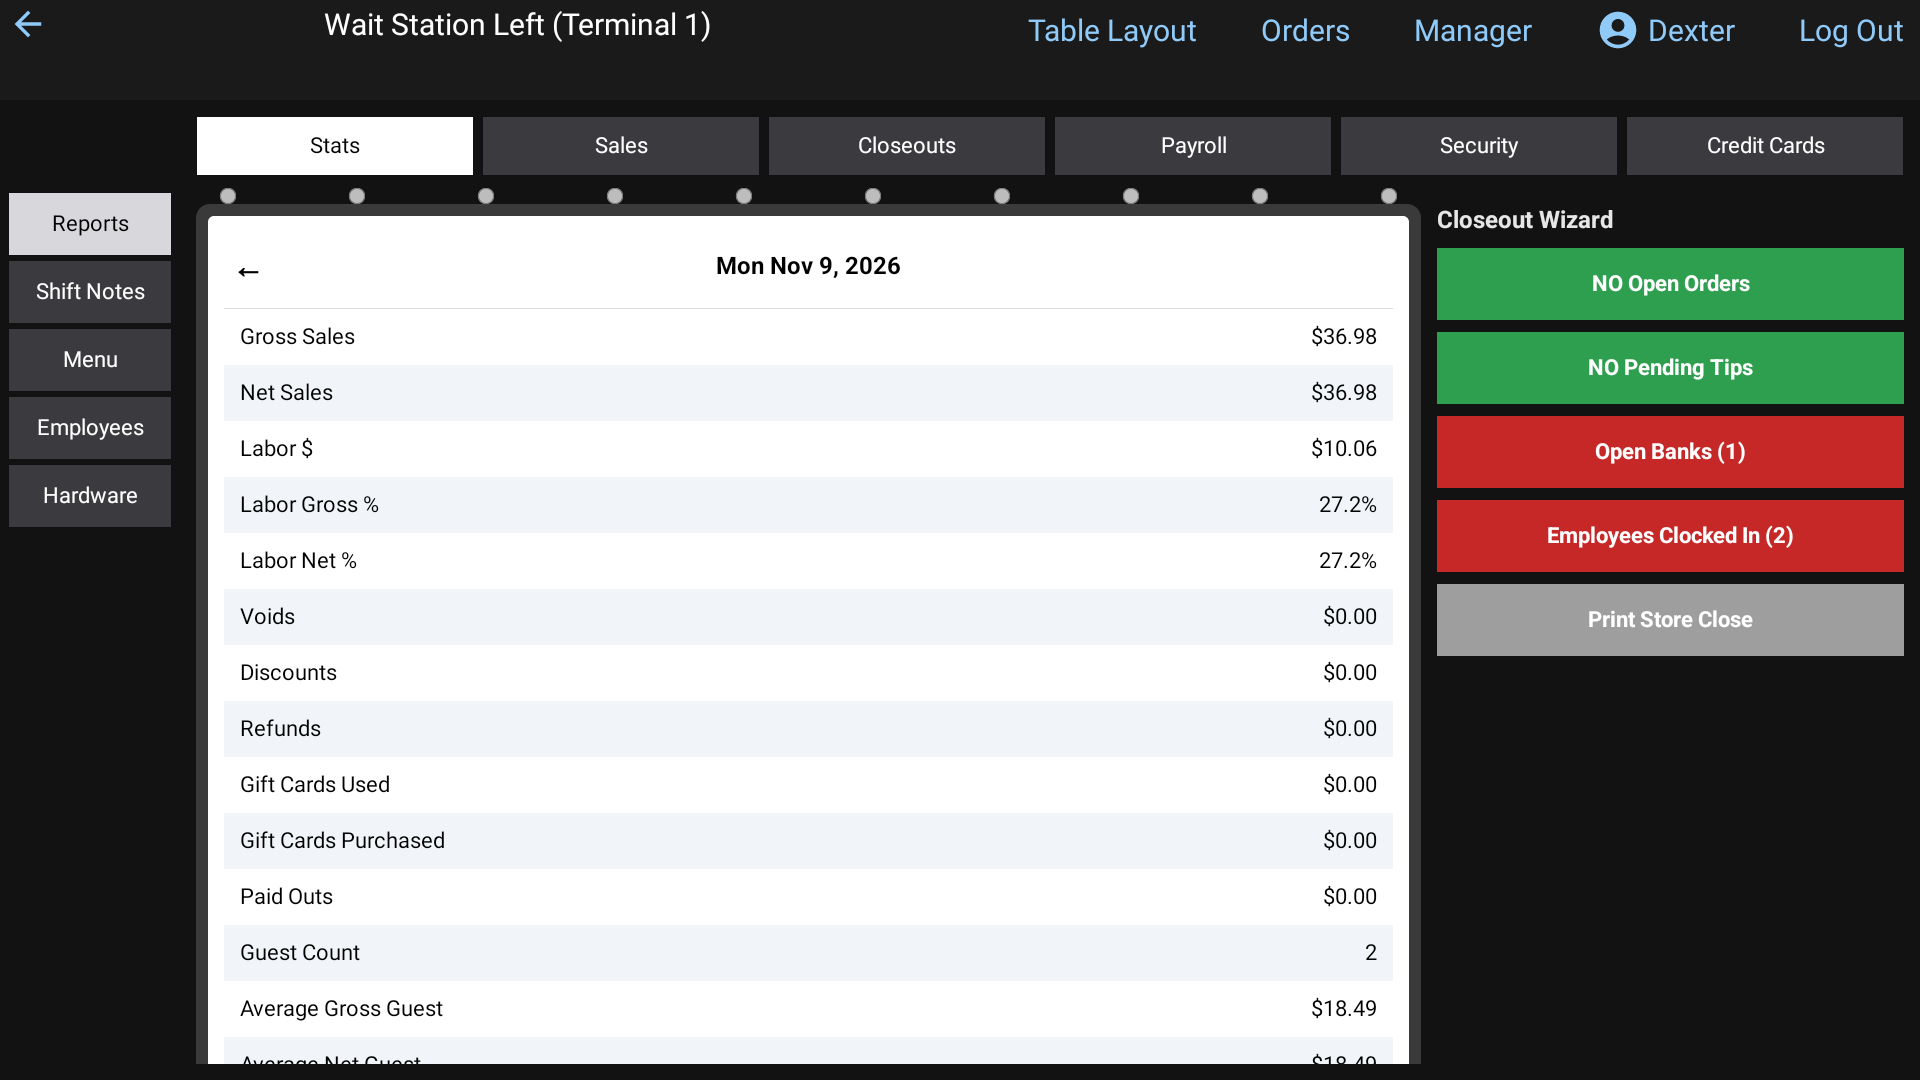 The Closeout Wizard
- Open Tickets (n): tap to see the open orders. Turns green as NO Open Orders.
- Pending Tips (n): tap to go to the pending tips and enter them. Turns green as NO Pending Tips.
- Open Banks (n): tap to see open banks and close them. Closing a bank asks Do you wish to close this employee's bank?, prints their shift report and closes the bank. They stay clocked in. If they still have open orders you'll see This employee still has (n) open orders. with Show Orders.
- Employees Clocked In (n): tap to go to the timeclocks and clock people out.
- Print Store Close: turns green once the first three are done. It adds together every shift worked today into one report and shows it ready to print.
If a terminal hasn't been able to sync, you'll see Terminal not syncing with a warning that this could affect closeout numbers. Check that terminal is on and connected.
#Good to know
- A terminal must be on and connected at the End of Day Time for the close to run. A terminal that was off through the close doesn't run it hours later.
- The card batch closes only if the terminal running the close has a card reader set up. If the batch couldn't close, the Manager Note says so.
- For individual employee and past store closeouts, see Closeouts. For the day's sales, see the Daily report.
Your customer list
See and export the guests who've signed up on the POS, with their phone numbers and emails.
The customer list is everyone who has signed up as a loyalty member on the POS: their name, phone number and email (if they gave one). Use it to look someone up, or export it for a mailing.
#Where customers come from
Guests are added on the POS when a server taps Loyalty in an order and types a phone number that isn't on file yet. The POS asks for the guest's name, then their email, and signs them up. See Gift cards and loyalty.
#See the list
- In the back office, go to Customers.
- The Customer List shows each guest's Name, Phone Number and Email Address, A to Z by name.
- To find someone, type any part of their name or phone number in Search name or phone.
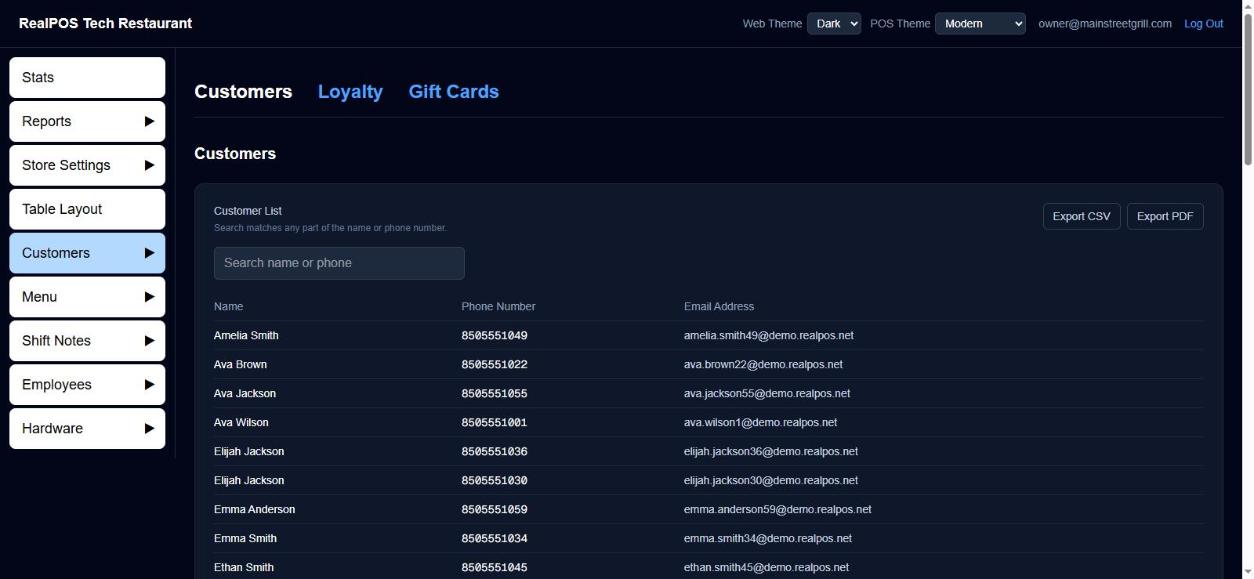 The customer list
#Export it
- Export CSV saves the list as a spreadsheet file (customers.csv) you can open in Excel or load into a mailing tool.
- Export PDF opens a printable Customer List. Use your browser's print screen to print it or save it as a PDF.
Both export what's showing, so search first if you only want some guests.
#Good to know
- To see each member's points, go to Customers > Loyalty. Gift cards are under Customers > Gift Cards. See Gift cards and loyalty.
Gift cards and loyalty
Sell and reload gift cards, take them as payment, check balances, sign guests up for loyalty points, and see it all in the back office.
RealPOS has its own gift cards and loyalty points. Both are run from the POS order screen, and both are listed in the back office under Customers.
#Sell or reload a gift card
- Open an order on the POS.
- Tap Gift Card, then Load Card.
- Type the card number (at least 10 digits) and tap Enter.
- Type the amount to load, in whole dollars, and tap Enter.
- "Would you like to add another gift card?" Tap Yes to load another card on the same order, or No to finish.
The card goes on the order as a line, and the guest pays for it like anything else. The card is turned on once the order is paid. Loading a card that already has money on it adds to its balance.
#Check a balance
- In an order: tap Gift Card, then Check Balance, enter the card number and tap Enter.
- Without an order: tap Gift Lookup at the bottom of the floor screen.
The balance shows big, with the last 4 digits of the card. Tap Print to print a small balance slip for the guest, or OK to close. "Card Not Found" means that number isn't one of your cards.
#Take a gift card as payment
On the payment screen, staff choose the Gift Card tender and enter the card number. The amount box fills in with whichever is less, the card's balance or what's due, and can be changed before they tap Enter. Whatever is left on the check can be paid another way. See Take a payment.
The Gift Card tender is one of your payment types. See Payment types.
#Loyalty points
Guests earn 1 point for every $1 spent, tax included, once the order is paid.
To add a guest to an order:
- In the order, tap Loyalty.
- Type the guest's phone number and tap Enter.
- If they're already a member, they're added to the order.
- If not, the POS signs them up: type their name (New Loyalty Member — Name) and tap Next, then their email if they want to give it (New Loyalty Member — Email) and tap Save.
To put a member on just one guest's items, long-hold that seat on the order and choose Loyalty. That seat earns points on its own items (before tax).
To check someone's points without an order, tap Loyalty Lookup at the bottom of the floor screen and type their phone number. You can print their points balance too.
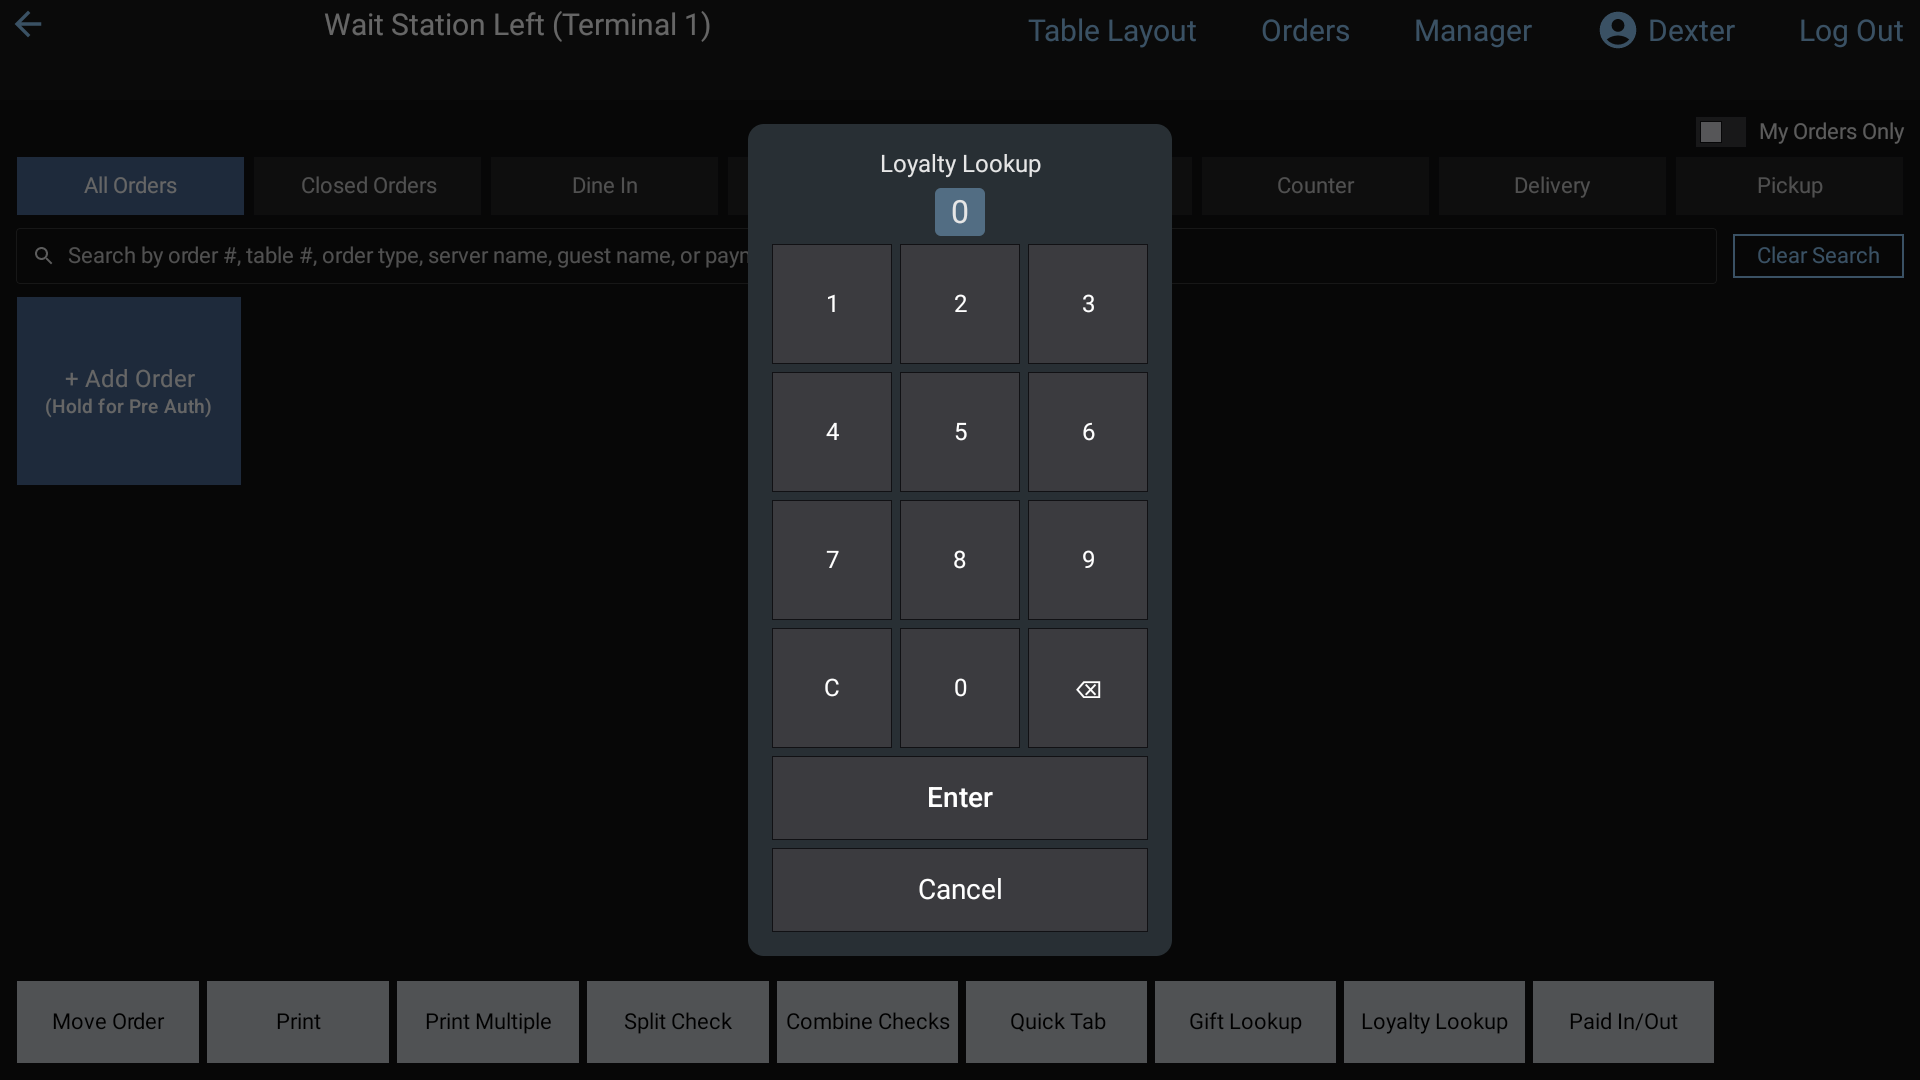 The Loyalty Lookup keypad: type the guest's phone number and tap Enter
#See them in the back office
- Customers > Gift Cards lists All Gift Cards with each card's Card Number, Value (what's on it now), Status and when it was Created. A card sold on an order that isn't paid yet shows as PENDING, then ACTIVE once the order is paid. Search by any part of the card number.
- Customers > Loyalty lists All Loyalty Members with their Name, Phone, Email and Points. Search by name or phone number.
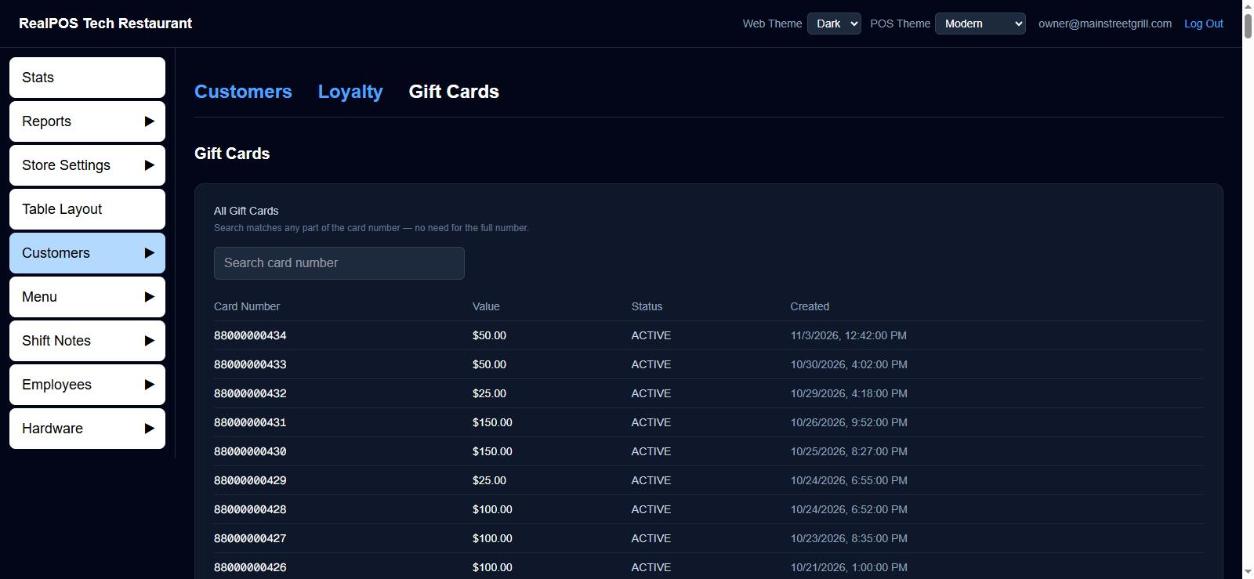 Gift cards in the back office
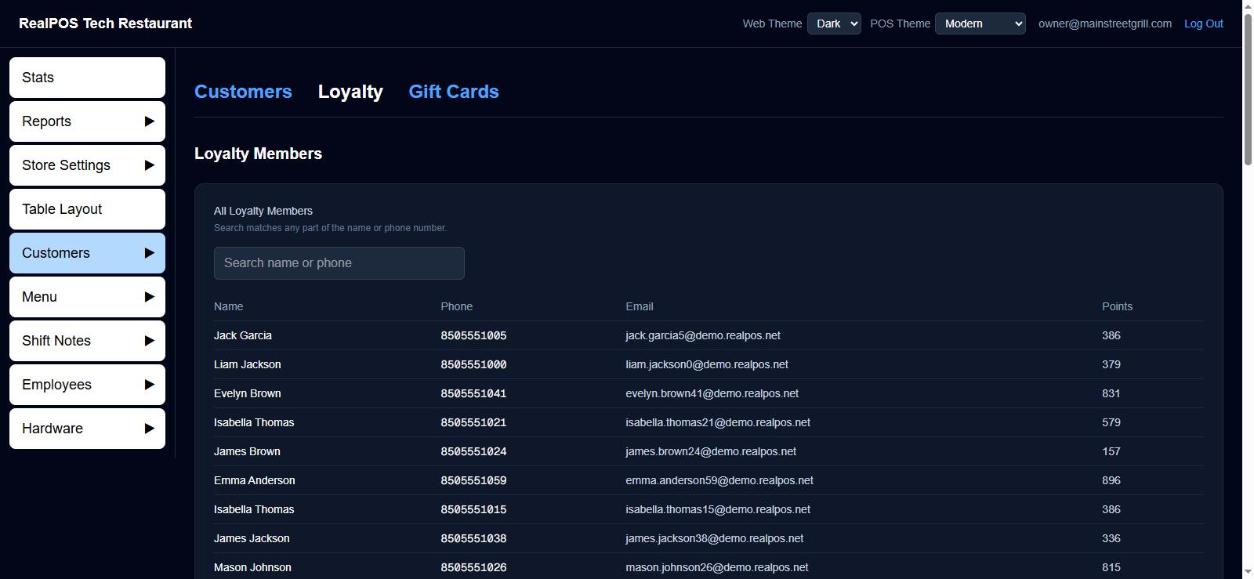 Loyalty members in the back office
#Good to know
- Gift cards sold are not counted as sales. They show as Gift Card Sales on the Daily Report, and the Stats page shows Gift Cards Purchased and Gift Cards Used. See Daily report.
- Loyalty members are also your customer list. See Customers.