Set your tax rate
How RealPOS decides the sales tax on each item, how to add a tax rate, and how to make items non-taxable or an order tax exempt.
Sales tax in RealPOS is set up in three places that work together:
- Taxes (in Store Settings): the tax rates themselves, like "Sales Tax 8%" or "Liquor Tax 10%".
- Categories (in Menu): reporting groups like Food, Beer, Wine and Liquor. Each category gets one of your taxes.
- Departments and Items (in Menu): each department belongs to a category, and an item can have its own tax or be marked Non Taxable.
Your restaurant also has a store sales tax rate, set by your dealer when your restaurant was created.
How the tax on an item is decided
When an item is rung in on the POS, RealPOS works out its tax in this order:
- Non Taxable is checked on the item, or on its department: no tax.
- The item has its own Tax picked: that rate.
- Otherwise, the tax on the item's department's category. If that category is set to No tax assigned, items in it are not taxed (unless the item picks a tax of its own).
- If the department has No category assigned: the store sales tax rate.
The tax is fixed on each item when it is rung in, so changing a tax setting affects new items rung in from then on, not items already on open checks.
Add a tax rate
- In the back office, go to Store Settings > Taxes.
- Under Named Taxes, type a name (for example "Sales Tax" or "Liquor Tax") and the rate in the % box.
- Click +.
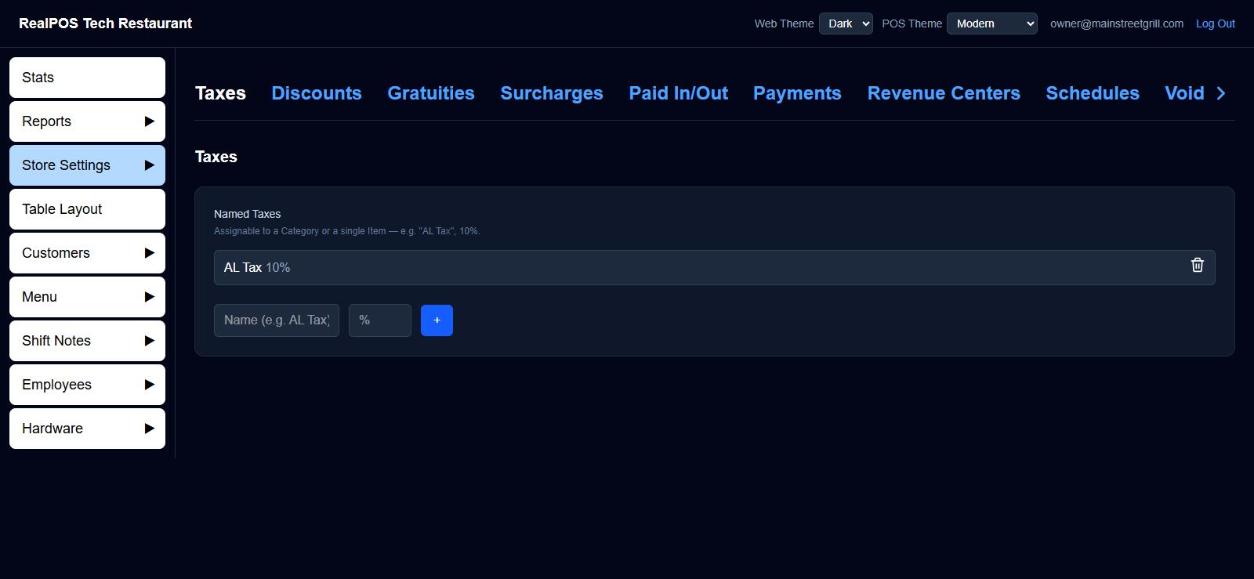 The Taxes page
To remove a tax, click the trash icon beside it.
Give a category its tax
- Go to Menu > Categories and click the category.
- Pick the rate in Tax.
- Click Save.
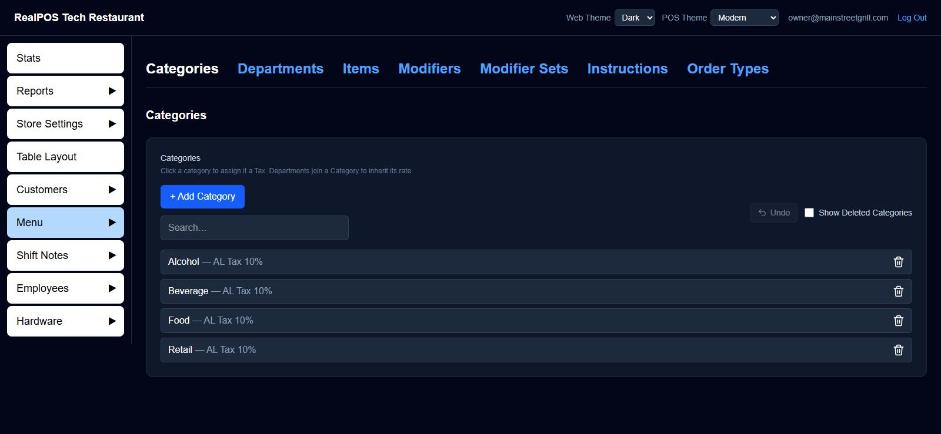 Categories, each with its tax
On the Categories list, a category with no tax shows No Tax Assigned beside its name. Check this list carefully: everything in a category with no tax is rung in with no tax.
Then make sure each department is in the right category: go to Menu > Departments, click a department, and pick its Category, then click Save.
Give one item a different tax
- Go to Menu > Items and click the item.
- In Tax, pick the rate. Leave it on Inherit from Dept/Category to use its category's tax.
- Click Save.
Make items non-taxable
- One item: open the item and check Non Taxable (beside Tax), then Save.
- A whole department: open the department under Menu > Departments, check Non Taxable, then Save.
Non-taxable sales are listed on the Non Taxed Items Sales Report under Reports > Sales.
Tax exempt orders
Some guests don't pay sales tax at all, like a church group or a school with a tax-exempt certificate. That's done on the POS for the one order, not in the menu: on the Pay screen, tap Tax Exempt and type a message for the receipt, such as the group's name or their tax ID. Every tax-exempt order, with its message, is on the Tax Exempt Sales Report under Reports > Sales.
Good to know
- Check before you open. Ring in one item from each department on a test order and look at the tax on the check. It's the quickest way to catch a department in the wrong category or a category with no tax.
- Changing the store sales tax rate. There isn't a screen for it in the back office. Ask your dealer or support@bayareapointofsale.com.
- More about categories and departments: Categories and departments.