Employee Manual
For servers, bartenders, hosts and cashiers: clocking in, taking orders, splitting checks and taking payment.
Online version with search and the Ask assistant: help.realpos.net/employee
- Sign in with your PIN
- Clock in and out
- Stock Watch and Shift Notes
- The floor plan (Table Layout)
- Start an order
- Order types (Dine In, ToGo and more)
- Quick Tab
- Add items and modifiers
- Special instructions and messages
- Seats
- Send to the kitchen
- Void an item or an order
- Apply a discount
- Change an item's price
- Transfer or move an order
- Split a check
- Take a payment
- Cash payments
- Card payments
- Tips
- Receipts (print, text or email)
- Find an order, or reopen a check
- Your shift closeout
- Automatic sign-out
- Using the handheld
- The kitchen screen (KDS)
Sign in with your PIN
Sign in to a RealPOS terminal with your 4-digit PIN, and what you see on the sign-in screen.
Every RealPOS terminal opens on the sign-in screen. You sign in with your own 4-digit PIN. Your manager gives you your PIN.
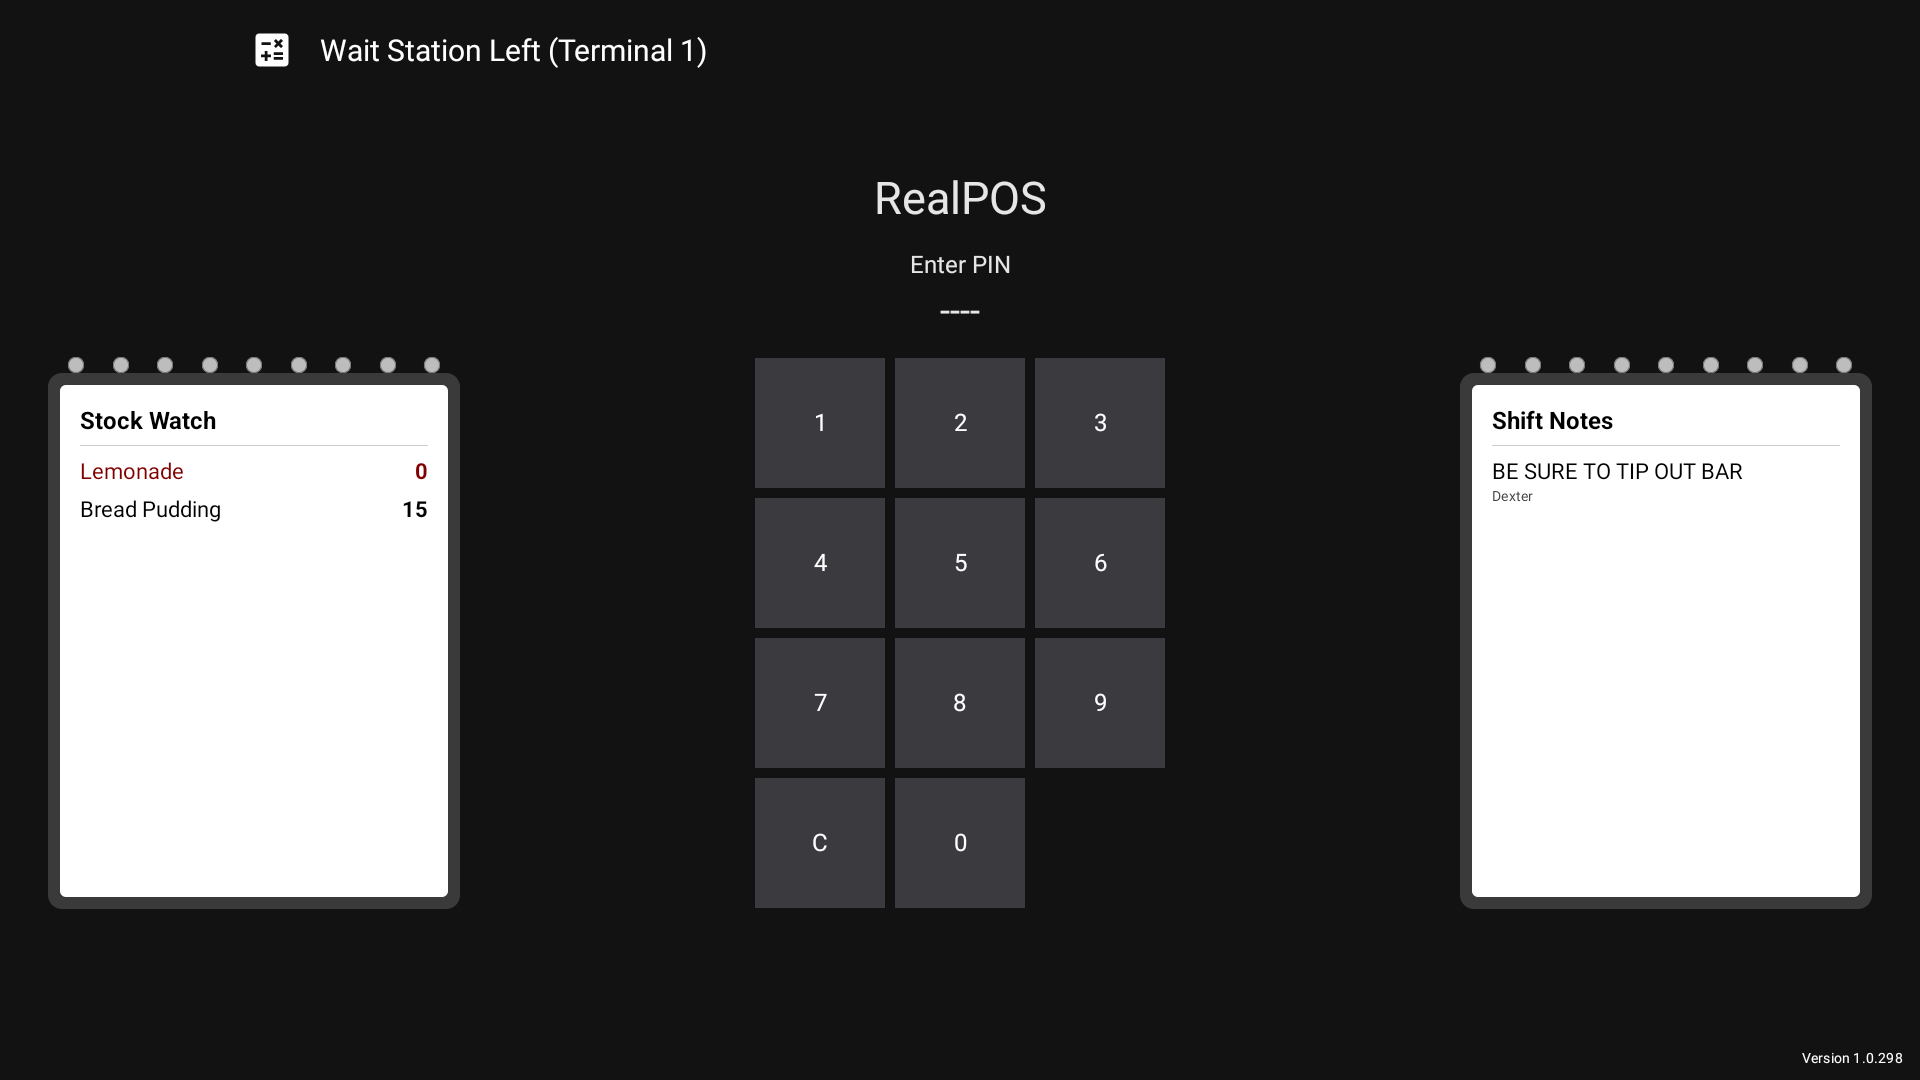 The sign-in screen with the PIN pad in the middle
#Sign in
- On the POS, find the Enter PIN pad in the middle of the screen.
- Tap your 4 digits. The screen shows a
*for each one. - That's it. As soon as the 4th digit goes in, you're signed in. There is no Enter key.
Made a mistake? Tap C to clear and start again.
If the PIN is wrong you'll see Invalid PIN in red. The pad clears itself, so you can type the right one straight away.
#Where you land
Where you land depends on how your manager set up this terminal. It could be:
- the Table Layout (floor plan), for table service
- one Order Type's tab on the Orders screen, like a ToGo counter
- a Quick Tab screen, for a fast bar or counter
See The floor plan, Order types and Quick Tab.
#Notes you must read
Sometimes a manager leaves a note just for you. When you sign in it pops up as Note from (their name). The Dismiss button counts down for a few seconds first, so take a moment to read it. If you have more than one note, they show one after the other.
#Signing in also clocks you in
Your first sign-in of the shift clocks you in for the day. You don't need a separate clock-in step. See Clock in and out.
#Log out
Tap Log Out at the top right of any screen. Logging out does not clock you out. You stay on the clock until you clock out.
Some terminals also log you out by themselves when nobody touches them for a while. See Automatic sign-out.
#Good to know
- The rest of the sign-in screen. You can see these without signing in:
- Stock Watch and Shift Notes, two notepads beside the PIN pad. See Stock Watch and Shift Notes.
- A list of tables that have been open 2 minutes or longer, shown as Table #: and a timer. The timer turns yellow at 2 minutes and red at 10 minutes. Tap the list to pause or restart its scrolling.
- Pickup orders, if your restaurant uses them. Read about them in Order types.
- "Updating RealPOS". This means a new version is installing. Sign-in opens again once it's done. If the update fails, a Sign in anyway for now button shows up.
- The terminal's name is at the top of the screen. If it turns pink, the internet is down and card payments are being stored to send later. See Card payments.
- A red message beside the terminal name that says "This terminal can not communicate with the others" means this terminal has lost touch with the rest of the restaurant. It still works, but only use it if you have to. Tell a manager.
Clock in and out
How clocking in happens when you sign in, and how to clock out at the end of your shift.
RealPOS keeps track of your hours for payroll. Clocking in happens on its own when you sign in. Clocking out is something you do yourself at the end of your shift.
#Clock in
- Sign in on any POS terminal with your PIN. See Sign in with your PIN.
- If you aren't already on the clock, signing in clocks you in under your job.
If you sign out and back in during your shift, you stay clocked in. You won't get a second punch.
#Clock out
You clock out from your Employee Menu.
- Tap your name at the top right of the screen. Your Employee Menu opens.
- Tap the red Clock Out button at the bottom right.
- The Cash Tips pad opens and asks you to Enter your cash tips. Type the cash tips you took home this shift. If you already entered them for your shift closeout, they are already filled in. Leave them, or type over them.
- Tap Clock Out on the pad.
Clocking out also signs you out of the terminal.
#Why Clock Out is grayed out
Clock Out stays locked until:
- every check of yours is closed. While you have one open, the button beside it says You Have Open Orders. Tap it to jump to Orders > All Orders and finish them.
- every card tip is in. If any card payments are still under Pending Tips, enter those tips first. See Tips.
#Good to know
- Print your shift closeout before you clock out. See Your shift closeout.
- Log Out at the top of the screen does not clock you out. Only Clock Out does that.
- If you can't clock in or out because of your job's permissions, ask a manager. They'll sort out your punch.
- On a handheld, clock out from My Account. See Using the handheld.
Stock Watch and Shift Notes
Check what's running low and read the manager's notes for the shift, right on the sign-in screen.
Two notepads sit beside the PIN pad on the sign-in screen. You can read both without signing in. Glance at them before every shift.
#Stock Watch
Stock Watch lists every menu item your managers are counting, with how many are left.
- Items that are out (count 0) show in dark red at the top of the list.
- Everything else is listed A to Z.
The same numbers show on the menu buttons while you take an order. A small orange number in the corner of an item button is how many are left. An item that's out turns dark gray, and you can't ring it in.
#Shift Notes
Shift Notes shows the notes your managers have posted for the staff, like specials, large parties or reminders. The name under each note is who wrote it.
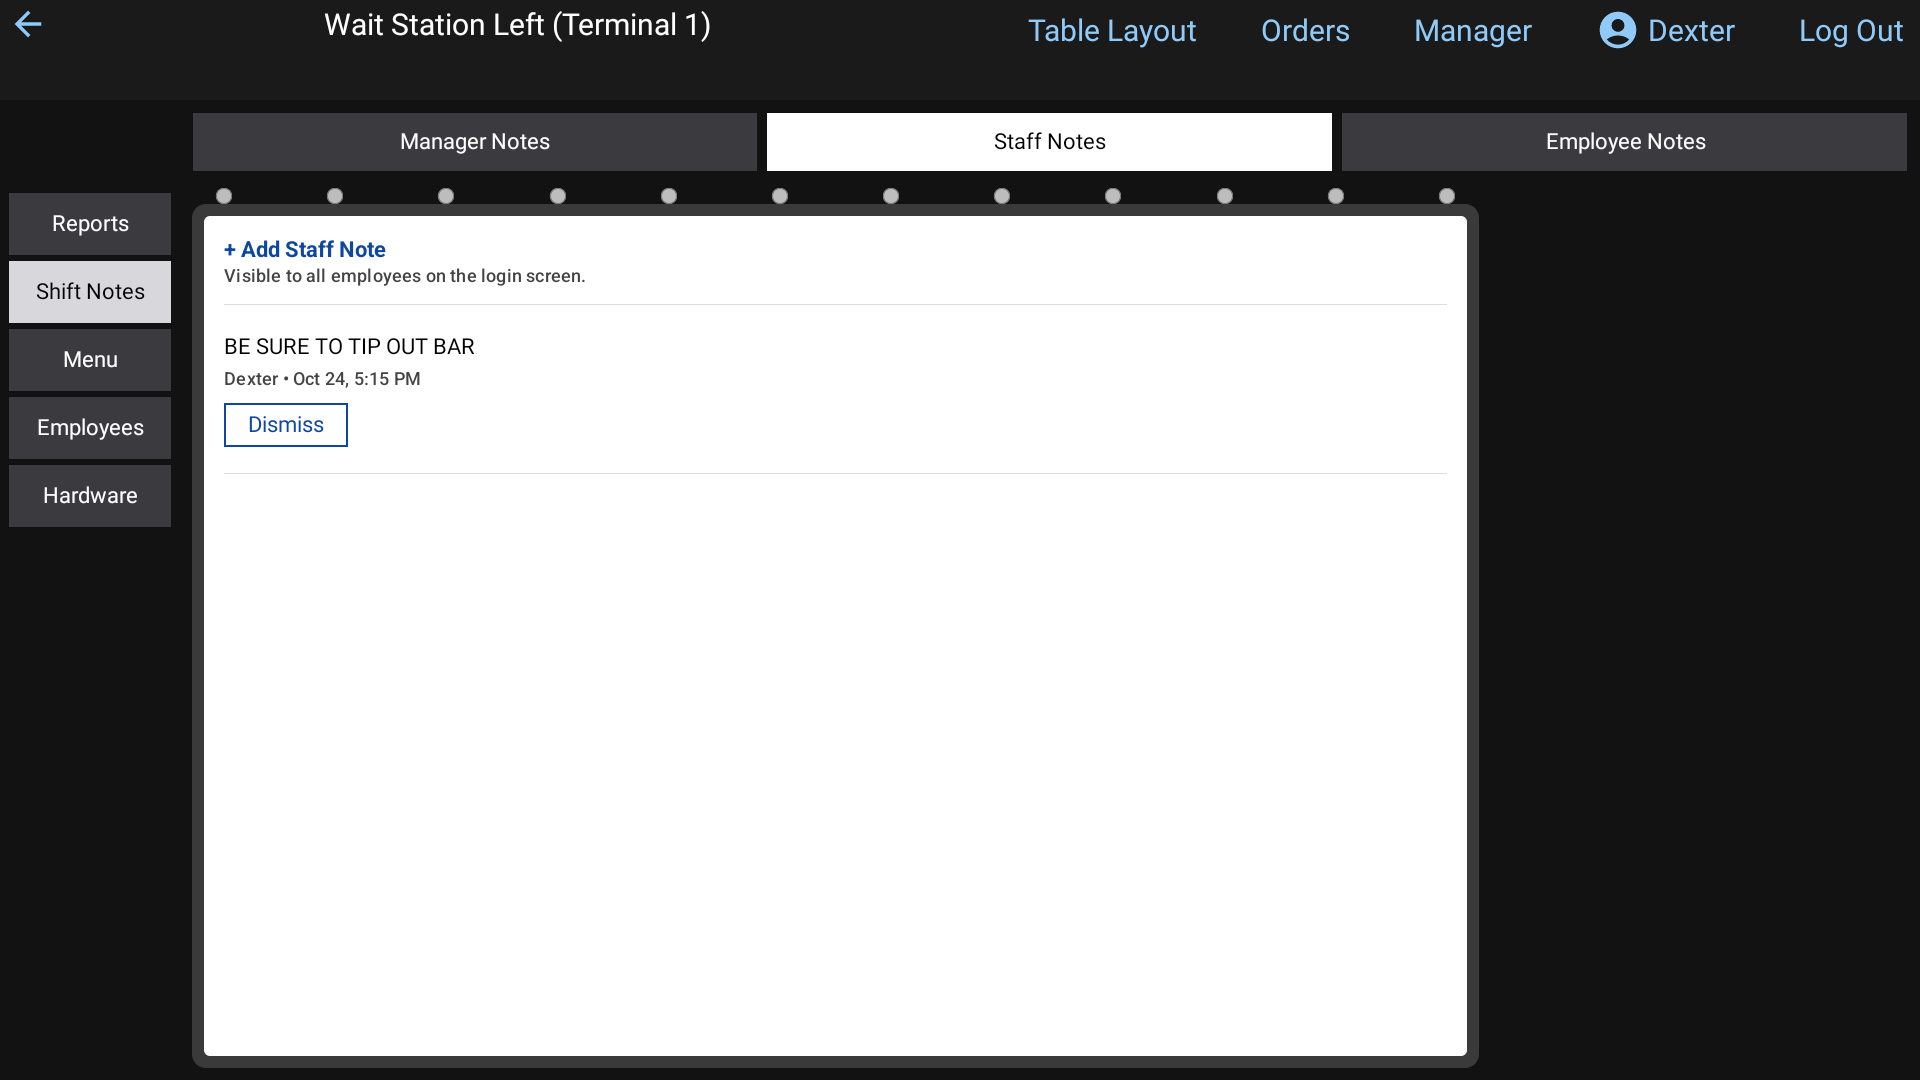 Shift Notes on the sign-in screen
#Notes just for you
A manager can also leave a note for one person. Those don't go on the notepad. They pop up when that person signs in, as Note from (name). Tap Dismiss once the countdown finishes. See Sign in with your PIN.
#On the handheld
The handheld's sign-in screen has the same two lists. Scroll down under the PIN pad. See Using the handheld.
#Good to know
- Managers set stock counts and 86 items. Ask a manager if a count looks wrong. Managers can read Price changes and 86.
- An item's count goes down each time someone rings it in.
The floor plan (Table Layout)
Read the table colors, open a table, and use the buttons along the top and bottom of the Table Layout screen.
The Table Layout screen shows your dining room as your manager drew it. You can see which tables are free, whose they are, and how long each has been open.
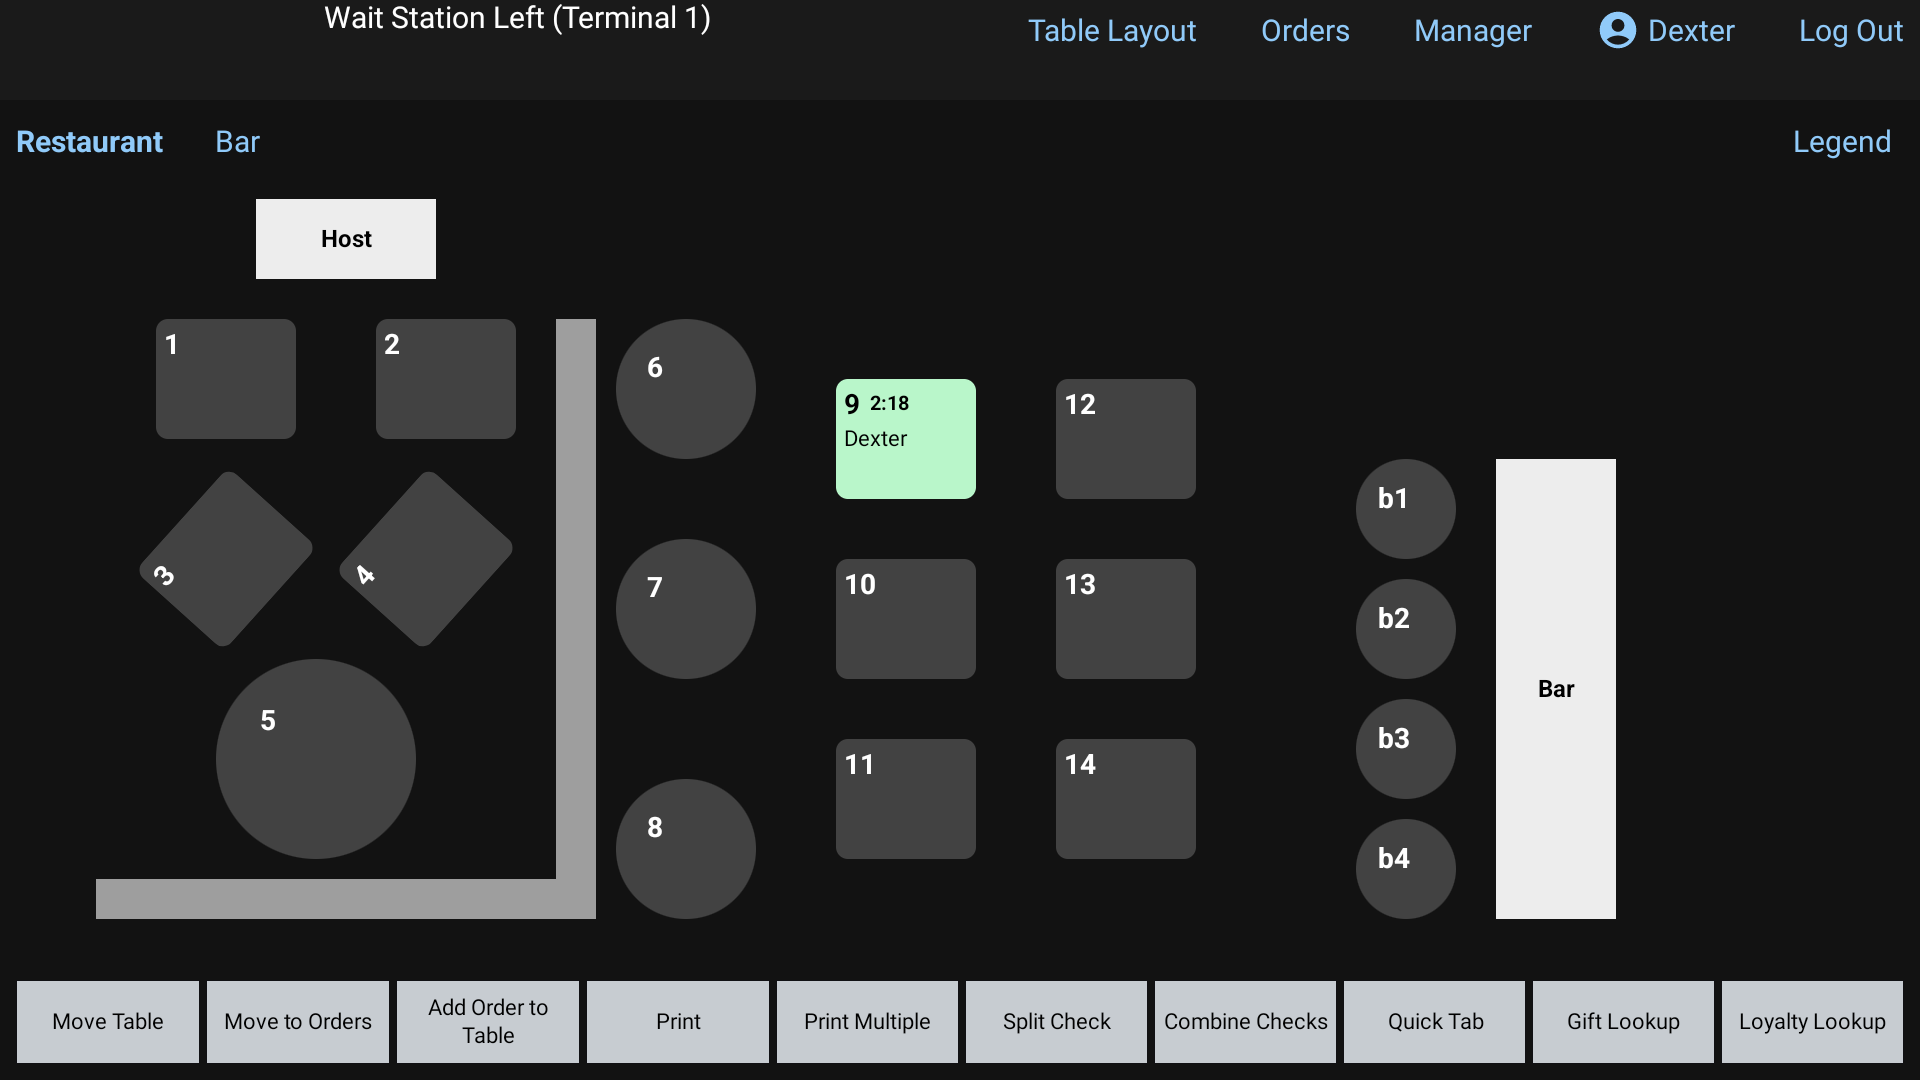
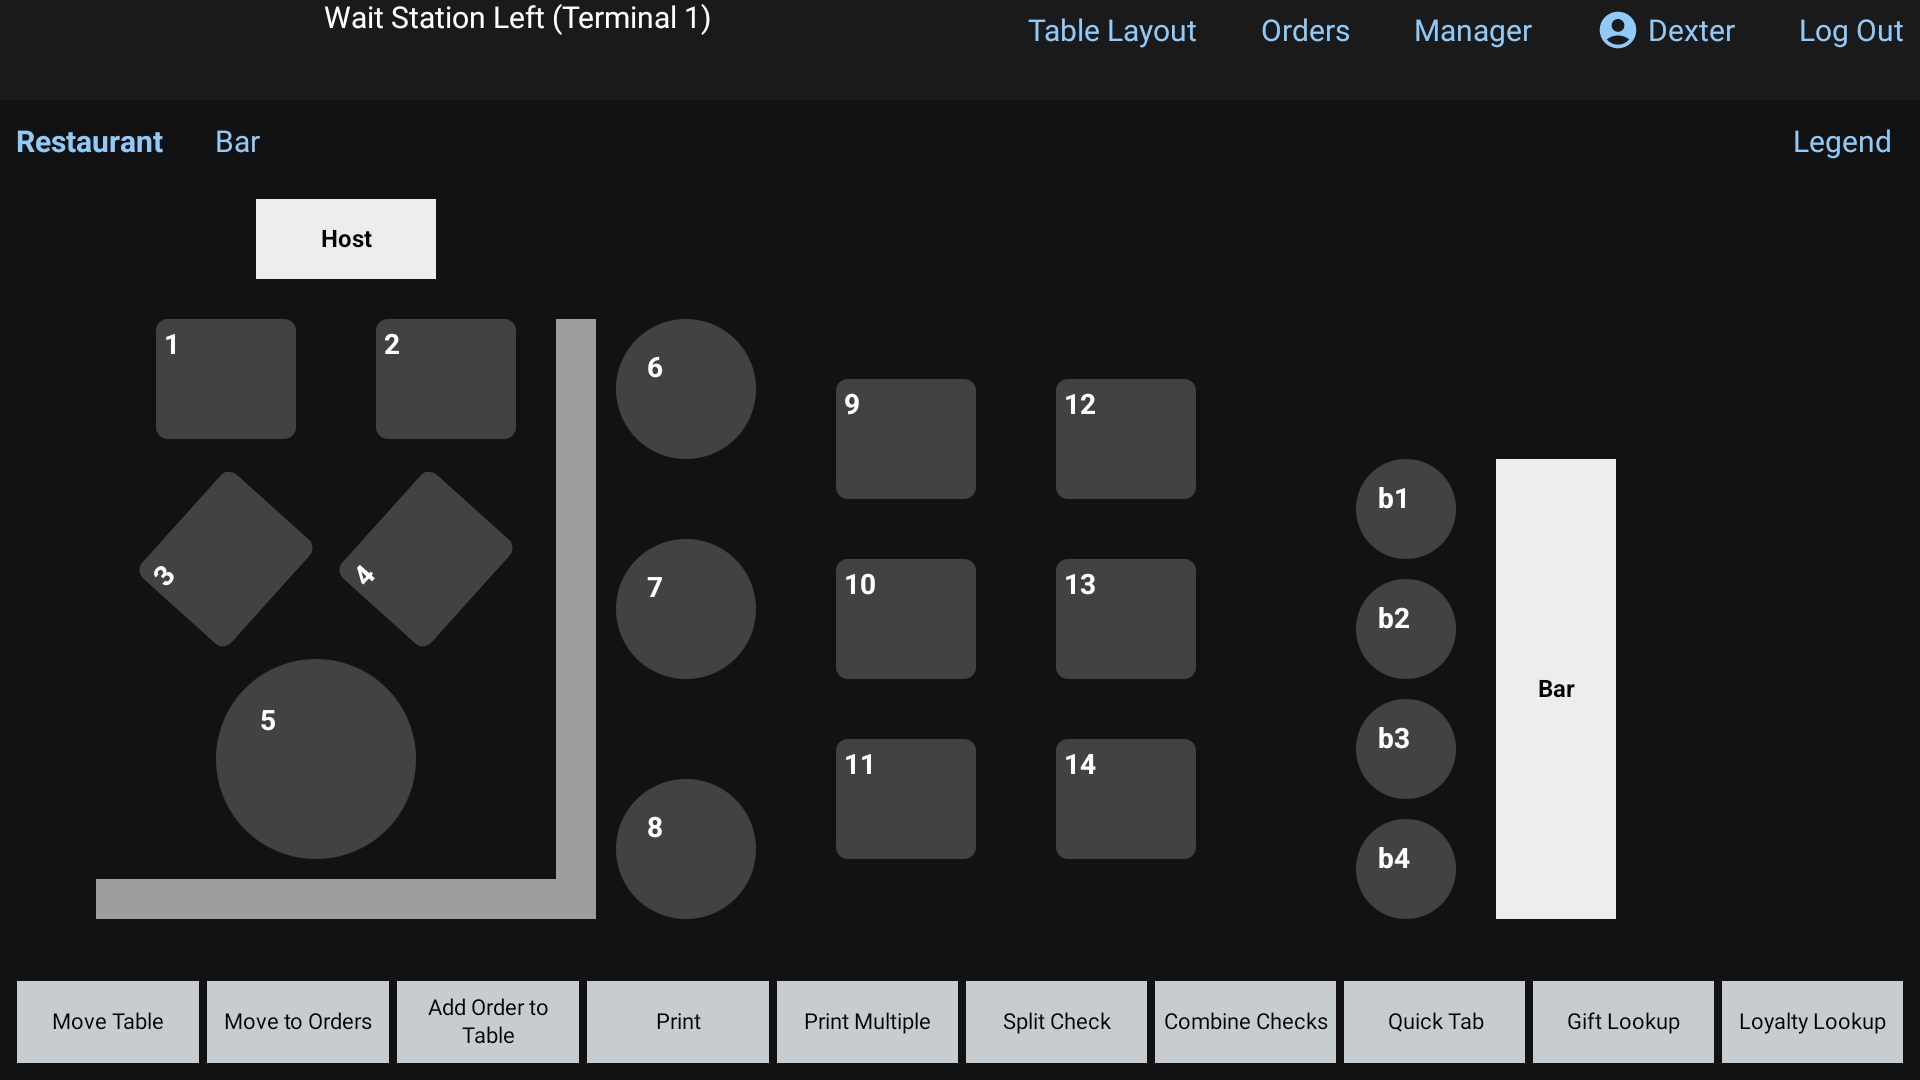 The Table Layout screen
#Switch between rooms
If your restaurant has more than one layout (a patio, a bar, a back room), the current one's name shows in bold at the top left. The others are listed beside it. Tap one to switch.
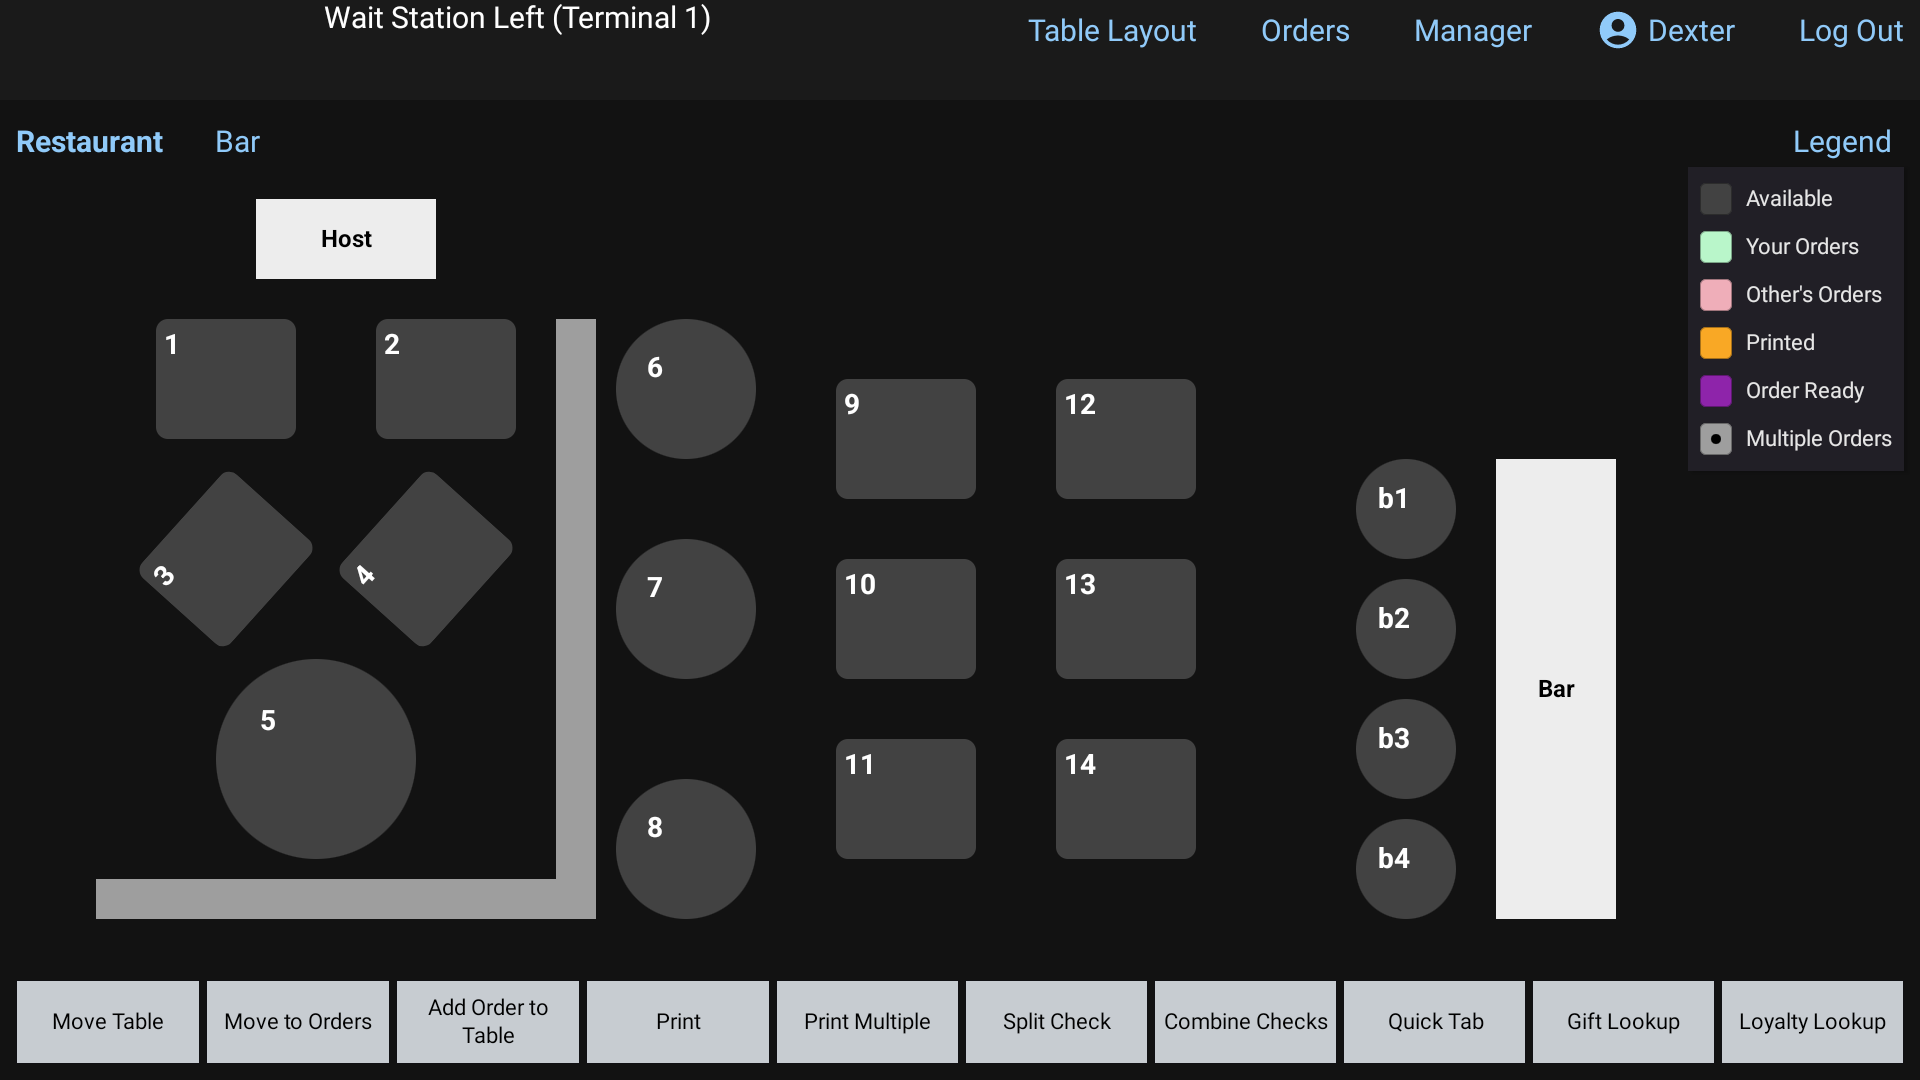 Layout names across the top of the floor plan
#What the table colors mean
Tap Legend at the top right to see this list on the screen.
| Color | Means |
|---|---|
| Dark gray | Available: nobody is seated |
| Light green | Your Orders |
| Pink | Other's Orders: another server's table |
| Yellow | Printed: the check has been printed. The table number is green if it's yours, pink if it's someone else's |
| Purple | Order Ready: the kitchen has finished your order |
A table with more than one order on it shows a small black dot for each order (Multiple Orders).
An open table also shows a timer, the server and the guest's name, if one was entered.
#Open a table
- Tap an available (gray) table.
- The Guest count pad opens. Type how many guests and tap Enter.
- The order screen opens for that table. See Start an order.
To get back into a table you already have, just tap it.
Peek at a table without opening it: press and hold a table for about a second. Its ticket pops up. Tap the ticket (Touch to open) to open it, or tap outside to close it.
#Someone else's table
If you tap another server's table, you'll see something like Table 5 belongs to Sam. Only managers, and staff with the "See All Staff Orders" permission, can open other people's tables.
#The buttons along the bottom
Tap a button first, then tap the table it should work on. While a button is waiting for you to tap a table, it turns orange and its label changes. Tap it again to cancel.
| Button | What it does |
|---|---|
| Move Table | Move an order to a different table. See Transfer or move an order |
| Move to Orders | Take an order off its table and put it under an Order Type, like ToGo |
| Add Order to Table | Start a second, separate order on a table that already has one |
| Print the check for one table | |
| Print Multiple | Tap several tables, then tap Complete to print all their checks |
| Split Check | Open the Split Check screen for a table. See Split a check |
| Combine Checks | Tap several tables, then Complete, to put their checks together |
| Quick Tab | Pick an Order Type and open its Quick Tab. See Quick Tab |
| Gift Lookup / Loyalty Lookup | Look up a gift card balance or a loyalty member |
#The bar across the top
These buttons are at the top of almost every screen:
- Table Layout brings you back to this screen from anywhere.
- Orders opens the Orders screen. See Find an order, or reopen a check.
- Manager opens the Manager menu. If you're not a manager, it asks for a manager's PIN.
- Your name opens your Employee Menu, where you enter tips and clock out.
- Log Out signs you out. You stay on the clock.
When you're in an order, the top left also shows Table # with the table name.
#Good to know
- If you leave an order that has items you haven't sent yet, RealPOS asks Cancel order? first. See Send to the kitchen.
- A table with more than one order opens a short list of its tickets. Tap the one you want. If only one of them is yours, it opens straight away.
Start an order
Open a new order from a table, an Order Type tab, or Quick Tab, and find your way around the order screen.
There are three ways to start an order. Use the one that fits how you're serving the guest.
#From a table (dine in)
On the Table Layout screen, tap an available table.
Type the number of guests on the Guest count pad and tap Enter.
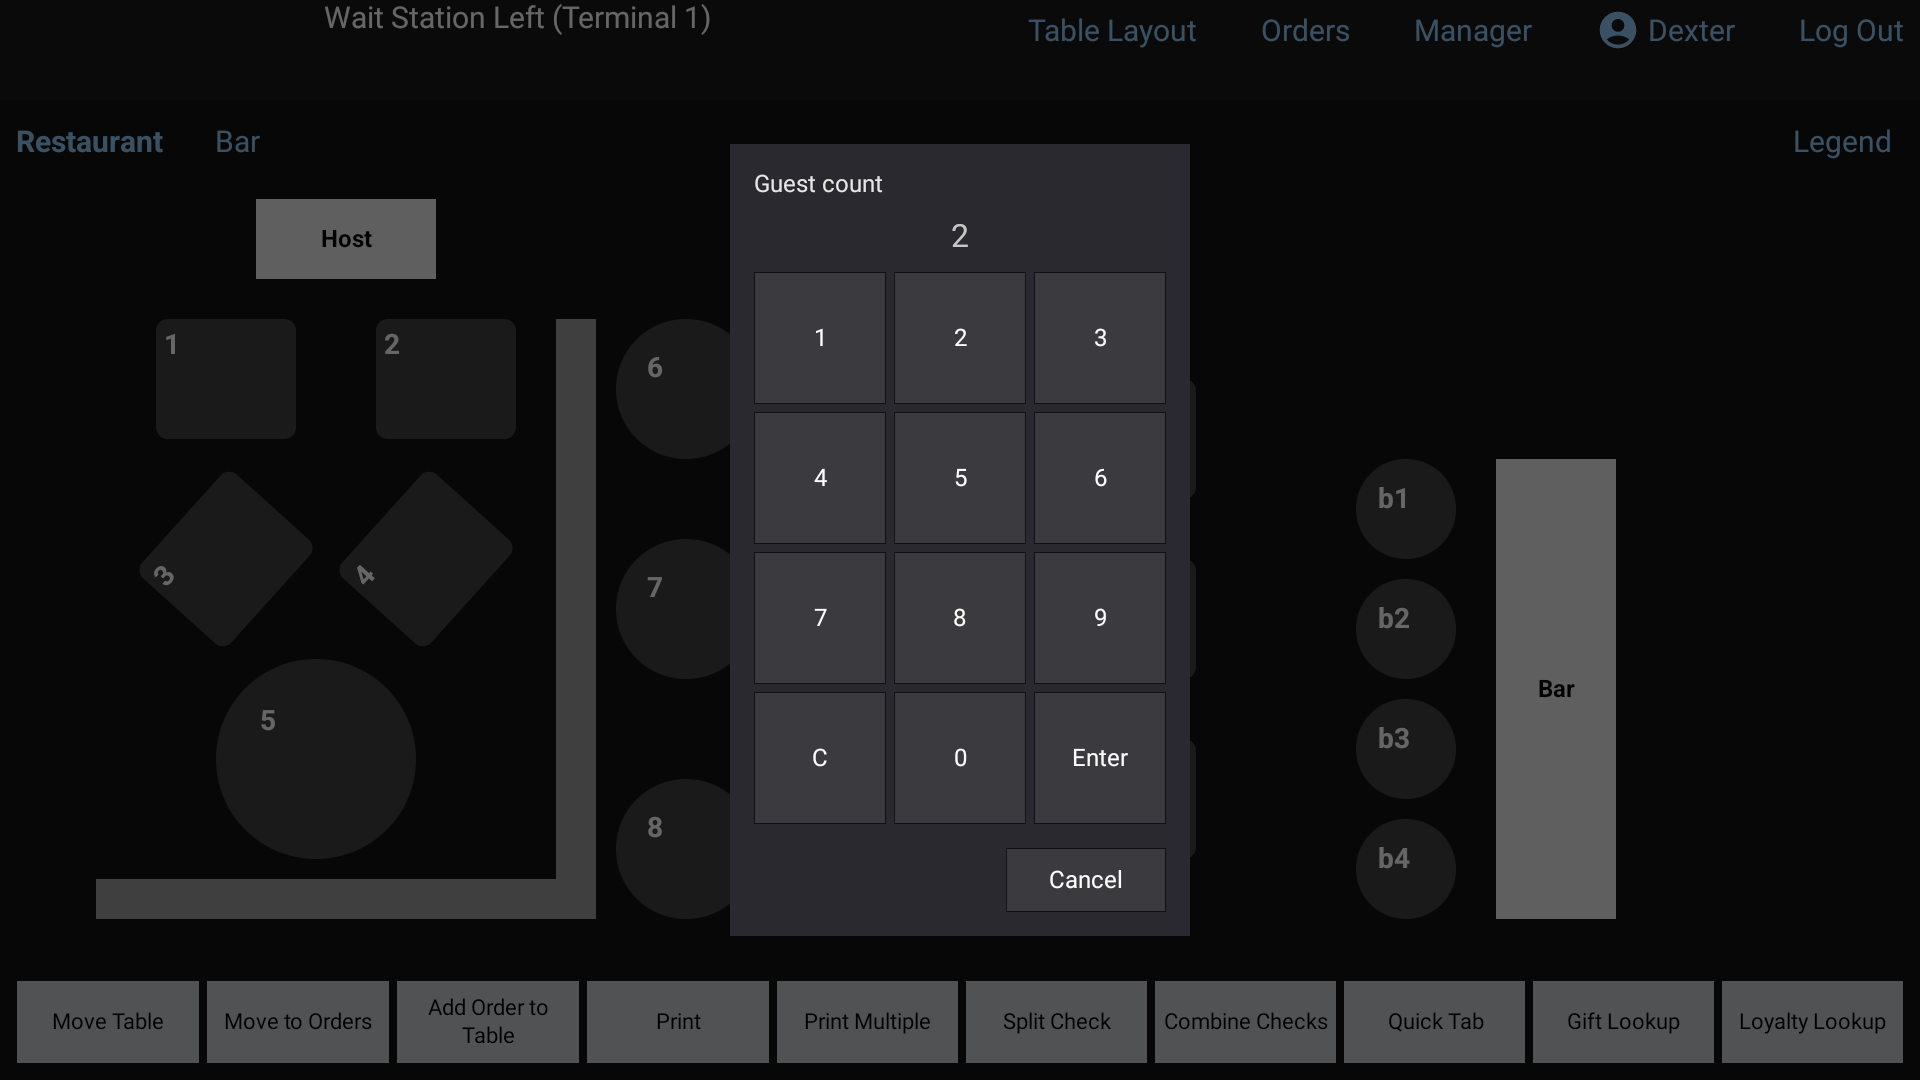 The Guest count pad over the Table Layout: type the number of guests, then tap Enter
The order screen opens with one seat for each guest.
See The floor plan.
#From an Order Type tab (ToGo, Delivery, Bar...)
- Tap Orders at the top of the screen.
- Tap the tab for the order type, for example ToGo.
- Tap the blue + Add Order square.
If you tap + Add Order on All Orders, RealPOS asks you to Select an Order Type first. On the Dine In tab, it takes you back to the Table Layout to pick a table. See Order types.
#From Quick Tab
On a Quick Tab screen, tap + Add Order in the bottom bar. See Quick Tab.
#Find your way around the order screen
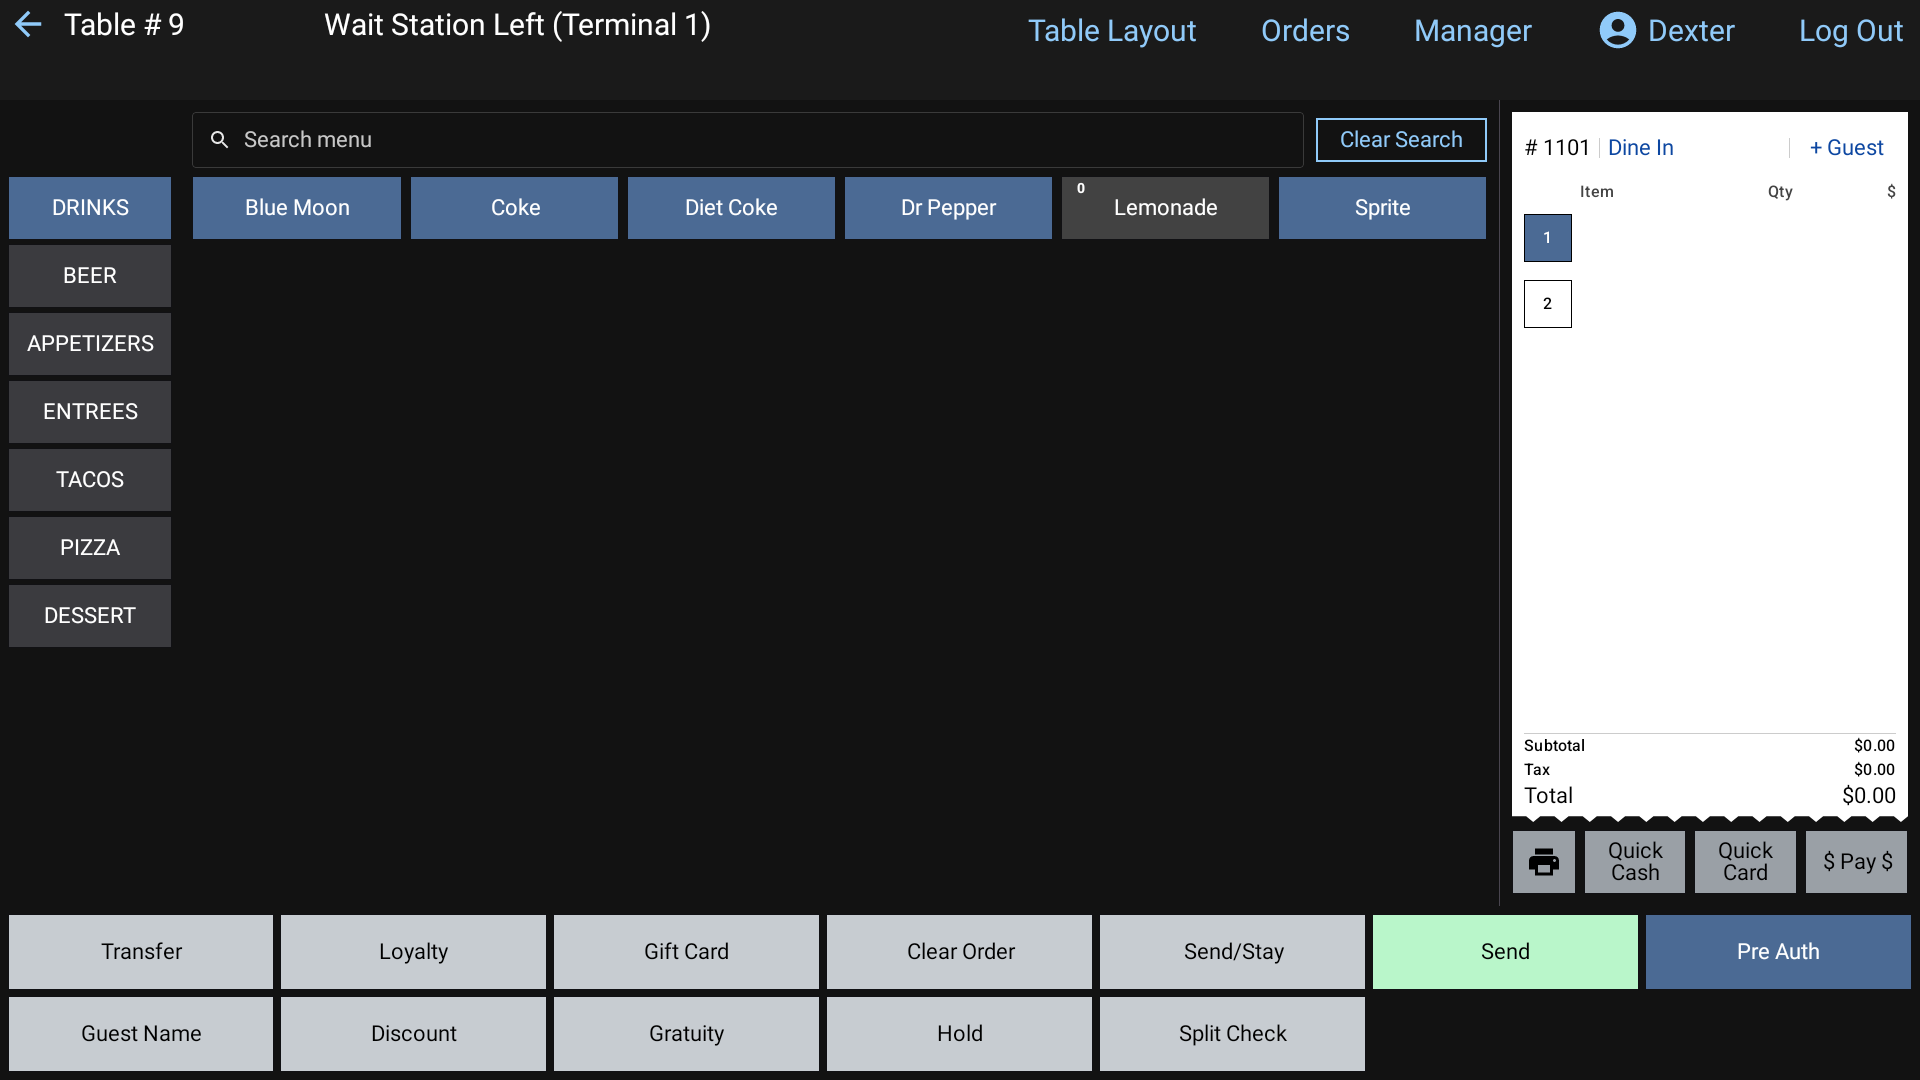 The order screen: departments on the left, items in the middle, the ticket on the right
- Departments run down the left side. Tap one to see its items.
- Items fill the middle. Tap an item to add it to the ticket. Use Search menu above the items to find one by name or barcode, and Clear Search to go back.
- The ticket is on the right. At the top it shows the order number, the order type (tap it to change it), the guest name, and + Guest to add a seat.
- Totals sit at the bottom of the ticket: Subtotal, Tax and Total, plus any discounts, surcharge or gratuity.
- Pay buttons are under the ticket: a printer icon to print the check, then Quick Cash, Quick Card and $ Pay $. See Take a payment.
- Function buttons run along the bottom: Transfer, Loyalty, Gift Card, Clear Order, Send/Stay, Send, Void Order, Guest Name, Discount, Gratuity, Hold and Split Check.
Tap an item on the ticket to select it, and the bottom row changes to item buttons, like Quantity, Void Item and Change Price. Tap Done to go back. See Add items and modifiers.
#Add a guest name
Tap Guest Name, type the name on the keyboard and tap Enter. The name shows on the ticket, on the order's square, and on the kitchen screen.
#Good to know
- "(name) has this order open on (terminal)". Only one terminal can have an order open at a time. Tap OK and try again once they've closed it.
- Second order on a table. To start a separate ticket on a table that already has one, use Add Order to Table on the Table Layout screen, then tap the table.
- Pre Auth. If your restaurant uses card pre-authorization, there's a Pre Auth button in the order. On an Orders tab you can also press and hold + Add Order (it says (Hold for Pre Auth)) to start an order on a card. See Card payments.
Order types (Dine In, ToGo and more)
Use the Orders screen's tabs for each order type, change an order's type, and handle pickup orders.
Every order has an order type, like Dine In, ToGo or Delivery. Your manager chooses which types your restaurant uses. Dine In orders usually sit on a table. The others live on their own tabs on the Orders screen.
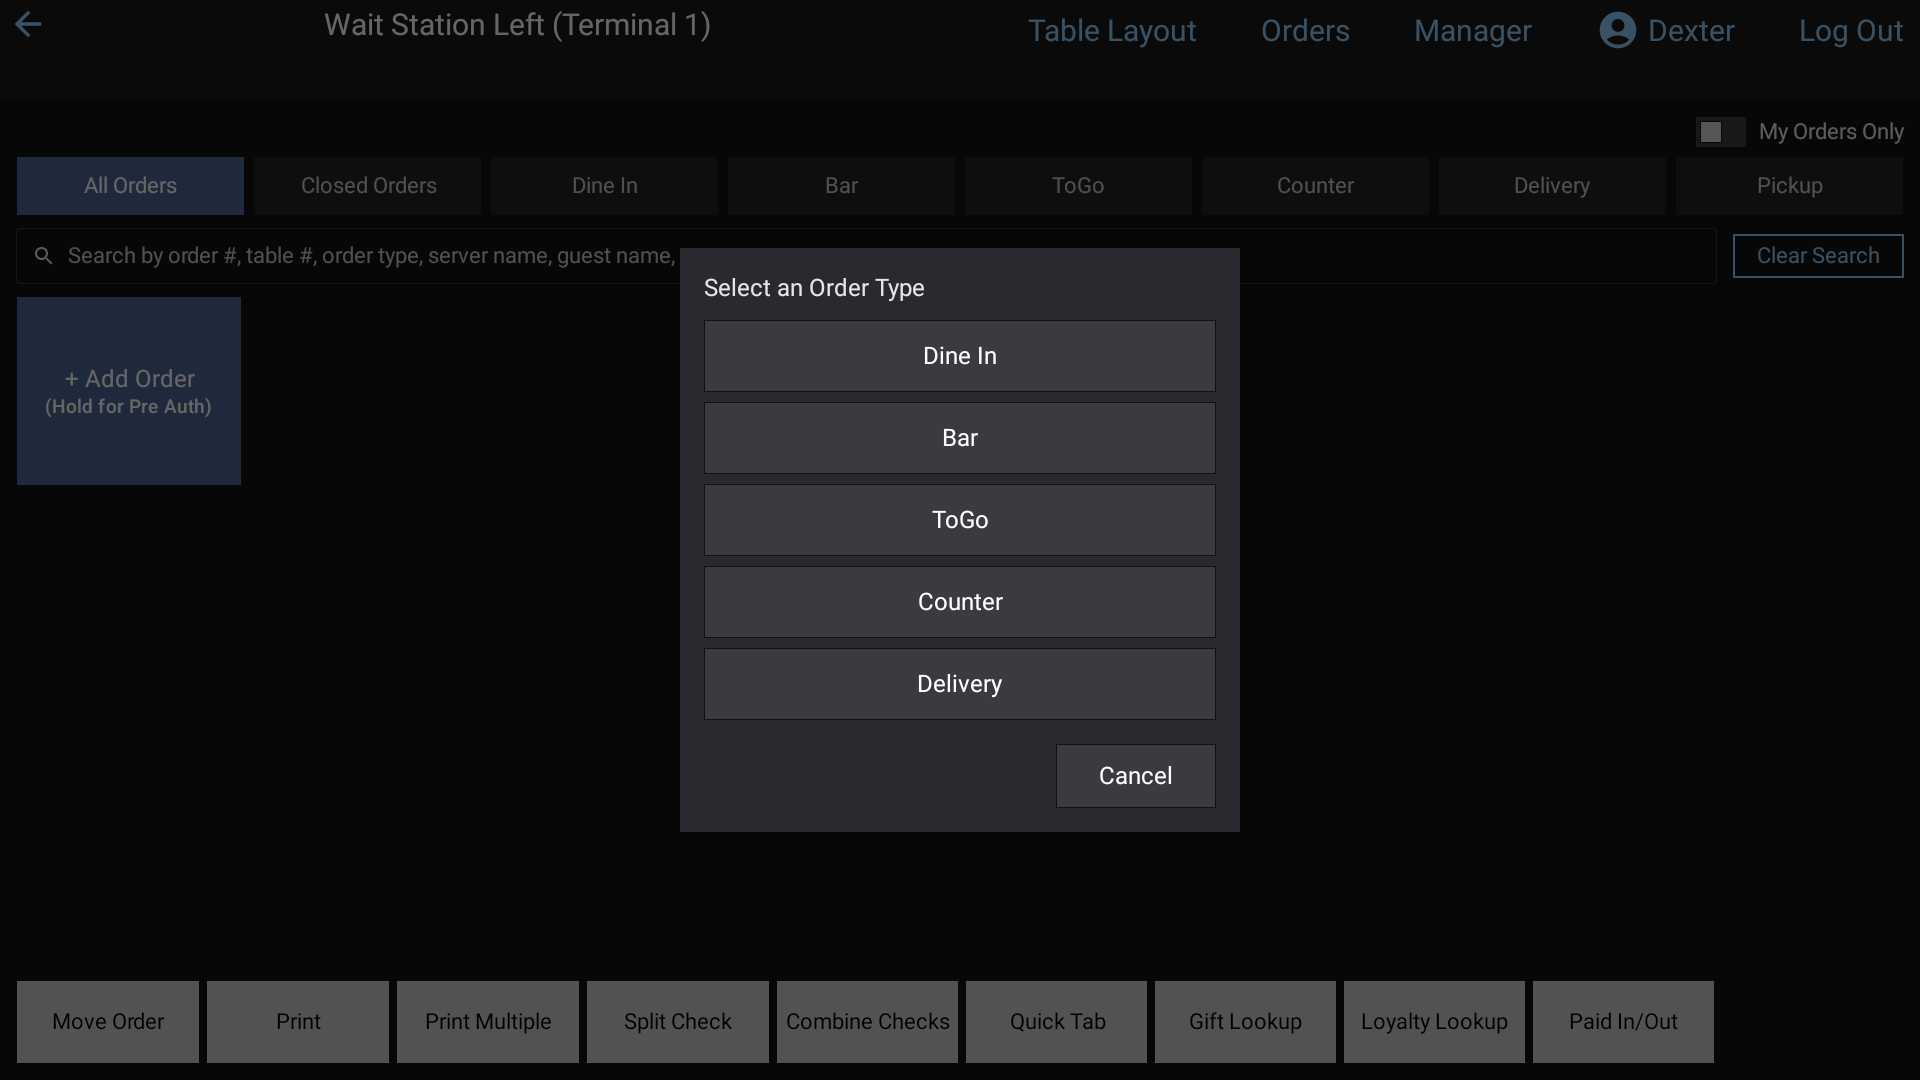 The Orders screen with a tab for each order type
#The Orders screen tabs
Tap Orders at the top of the screen. Along the top you'll see:
- All Orders: every open order you can see
- Closed Orders: today's paid and voided checks. See Find an order, or reopen a check
- one tab for each order type
- Pickup, at the far right, if your restaurant uses pickup orders
Each open order is a square showing its order number, its table or type, the server, the guest name, when it was opened (Open:) and the total. Tap a square to open the order. Press and hold one for about a second to peek at the ticket.
A thick yellow border means the order has been split.
#Start an order of a type
- Tap the order type's tab.
- Tap + Add Order.
The new order is tagged with that type. When you Send or pay, you come back to the same tab.
#Change an order's type
- In the order, tap the order type at the top of the ticket (it's blue, next to the order number).
- The Order type list opens, with the current one marked (current).
- Tap the new type.
#Orders that need a guest name
Some order types need a guest name, for example ToGo. When you tap Send, print the check or pay, a Guest Name Required keyboard opens if the order doesn't have one yet. Type the name and tap Enter. RealPOS then carries on with what you were doing.
Adding a loyalty member to the order counts as a name.
#Pickup orders
Your manager can set some order types to show on the sign-in screen until the guest picks them up.
- On the sign-in screen, these orders are listed by type, guest name and a timer since the order was sent. A paid order waiting for pickup shows a purple timer.
- On the Pickup tab of the Orders screen, open orders are orange squares and paid orders waiting for the guest are purple.
When the guest picks up a paid order:
- Go to Orders > Pickup.
- Tap the purple Pickup button at the bottom left.
- Tap the guest's purple square. It's cleared from the board.
Shortcut from the sign-in screen: press and hold the pickup list. Enter PIN for Pickup opens. Type your PIN and you go straight to the Pickup tab.
On the Pickup tab, tapping an open square takes you straight to its payment screen.
#Good to know
- Your terminal's default order type decides where you land when you sign in. A manager sets it.
- If an order type is set to print in red, its name shows in red on the order squares and on the kitchen screen.
- Staff who aren't managers see only their own orders on these tabs. Managers and staff with "See All Staff Orders" see everyone's, and can switch on My Orders Only.
Quick Tab
Run a bar or counter fast with Quick Tab, a full-screen grid of one order type's open orders.
Quick Tab shows all the open orders of one order type as big tiles. You can see a lot at a glance. It's made for a busy bar or counter. Some terminals open on Quick Tab as soon as you sign in.
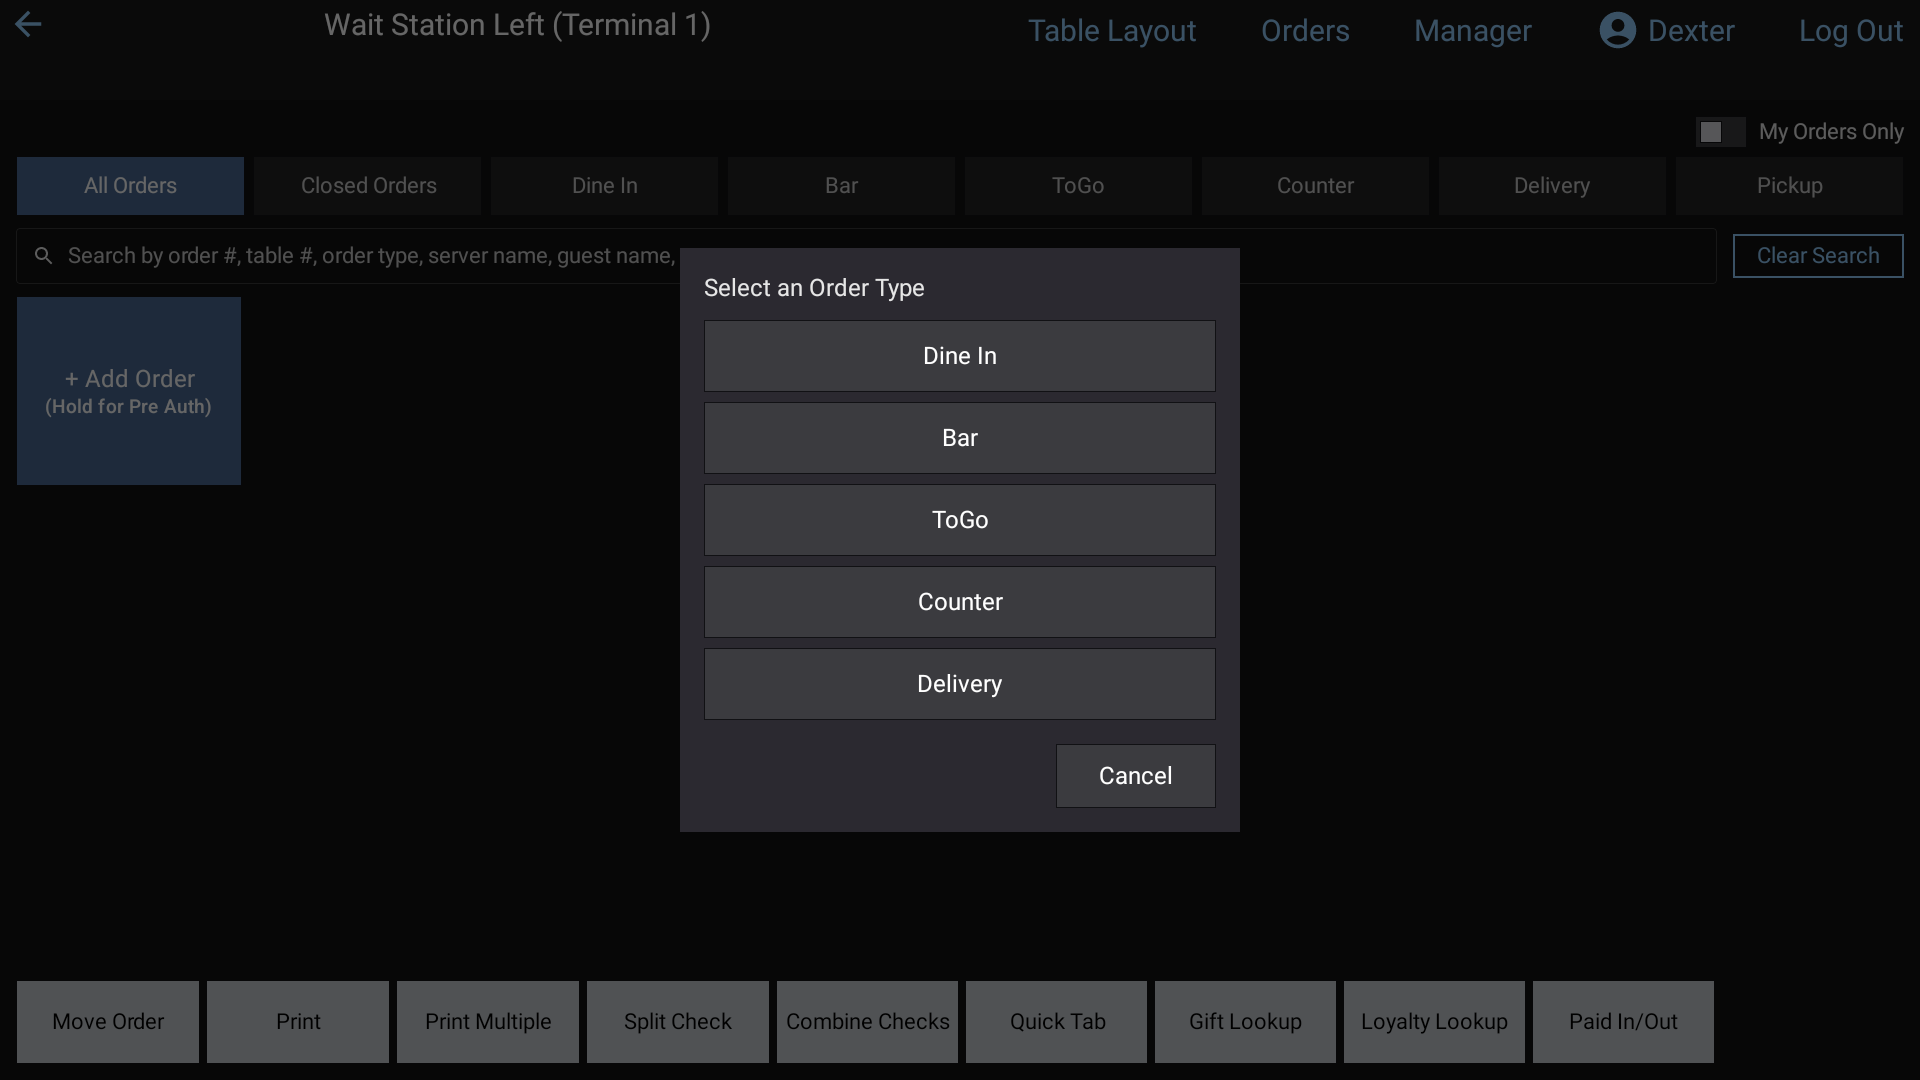 A Quick Tab screen
#Open Quick Tab
- From the Table Layout: tap Quick Tab at the bottom, then pick the order type.
- From Orders: on an order type's tab, tap Quick Tab at the bottom. On All Orders it asks which type first.
The heading tells you which type you're looking at, for example Bar — Quick Tab.
#Use it
- Open an order: tap its tile.
- Peek at an order: press and hold a tile for about a second.
- Start a new order: tap the blue + Add Order button at the bottom. On Quick Tab, even Dine In orders start without a table.
- Find an order: tap the search box and type an order number, table, server, guest name or payment type. Clear Search shows them all again.
When there are more tiles than fit on the screen, swipe to the next page.
After you Send or pay an order you opened here, you come back to this Quick Tab.
#The bottom buttons
| Button | What it does |
|---|---|
| Close | Leave Quick Tab for this type's tab on the Orders screen |
| + Add Order | Start a new order of this type |
| Move to Orders | Tap an order, then pick a different order type for it |
| Move to Layout | Tap an order, then tap a table on the Table Layout to seat it there. It keeps its order type |
| Print / Print Multiple | Print one check, or tap several and then Complete |
| Split Check / Combine Checks | See Split a check |
| Gift Lookup / Loyalty Lookup | Look up a gift card or a loyalty member |
#Good to know
- Quick Tab only shows orders that aren't on a table. Once you move an order to a table, it leaves this screen.
- Managers and staff with "See All Staff Orders" get a My Orders Only switch at the top right. Everyone else sees only their own orders.
- If your restaurant uses Pre Auth, press and hold + Add Order to open the new order on a card. See Card payments.
Add items and modifiers
Ring in items, pick their modifiers, and change the quantity, remove or copy an item on the ticket.
#Add an item
- Tap a department on the left.
- Tap the item. It's added to the ticket for the seat that's currently selected. A message like Added Cheeseburger flashes on the screen.
Searching instead: tap Search menu, type part of the name (or scan the barcode), then tap the item or Done. Clear Search puts the full menu back.
An item button with a small orange number in the corner has that many left. A dark gray button is out of stock and can't be rung in.
#Pick modifiers
Some items have modifier choices, like a temperature or a side. When you tap one of these, the menu turns into the choice screen. The ticket stays on the right.
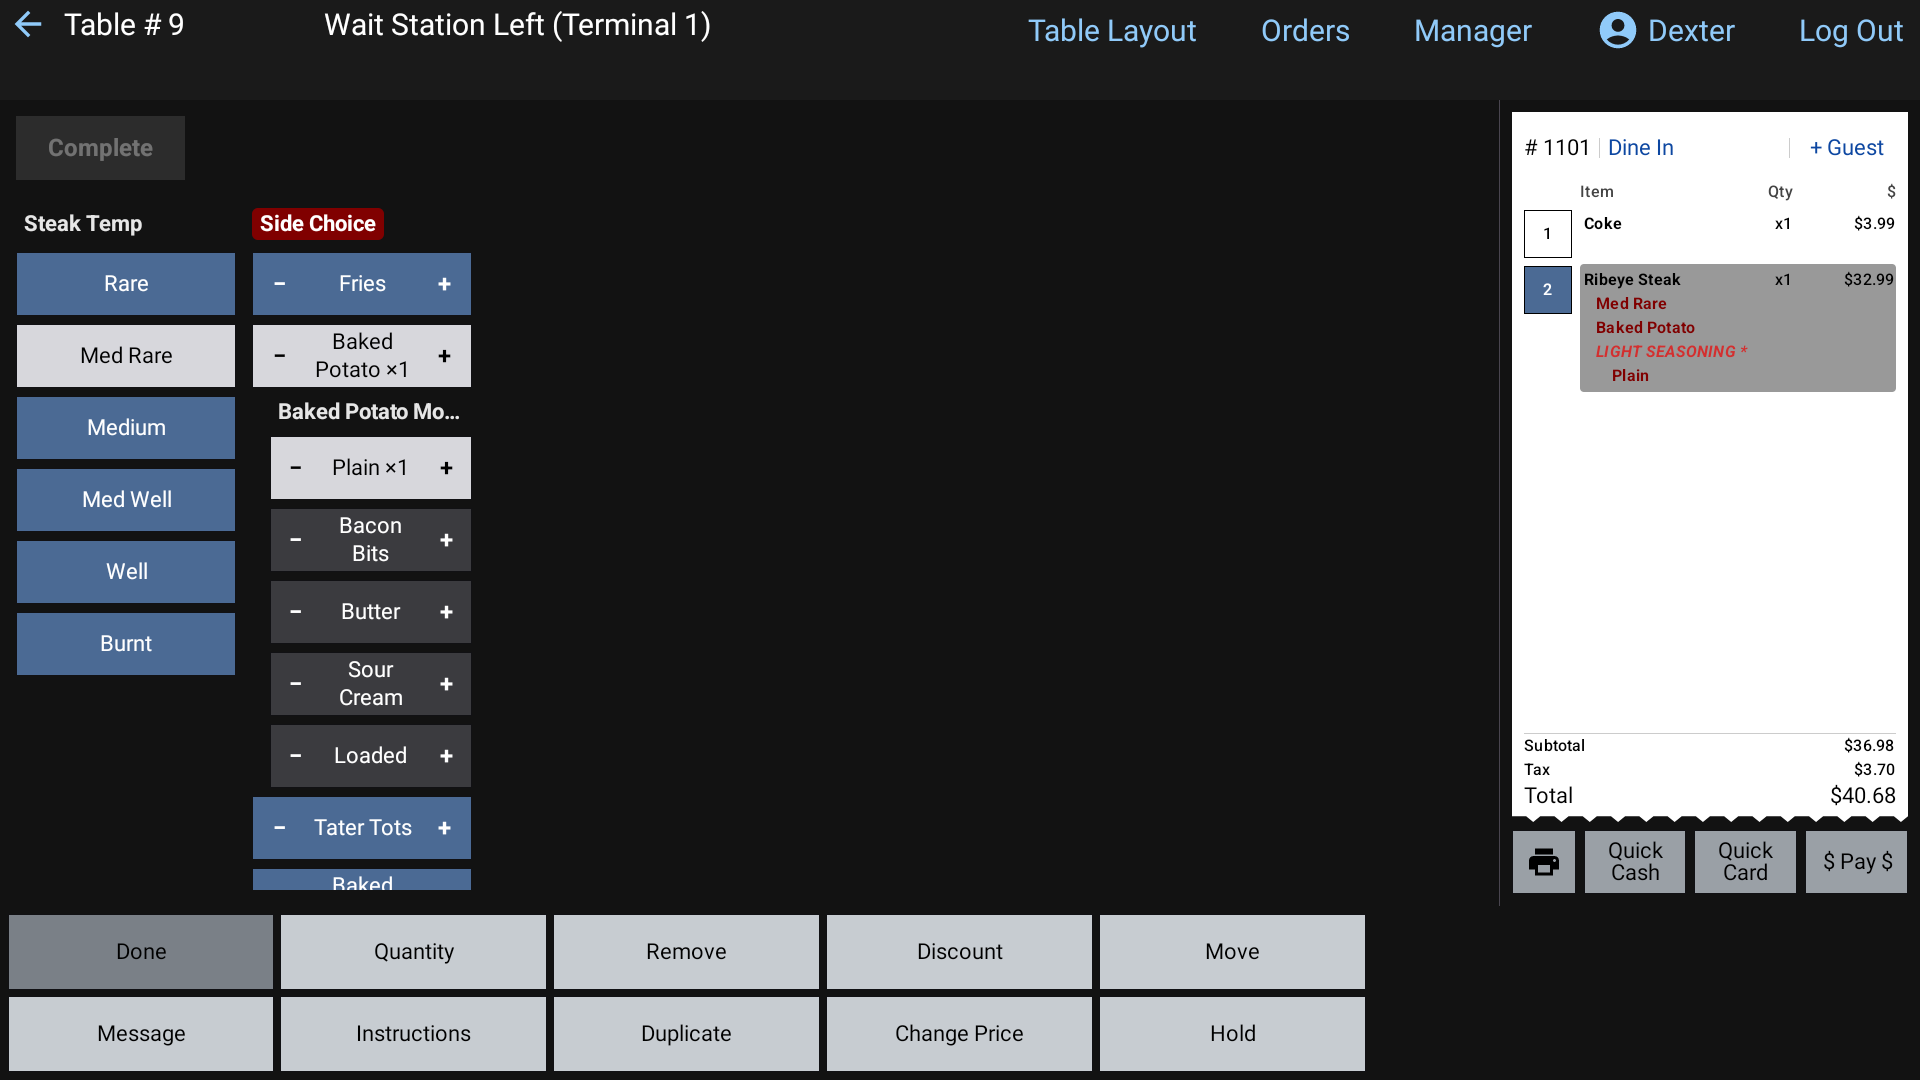 Picking modifiers, with the orange Complete button at the top left
- Each group of choices has its own column, with its name on top.
- Tap a choice to pick it. Tap it again to take it off. Picked choices are highlighted.
- A group name in a dark red box is required. Pick what it needs. Once that's done, the box goes away.
- When a group lets you pick the same thing more than once, its button has − and + halves. Tap the right half to add one more and the left half to take one off. The count shows as ×2, ×3.
- Some choices open more choices under them. A picked choice turns red until its own required choices are made.
- Tap the orange Complete button at the top left when you're done.
Complete stays grayed out until every required group is filled. The choices go onto the ticket as you tap them, so you can watch it build up.
To change an item's modifiers later, tap the item on the ticket. You can only do this before it's sent to the kitchen.
#Items that ask for a price or a weight
- Open price items pop up a price pad first. Type the price and tap Enter. The .00 key adds whole dollars.
- Sold by weight items pop up a weight pad, for example Salmon x Lb. Type the weight and tap Enter. The price is worked out from the weight.
#Change, remove or copy an item
Tap an item on the ticket to select it (tap more items to select several). The bottom buttons change to item buttons:
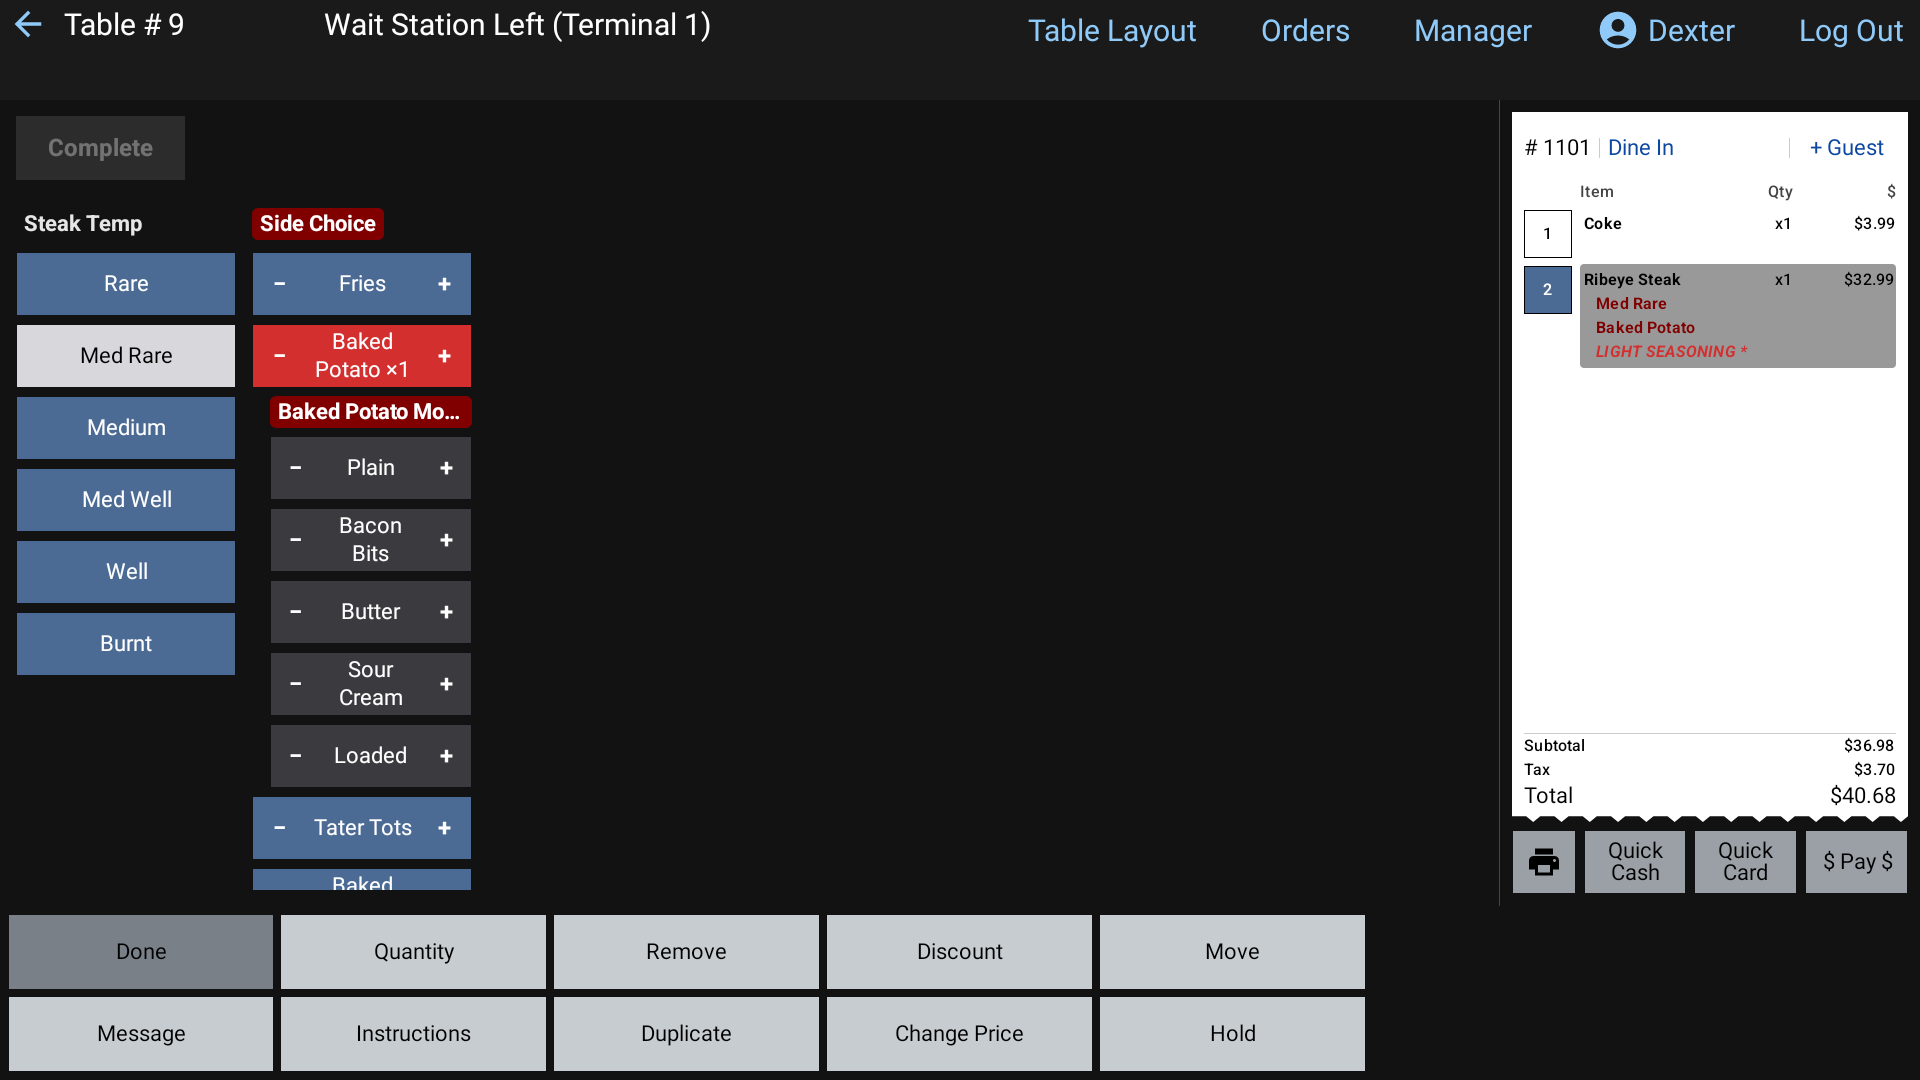 The item buttons after selecting a line on the ticket
| Button | What it does |
|---|---|
| Done | Unselect and go back to the order buttons |
| Quantity | Type a new quantity (only before it's sent) |
| Remove | Take an item off the ticket before it's sent |
| Discount | Discount the selected item(s). See Apply a discount |
| Split Item | Share one item across several guests (after it's sent) |
| Move | Move the item(s) to another seat. See Seats |
| Message / Instructions | Add a note for the kitchen. See Special instructions |
| Duplicate | Add a copy of the item, then pick a seat for the copy |
| Void Item | Take off an item that's already been sent. See Void an item |
| Change Price | Change this item's price on this ticket only. See Change an item's price |
| Hold / Fire | Hold items back from the kitchen, or release them. See Send to the kitchen |
Only the buttons that make sense for what you selected show up.
#How to read the ticket
- Bold items haven't been sent to the kitchen yet.
- Italic items have been sent. They show Sent and the time underneath.
- Modifiers show in dark red under their item. Their prices are in the price column.
- Messages and instructions show in red, with a
*. - An item on hold is blue, with a
*.
#Good to know
- Clear Order removes every item that hasn't been sent yet. It asks Clear order? first. You may need a manager's PIN.
- Split Item asks How many guests are splitting this item? It only works on a single item that's been sent.
Special instructions and messages
Tell the kitchen how to make an item with a typed message or a ready-made instruction.
There are two ways to add a note to an item for the kitchen:
- Instructions are ready-made notes your manager set up, like No Onions or Allergy. They're quick to tap.
- Message lets you type anything you want.
Both show in red on the ticket and on the kitchen screen, with a * after them.
Add them before you send the item. Once an item has been sent, these buttons go away.
#Add an instruction
- Tap the item on the ticket to select it. Select just one item.
- Tap Instructions.
- Tap the instruction you want. It's added and the list closes.
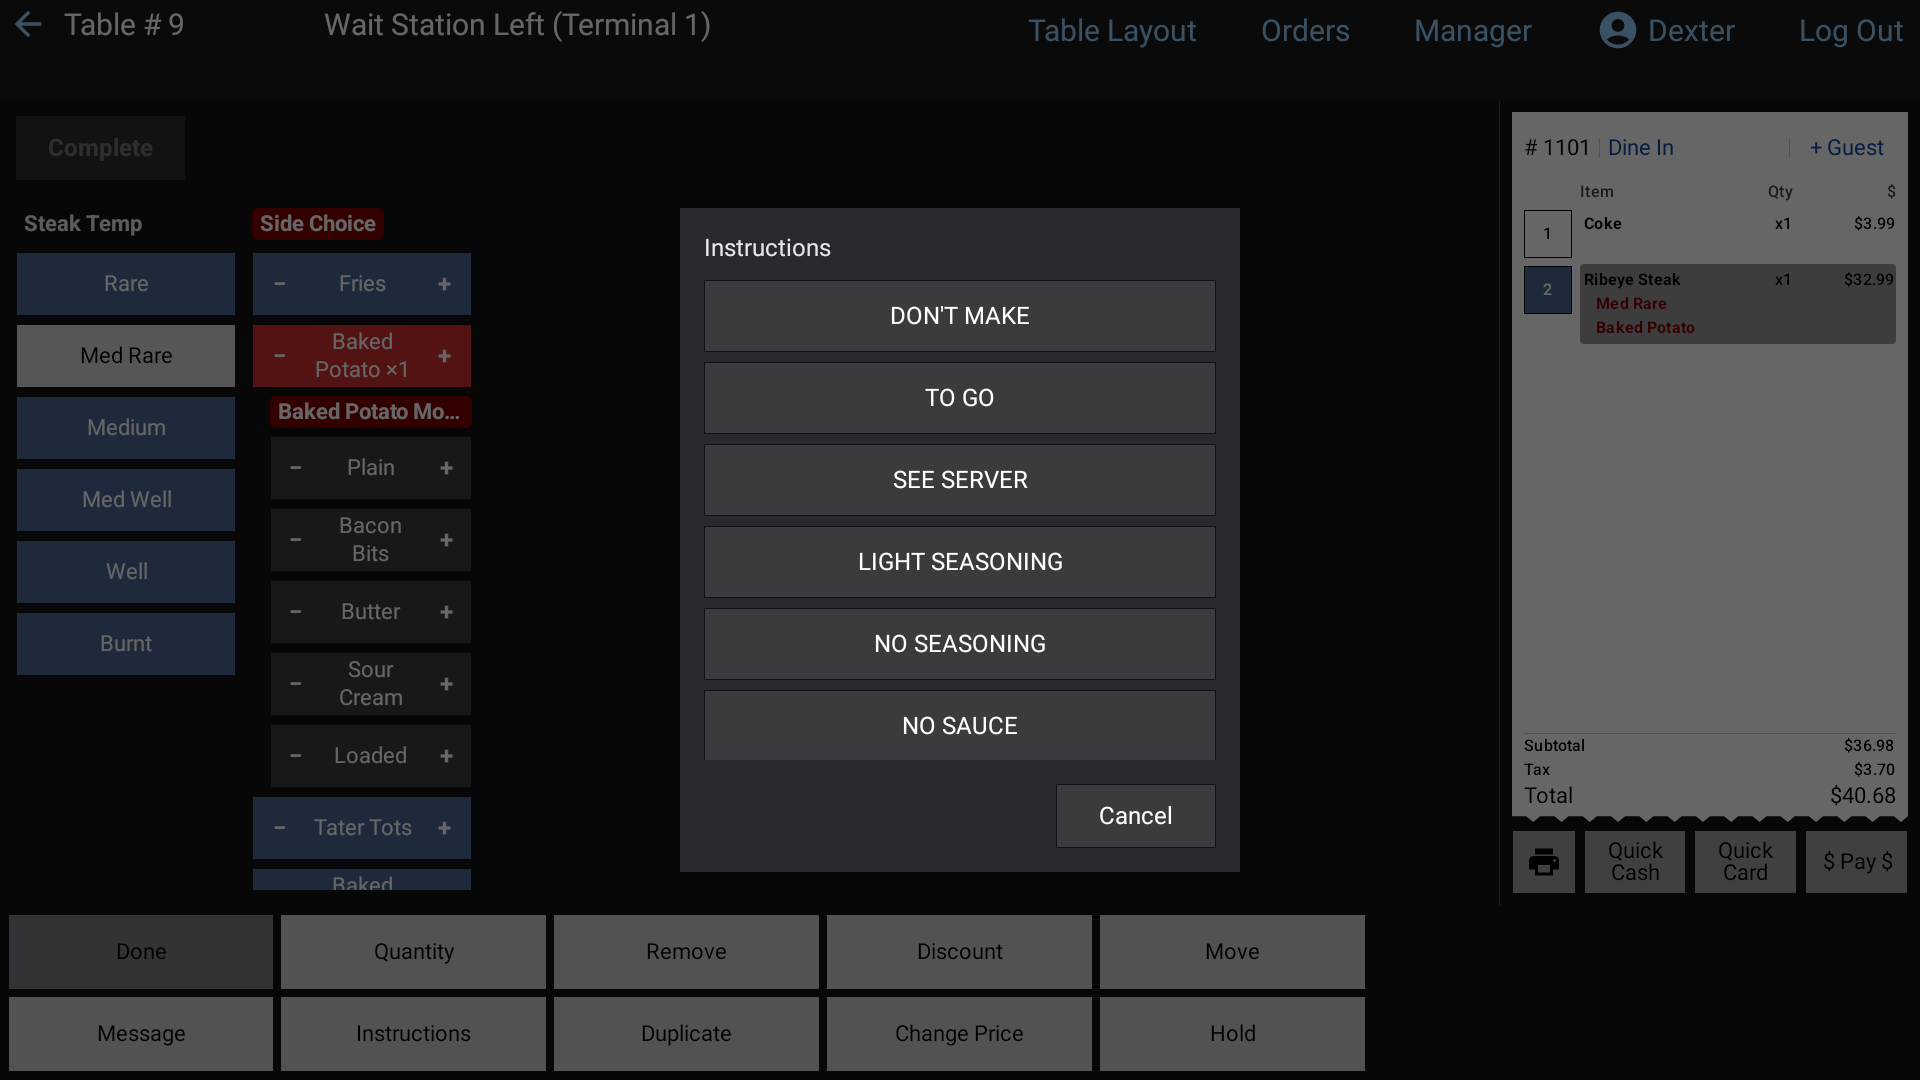 The Instructions list
To add the same instruction twice, open Instructions again and tap the + beside it. To take one off, tap the trash can beside it.
If the list says No instructions configured., your manager hasn't set any up yet. Use Message instead.
#Type a message
- Tap the item on the ticket to select it.
- Tap Message.
- Type the note on the keyboard, up to 60 characters.
- Tap Enter.
Messages already on the item are listed on the left of the keyboard:
- Tap one to load it into the box and change it. Then tap Enter.
- Tap its trash can to remove it.
#Good to know
- Sent items can't get new messages or instructions. If you forgot one, tell the kitchen another way.
- Modifiers that change the item itself, like a side or temperature, are picked when you ring the item in. See Add items and modifiers.
Seats
Ring items in by seat, add or remove seats, move items between seats, and give one seat its own name, discount or loyalty member.
Ringing items in by seat helps food go to the right guest. It also makes splitting the check by seat easy later.
When you open a table, you get one seat for each guest you typed in. Seat squares run down the left side of the ticket.
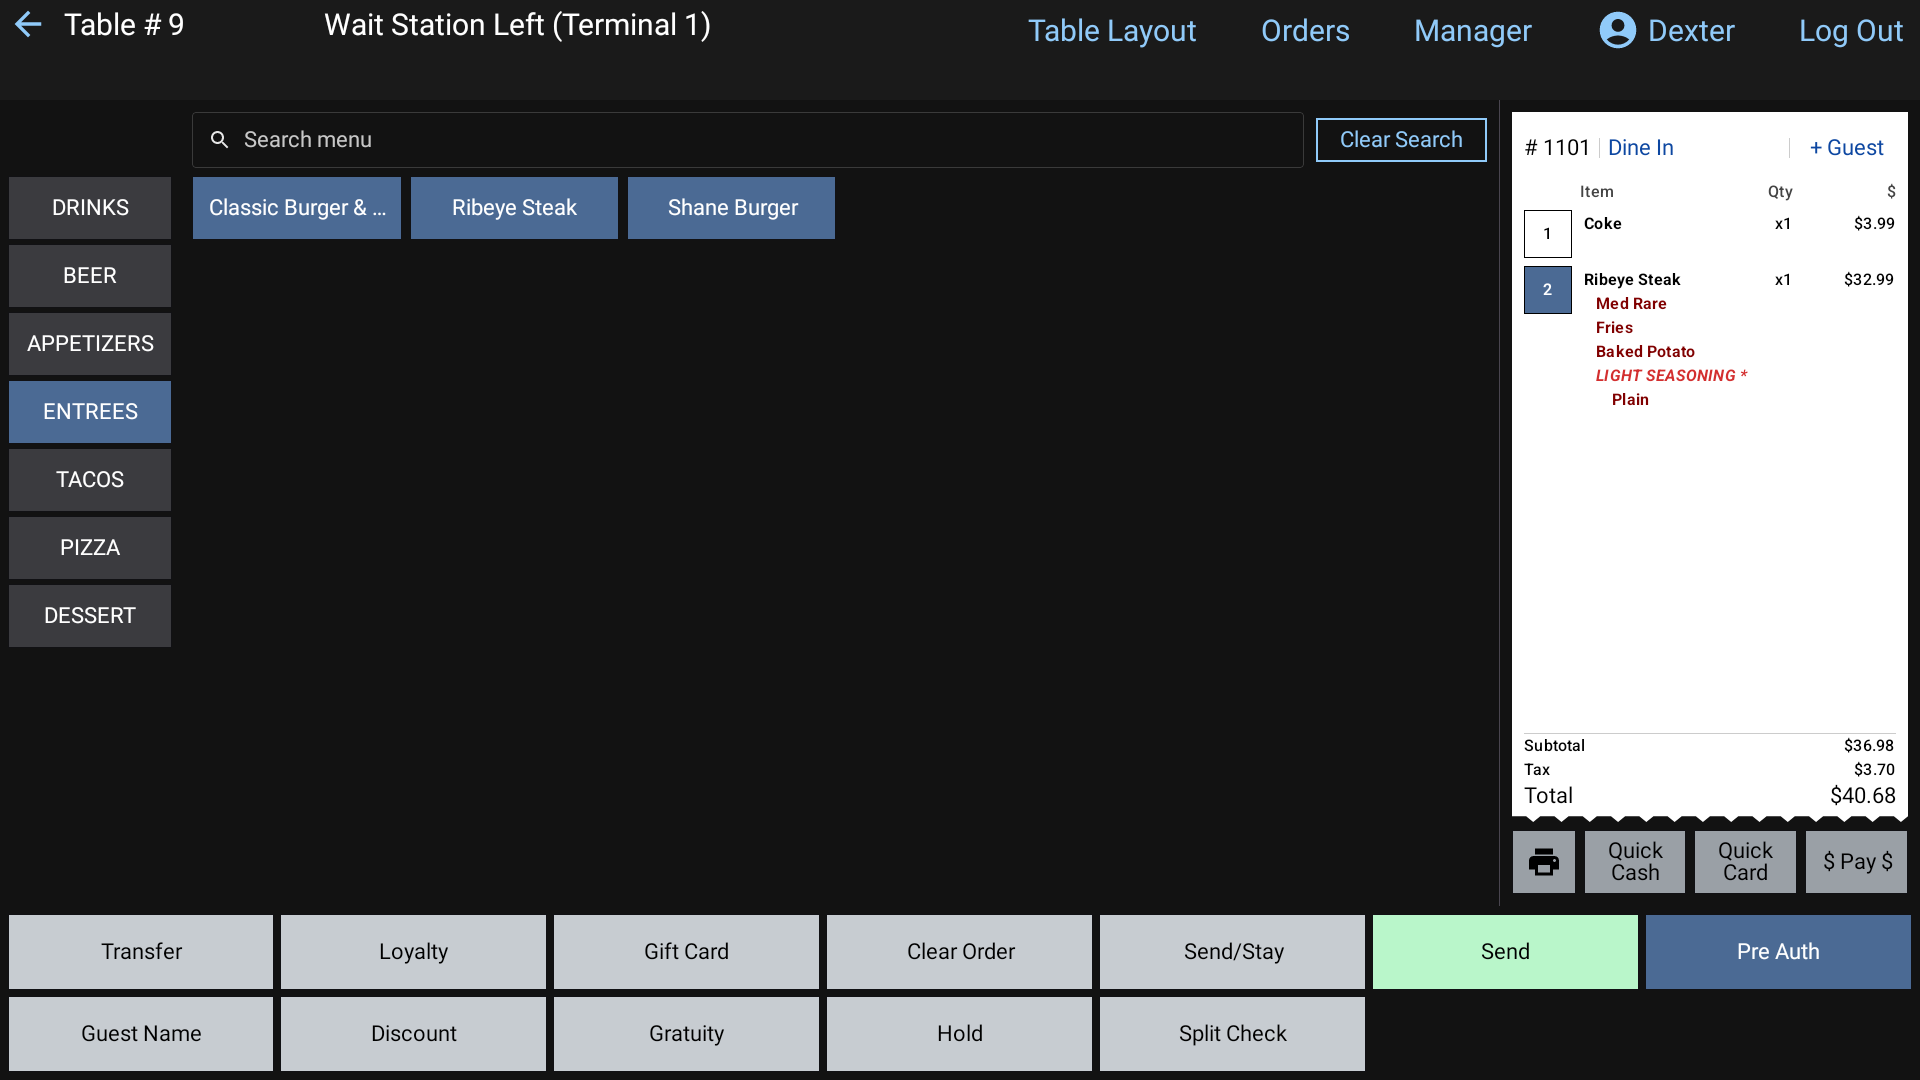 Seat squares down the side of the ticket
#Ring items in for a seat
- Tap a seat's square. It lights up as the active seat.
- Tap items. They go on that seat until you pick another one.
#Add a seat
Tap + Guest at the top right of the ticket.
#Move items to another seat
- Tap the item(s) on the ticket.
- Tap Move.
- In Move to seat, tap the seat number. Tap + Guest to add a new seat first, if you need one.
#Seat options
Press and hold a seat's square. A menu opens for that seat:
- Discount: discount every item on this seat. See Apply a discount
- Loyalty: add a loyalty member to just this seat
- Guest Name: name this seat's guest. The name shows beside the seat and on the kitchen screen
- Remove Seat: take an empty seat off the ticket. The seats after it move down one. This only shows for an empty seat, and never for the last seat
#Good to know
- Items with no seat go on seat 1.
- Duplicate copies an item and then asks which seat the copy goes on.
- To give each seat its own check, use Split by Seat on the Split Check screen. See Split a check.
Send to the kitchen
Send new items to the kitchen, stay in the order or leave it, and hold items to fire later.
Nothing reaches the kitchen until you send it. Items you haven't sent are bold on the ticket. Once they're sent they turn italic and show Sent with the time.
 A ticket after sending, with sent items in italics
#Send
- Send (green) sends every new item and takes you out of the order. You go back to the Table Layout, or to the Orders tab or Quick Tab you came from.
- Send/Stay sends every new item and keeps the order open, so you can keep ringing in. A message tells you how many items went, for example Sent 3 items to kitchen.
Items that were already sent are never sent twice.
#Things that send for you
These also send any new items first:
- printing the check (the printer icon under the ticket)
- Quick Cash, Quick Card and $ Pay $
#Hold items to fire later
Use Hold to keep items back, like entrées while the table finishes appetizers.
Hold everything new on the order:
- Tap Hold in the bottom row.
- Hold items asks for minutes. It starts at 5. Type a new number if you want.
- Tap Hold.
Hold just some items: select them on the ticket first, then tap Hold in the item buttons.
Held items show in blue with a *. When the minutes run out, they fire to the kitchen by themselves.
Fire held items early:
- Tap Fire in the bottom row. It asks Fire held items? Tap Yes. Or select some held items and tap Fire in the item buttons.
- You'll see Released from Hold. Then tap Send or Send/Stay to send them to the kitchen.
#Leaving an order without sending
If you tap the back arrow, or go to another screen, while the order has items you haven't sent, RealPOS asks Cancel order? Are you sure you wish to cancel?
- Yes throws away the items you didn't send. Anything already sent stays, and so do held items.
- No keeps you in the order.
An order that's empty, or fully sent, just closes with no question.
#Good to know
- Hold may need a manager's PIN, depending on your job.
- If a kitchen printer or screen can't be reached when you send, a red message shows at the top of the screen. Tell a manager or the kitchen.
- To take back an item that's already been sent, use Void an item.
Void an item or an order
Take items off a ticket after they've been sent, or void a whole order, with a reason.
Remove or void?
- An item you haven't sent yet: select it and tap Remove. No reason needed.
- An item that has been sent (or is on hold): use Void Item. Every void needs a reason, and it shows up on the manager's void report.
#Void an item
- Tap the item(s) on the ticket to select them.
- Tap Void Item.
- Select a reason: tap the reason that fits.
- If your job is allowed to void, the item comes off straight away.
- If not, a box says An override is required to perform this function. A manager types their 4-digit PIN and the void goes through.
The voided item comes off the ticket and the totals update.
#Void a whole order
- In the order, tap Void Order. It only shows once something on the order has been sent or held.
- Pick a reason.
- If you need an override, a manager enters their PIN.
- The order is voided and you go back to the Table Layout (or the tab you came from).
"Payment exists": you can't void an order that has a payment on it. Tap OK to go to the payment screen, remove the payment there, then void the order. See Take a payment.
#Good to know
- Some reasons show (Track Inventory) after their name. That's how your manager set them up. Just pick the reason that fits.
- If the reason list says No void reasons are set up yet, a manager needs to add some. Managers can read Void reasons.
- Voided orders show on Orders > Closed Orders when Show Voids Only is switched on.
Apply a discount
Take money off a whole order, one seat, or selected items, with a named discount or a typed percent or dollar amount.
You can discount a whole order, one seat, or just certain items. Each way opens the same discount window.
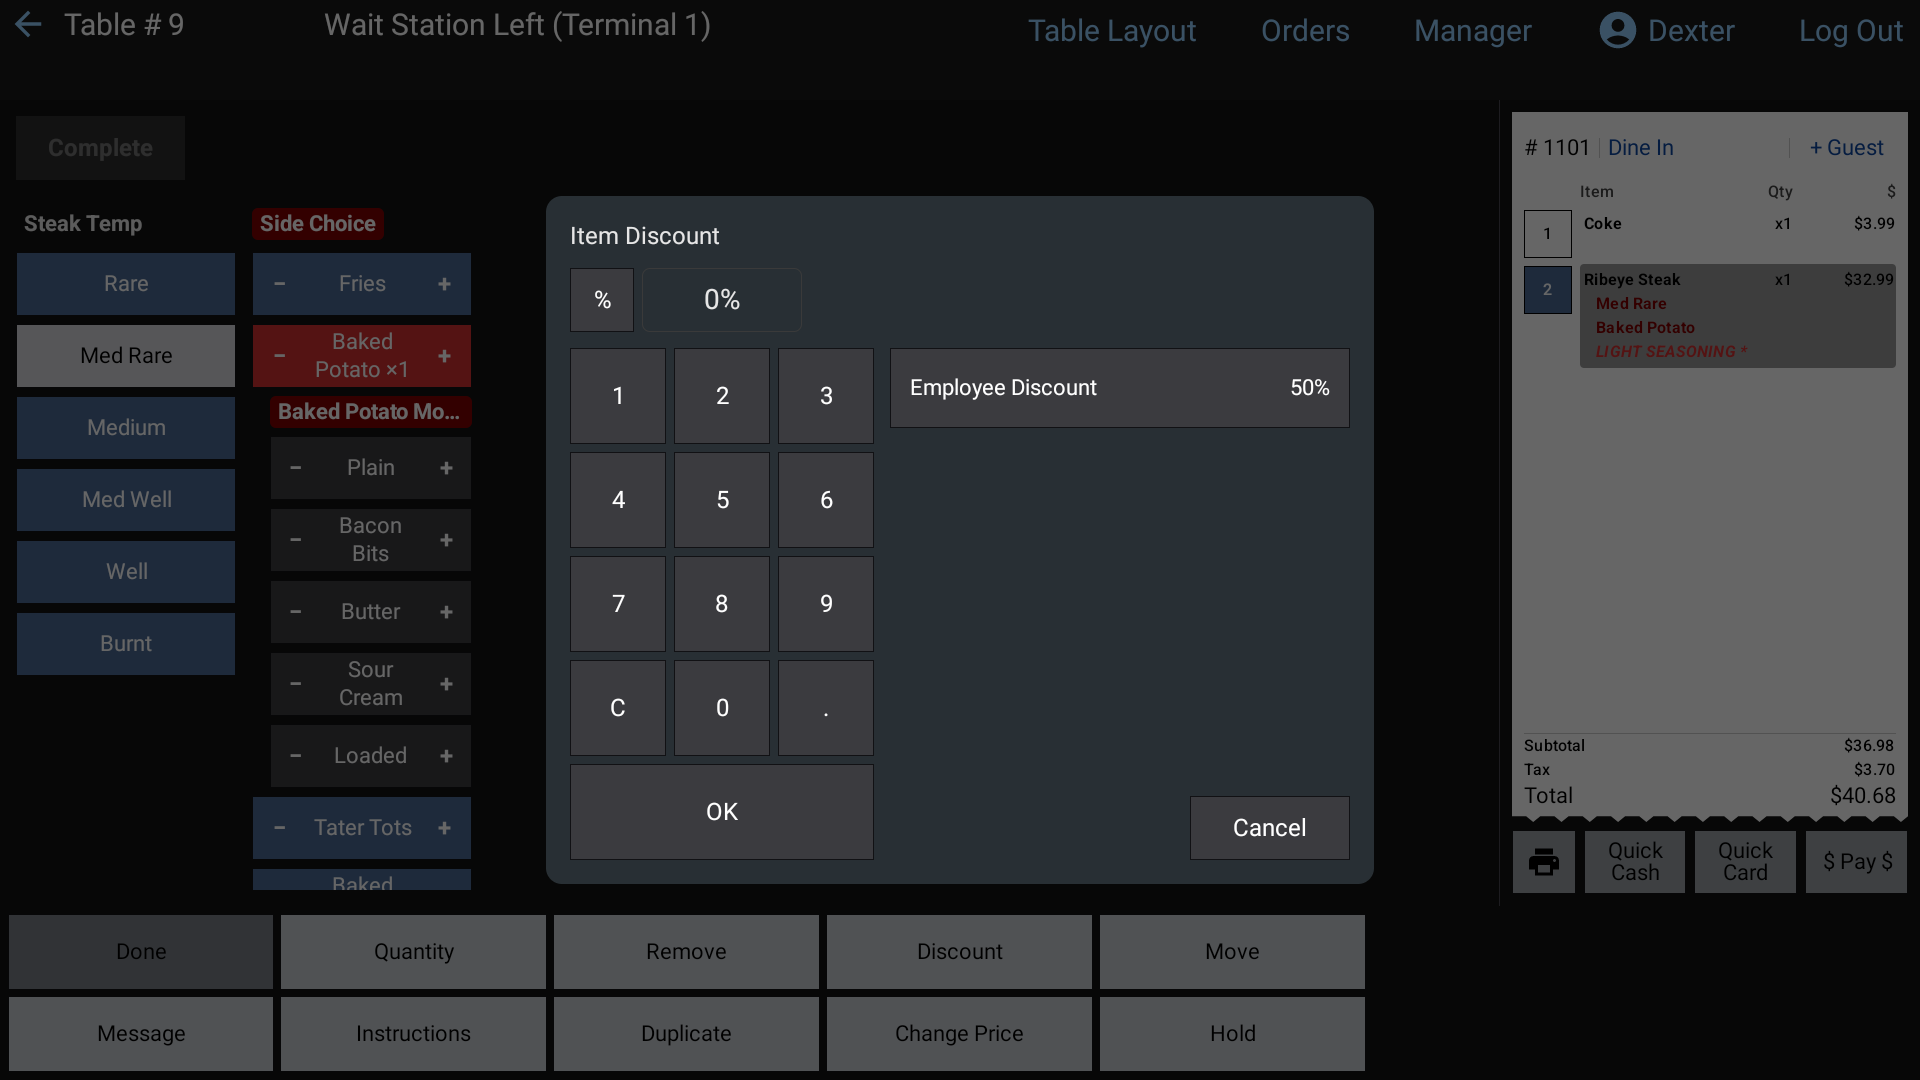 The discount window: percent or dollar pad on the left, named discounts on the right
#Discount the whole order
- In the order, with nothing selected on the ticket, tap Discount in the bottom row.
- Pick a discount (see below).
The discount shows in green under the items, and in Discounts in the totals.
#Discount some items
- Tap the item(s) on the ticket to select them.
- Tap Discount in the item buttons. The window is called Item Discount.
- Pick a discount.
The discount shows in green under each item.
#Discount one seat
Press and hold the seat's square on the ticket, then tap Discount. Every item on that seat is selected for you. See Seats.
#Pick a discount
Named discounts are the blue buttons on the right. Each shows its name and its amount. Tap one and it's applied.
Typing your own (if your restaurant allows it):
- The square button beside the amount box picks % or $. Tap it to switch.
- Type the amount. Use . for cents or a part of a percent.
- Tap OK.
To take a discount off: open the same window again and tap Remove.
#When a manager has to approve it
- Secure named discounts need the Discounts permission.
- Typing your own amount needs the Open Discounts permission.
If you don't have the permission, you'll see An override is required to perform this function. A manager types their PIN and the discount goes on.
#Good to know
- This item is not discountable: some items are set to never take a discount. If you select a mix, the discount goes on the items that can take one and skips the rest.
- If you only see the named buttons and no number pad, your restaurant has typed-in discounts turned off.
- A surcharge or gratuity is different from a discount. Gratuity is under Tips.
Change an item's price
Change the price of one item on one ticket, without changing the menu.
Change Price sets a new price for one item on this ticket only. The menu price doesn't change, and the next guest pays the normal price.
#Change the price
- Tap the item on the ticket. Select just one.
- Tap Change Price in the item buttons.
- The pad says This price change is temporary and shows the item's current price, highlighted.
- Type the new price. The first number you type replaces the old price.
- Numbers fill in from the right: type
1,2,5,0for $12.50. - .00 adds whole dollars: type
8, then .00, for $8.00.
- Numbers fill in from the right: type
- Tap Enter.
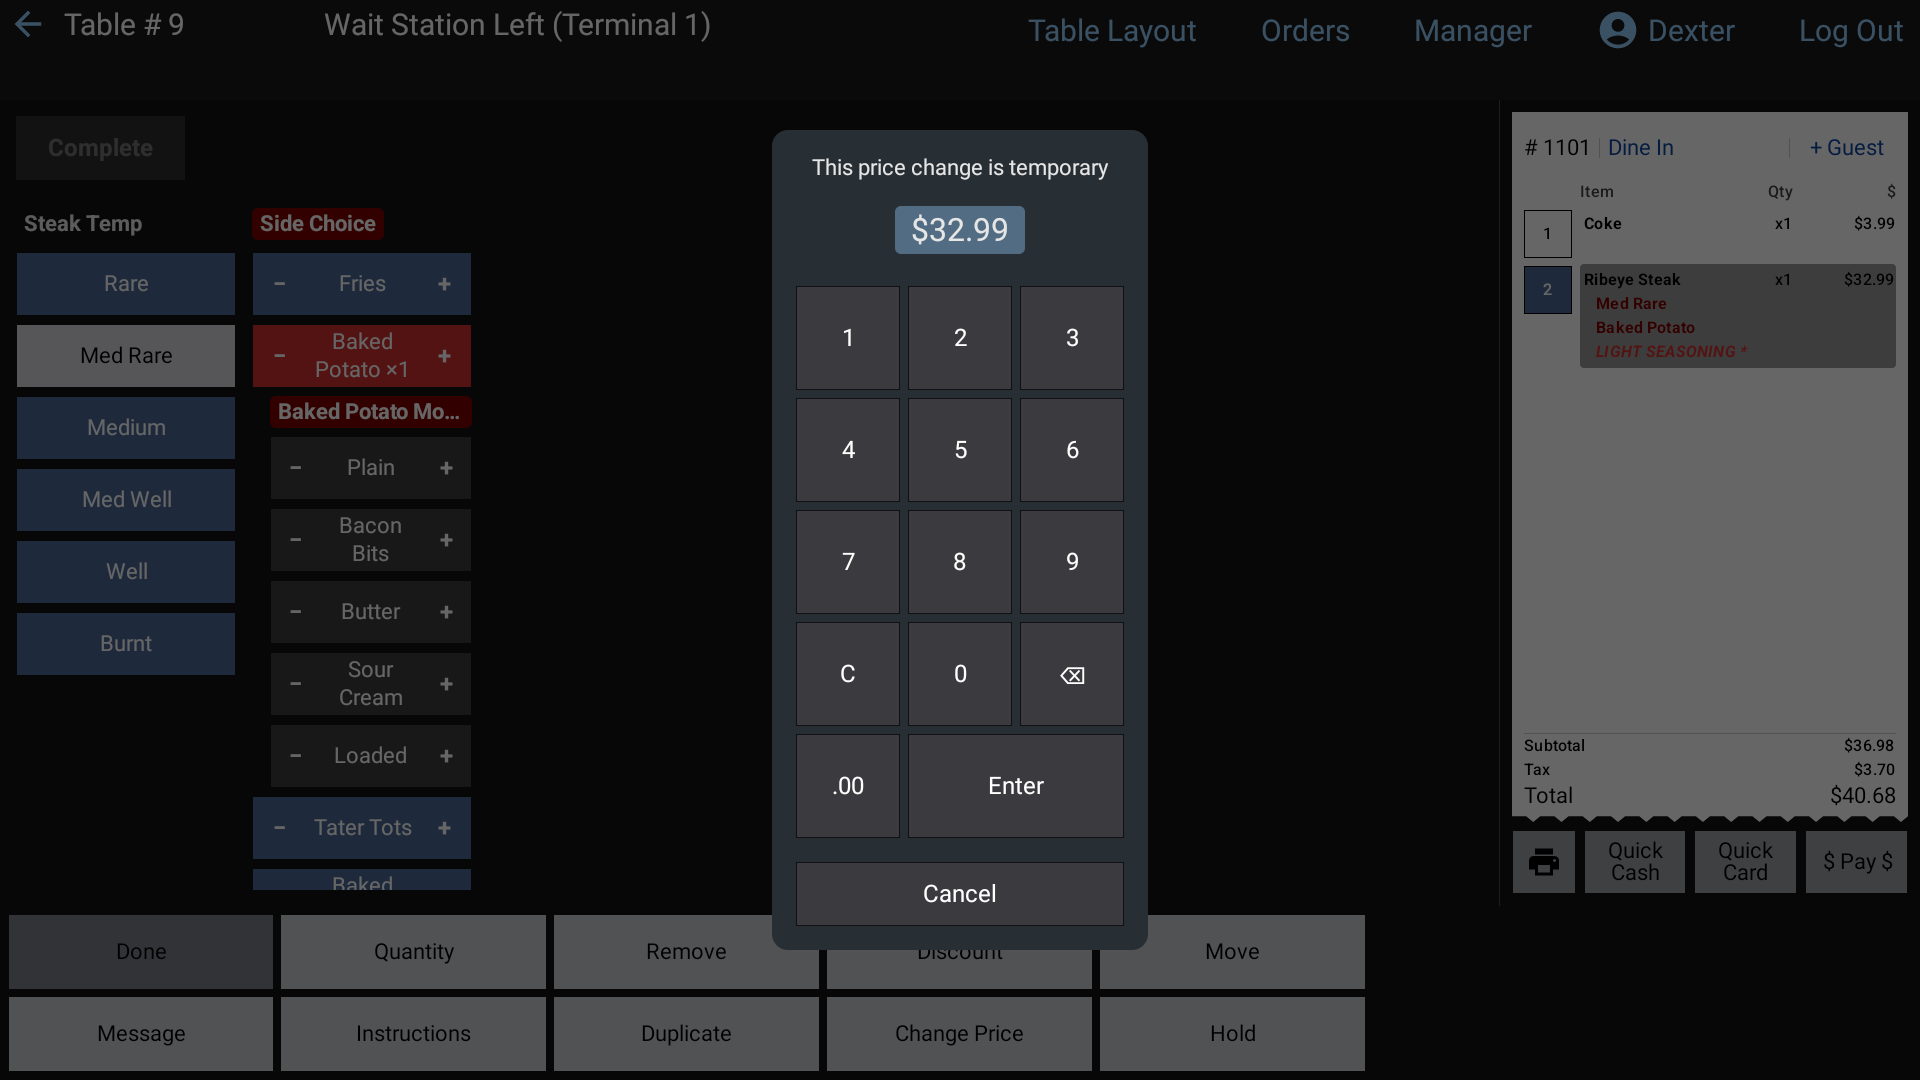 The Change Price pad
You can change the price before or after the item has been sent to the kitchen.
#When a manager has to approve it
Change Price needs the Change Price permission. If you don't have it, you'll see An override is required to perform this function. A manager types their 4-digit PIN, then the price pad opens.
#Good to know
- To take money off an item, you can also use a discount. Ask your manager which one your restaurant wants. See Apply a discount.
- Some items ask for a price every time you ring them in (open price items). See Add items and modifiers.
- To change an item's menu price for good, ask a manager. Managers can read Price changes and 86.
Transfer or move an order
Hand an order to another server, move it to a different table, or move it between order types.
#Transfer an order to another server
Use this when a guest's order should belong to someone else, for example at a shift change.
- Open the order.
- Tap Transfer in the bottom row.
- Transfer order lists the staff. The current owner is marked (current).
- Tap the new server's name. You'll see Order transferred.
Transfer needs the Transfer permission. If you don't have it, a manager types their PIN first.
#Move an order to another table
On the Table Layout screen:
- Tap Move Table. It turns orange and says Tap a table to move…
- Tap the table the guests are leaving.
- If that table has more than one order, Select an order to move opens. Tap one, or tap Move All Orders.
- Tap the table they're moving to. You'll see Table transferred.
Changed your mind? Tap the first table again to unselect it, or tap Move Table again to stop.
#Take an order off its table
Use Move to Orders when a dine-in guest decides to take their food to go, for example.
- On the Table Layout, tap Move to Orders. It says Touch a Table.
- Tap the table.
- Select an Order Type: tap the new type, like ToGo.
The table is freed. The order moves to that type's tab on the Orders screen, and you're taken there.
#Move an order between order types
On the Orders screen:
- Tap Move Order. It says Tap an order to move…
- Tap the order's square.
- Pick the new order type.
If the new type uses tables, you're taken to the Table Layout to pick one. The bottom-left button says Tap a table to move to… while it waits. Tap a table, or tap that button to cancel and leave the order on its tab.
On Quick Tab the same idea uses Move to Orders and Move to Layout. See Quick Tab.
#Good to know
- You can only move your own orders, unless you're a manager or have the "See All Staff Orders" permission.
- Moving orders needs the Move Table permission. Without it, the move doesn't happen and a "Missing permission" message shows. Ask a manager.
- Moving an order doesn't change who it belongs to. Use Transfer for that.
Split a check
Split one order into separate checks by item or by seat, or put several tables' checks together.
Use Split Check when guests want to pay separately. You move items between checks, then save it. Each check can then be paid on its own.
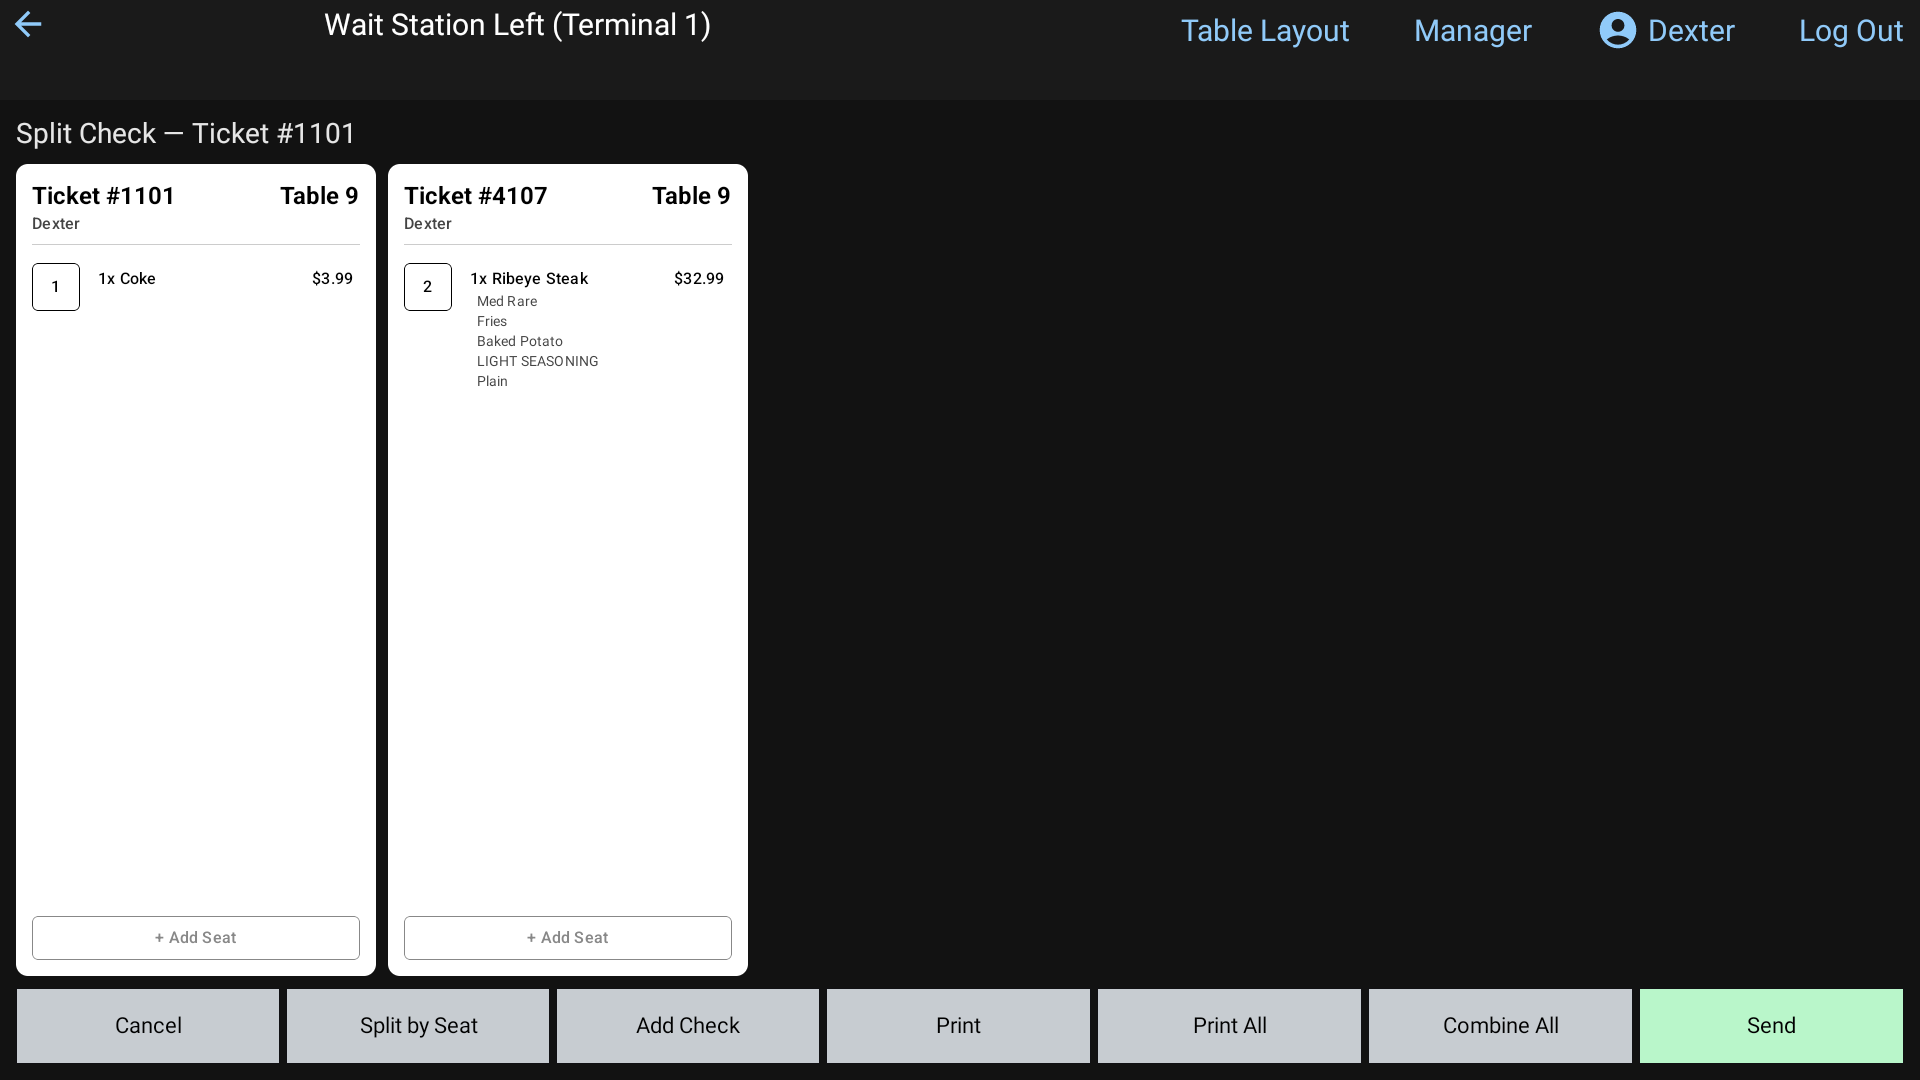 The Split Check screen with two checks side by side
#Open Split Check
Any of these work:
- In the order, tap Split Check in the bottom row.
- On the Table Layout, tap Split Check, then tap the table.
- On the Orders screen or Quick Tab, tap Split Check, then tap the order.
The screen shows Split Check — Ticket # and the order number. The original check is on the left, with an empty check beside it.
#Move items between checks
- Tap an item on one check. It turns blue. Tap more items to select them too.
- Tap the other check (a blank part of it). The items move there.
Move a whole seat: tap the seat's number square, then tap the other check. The seat keeps its number.
Move items onto a certain seat: select items, then tap a seat square on the other check.
#The buttons
| Button | What it does |
|---|---|
| Split by Seat | Makes one check for each seat, in one tap |
| Add Check | Adds another empty check at the end. Swipe left to see more checks |
| + Add Seat | (at the bottom of each check) Adds an empty seat on that check, to move items onto |
| Combine All | Puts everything back on the first check and starts over |
| Prints the check you tapped last (the one with the blue border) | |
| Print All | Prints every check and saves the split |
| Send | Saves the split without printing |
| Cancel | Throws away your changes. Nothing is saved |
Nothing changes until you tap Send or Print All. If you haven't moved anything onto a second check, you'll see Move items into at least 2 checks before sending.
#Pay a split check
After a table is split, tapping it on the Table Layout opens Checks on this table. Each check is listed with its ticket number and total. Tap one to pay it. Press and hold a row to peek at that check first.
On the Orders screen, each check has its own square with a yellow border.
#Combine checks
To put several tables (or orders) onto one check:
- On the Table Layout, tap Combine Checks. On the Orders screen, it's the same button.
- Tap each table or order you want together. Tap one again to take it out.
- Tap Complete. They open side by side on the Split Check screen.
- Tap Combine All to put everything on the first check, or move items however the guests want.
- Tap Send.
#Good to know
- Splitting from inside an order needs the Split Check permission. If you don't have it, a manager types their PIN.
- To split one payment evenly instead (like 3 cards for one bill), use Split Payment on the payment screen. See Take a payment.
- To share one item between guests, use Split Item. See Add items and modifiers.
Take a payment
Close out a check with Quick Cash, Quick Card, or the full payment screen, including split tenders, gift cards and tax exempt.
Under the ticket in every order there are three ways to pay:
- Quick Cash: the guest pays the whole check in cash. One tap closes it. See Cash payments.
- Quick Card: the whole balance goes on one card. See Card payments.
- $ Pay $: opens the full payment screen, for anything else. That means part cash and part card, more than one card, gift cards, a typed amount, and so on.
All three send any items you haven't sent to the kitchen yet.
#The payment screen
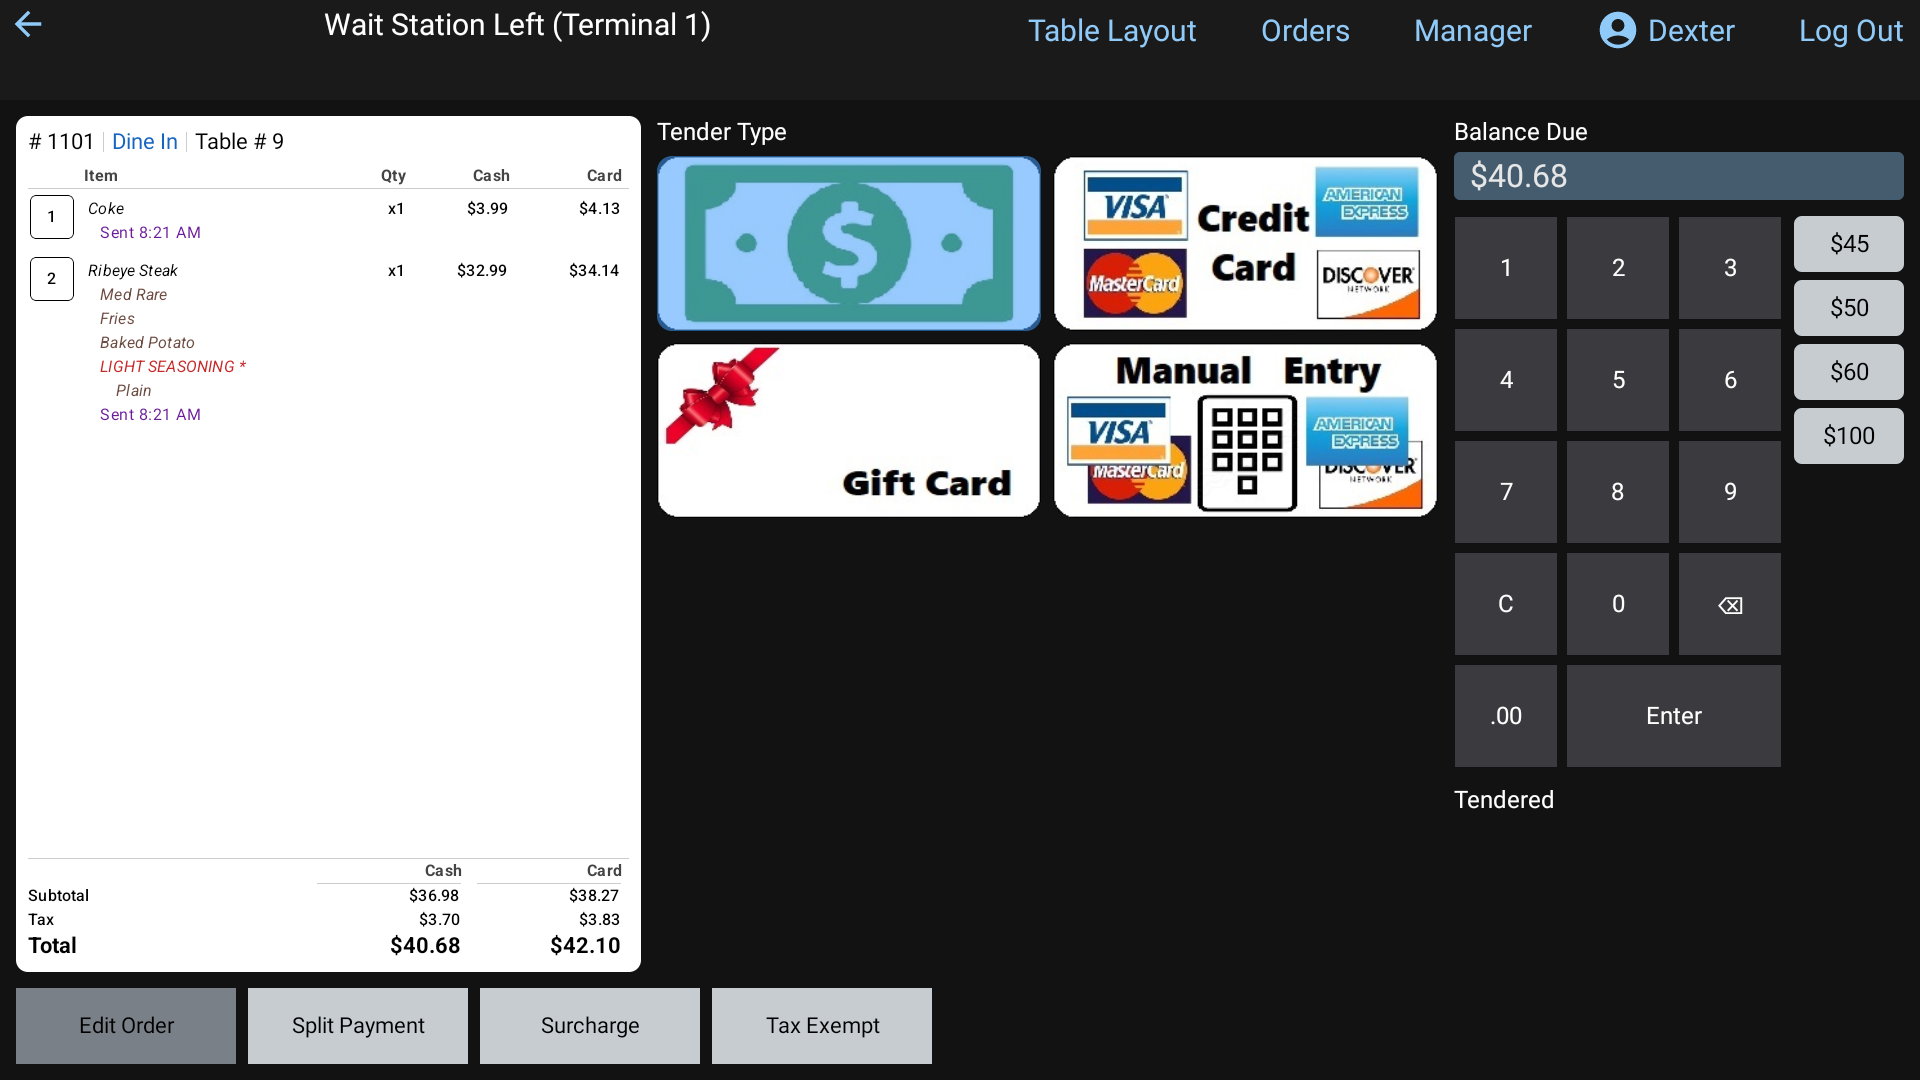 The payment screen: ticket on the left, tender types in the middle, Balance Due and the keypad on the right
- Left: the ticket. You can read it here, but you can't change it. Tap Edit Order at the bottom to go back into the order.
- Middle: Tender Type, one button for each way your restaurant takes payment. The selected one is shaded blue. Cash is selected when you arrive.
- Right: Balance Due, the keypad, quick cash amounts like $20 and $50, and Tendered, the list of payments taken so far.
#Pay the whole balance
- Tap the tender type.
- Balance Due already shows the full amount. Tap Enter.
#Pay part of it (split tender)
- Tap the tender type.
- Type the amount for this payment. Numbers fill in from the right, so
2,0,0,0is $20.00. .00 adds whole dollars. - Tap Enter. The payment shows under Tendered, and Balance Due drops. If your restaurant prints receipts for that tender, a receipt for this payment prints, showing what's still owed.
- Repeat with the next tender until the balance is $0.
When the last payment covers the check, the change screen shows Amount Due, Tendered and Change Due. Tap Done. The check closes and you go back to where you started.
#Split the payment evenly
- Tap Split Payment.
- Type how many ways, for example
3, and tap Enter. - Balance Due now shows one share. Take each share with any tender. The last share picks up any odd cent.
#Gift cards
- Tap the gift card tender.
- Type the card number on Gift Card Number and tap Enter.
- RealPOS takes whatever the card can cover, up to what's owed, straight away. If the card has money left over, it stays on the card. If it doesn't cover the whole check, take the rest with another tender.
If you typed an amount before tapping the gift card tender, it takes that amount instead. Card not found means the number is wrong. This gift card has no balance left. means the card is empty.
#Take a payment back off
Tap the payment in the Tendered list. RealPOS asks "This will void and remove this tender. Are you sure you wish to do this?" Tap Yes. You'll see Tender Removed and the balance goes back up.
#Other buttons
- Surcharge adds a charge to the check. Tap a named surcharge, or type a % or $ amount and tap OK. A typed one then asks Is this surcharge taxable? Tap Non-Taxable or Taxable.
- Tax Exempt takes all the tax off the order. Type a note for the receipt (like the group's name or tax ID) and tap Done. The button then reads Tax Exempt: ON. Tap it again to put the tax back.
#When a manager has to approve it
- Taking payment needs the Cash Out Order permission. Without it, Quick Cash, Quick Card and $ Pay $ ask for a manager's PIN.
- Some tender types are only for certain jobs. If yours isn't one, you'll see An override is required to use (tender). A manager types their PIN.
#Good to know
- Cashing out another server's order? When cash was taken, RealPOS reminds you: Please hand the $X to (server). The sale and tips stay with that server.
- Whether a receipt prints by itself, and how many copies, depends on how your manager set up each tender. See Receipts.
- Need to give money back after a check is closed? That's a refund. Ask a manager. Managers can read Refunds.
Cash payments
Take cash with one tap, or use the payment screen to work out the guest's change.
#The guest pays the exact amount: Quick Cash
- In the order, tap Quick Cash under the ticket.
- The check is paid in full in cash and closed. You go back to the Table Layout (or the tab you came from).
Quick Cash doesn't work out change. Use it when the guest hands you the exact amount, or when you'll count the change yourself.
#The guest needs change: the payment screen
In the order, tap $ Pay $.
Cash is already selected under Tender Type.
Enter what the guest handed you:
- tap a quick amount beside the keypad, like $20, $50 or $100, or
- type the amount on the keypad (
4,0,0,0is $40.00).
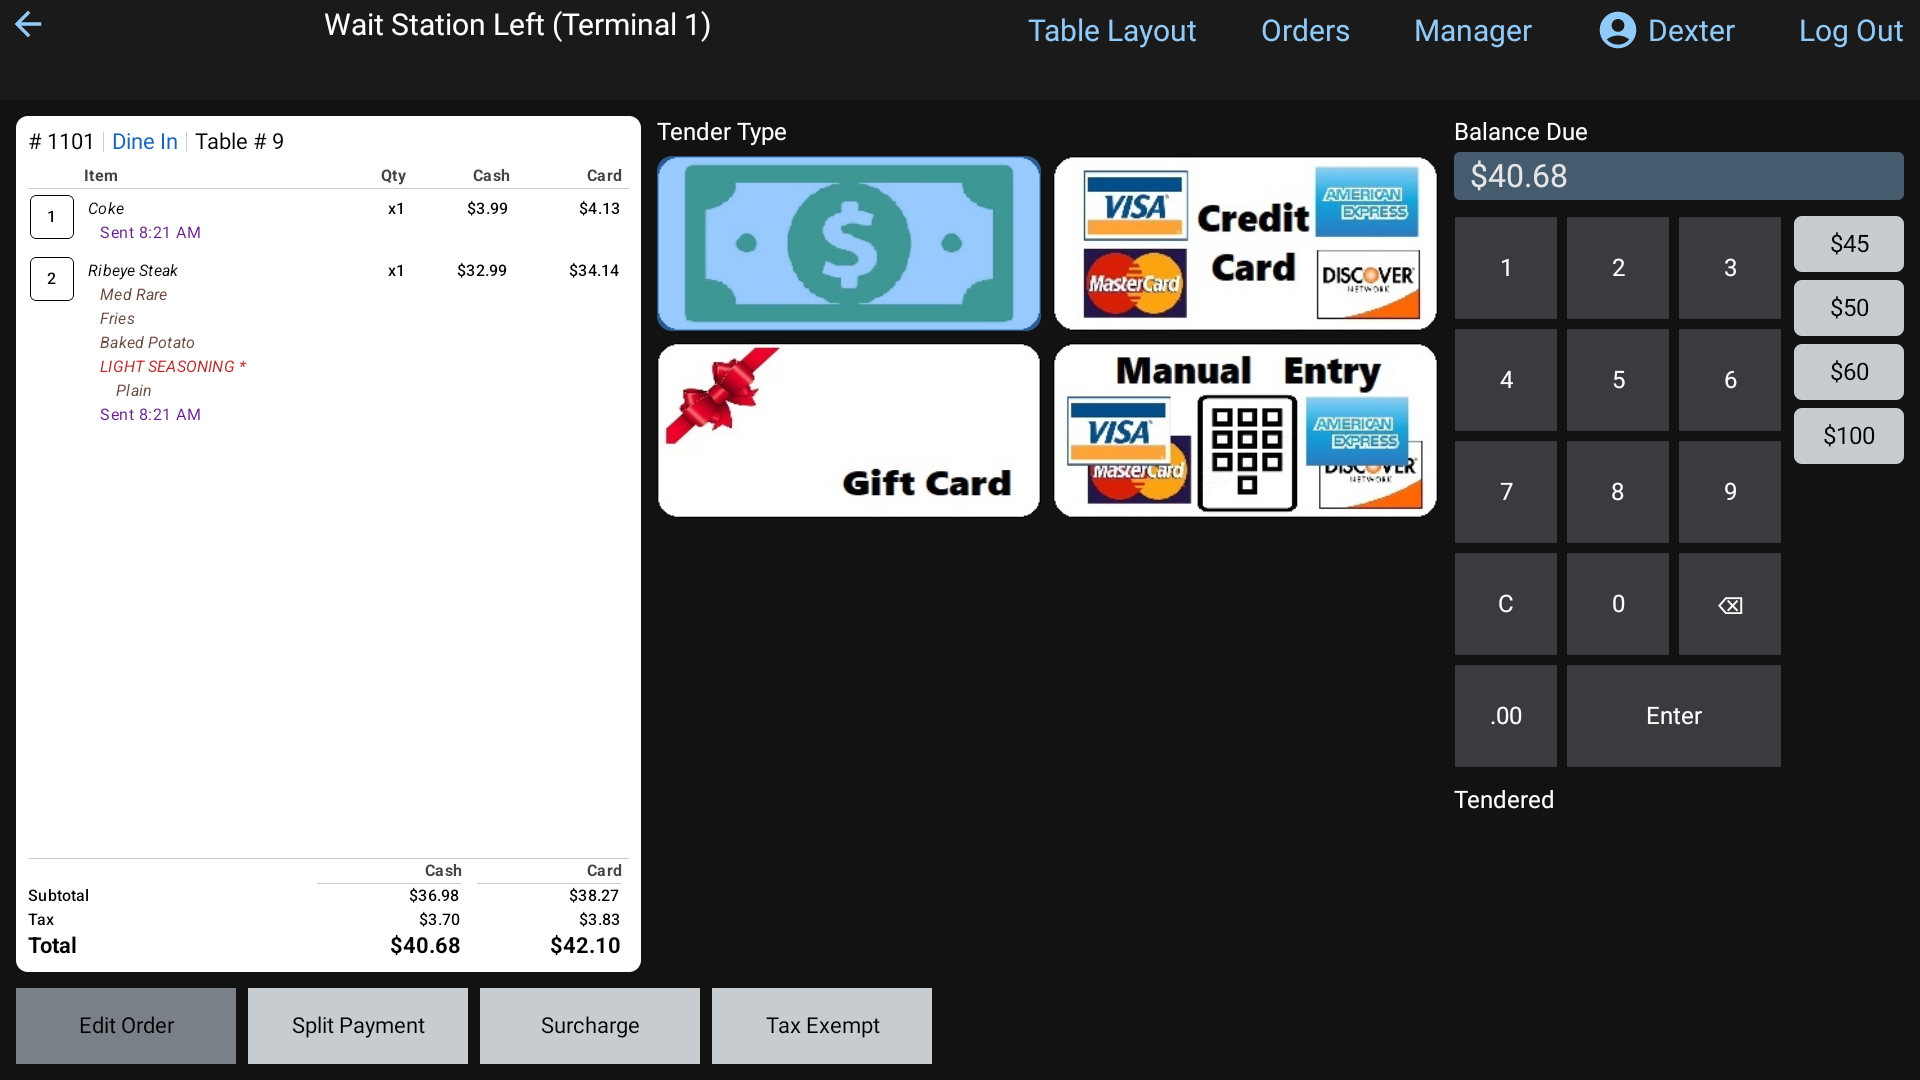 The payment screen with Cash picked under Tender Type, the quick amounts beside the keypad
Tap Enter.
The change screen shows Amount Due, Tendered and Change Due in large type. Give the guest the Change Due.
Tap Done.
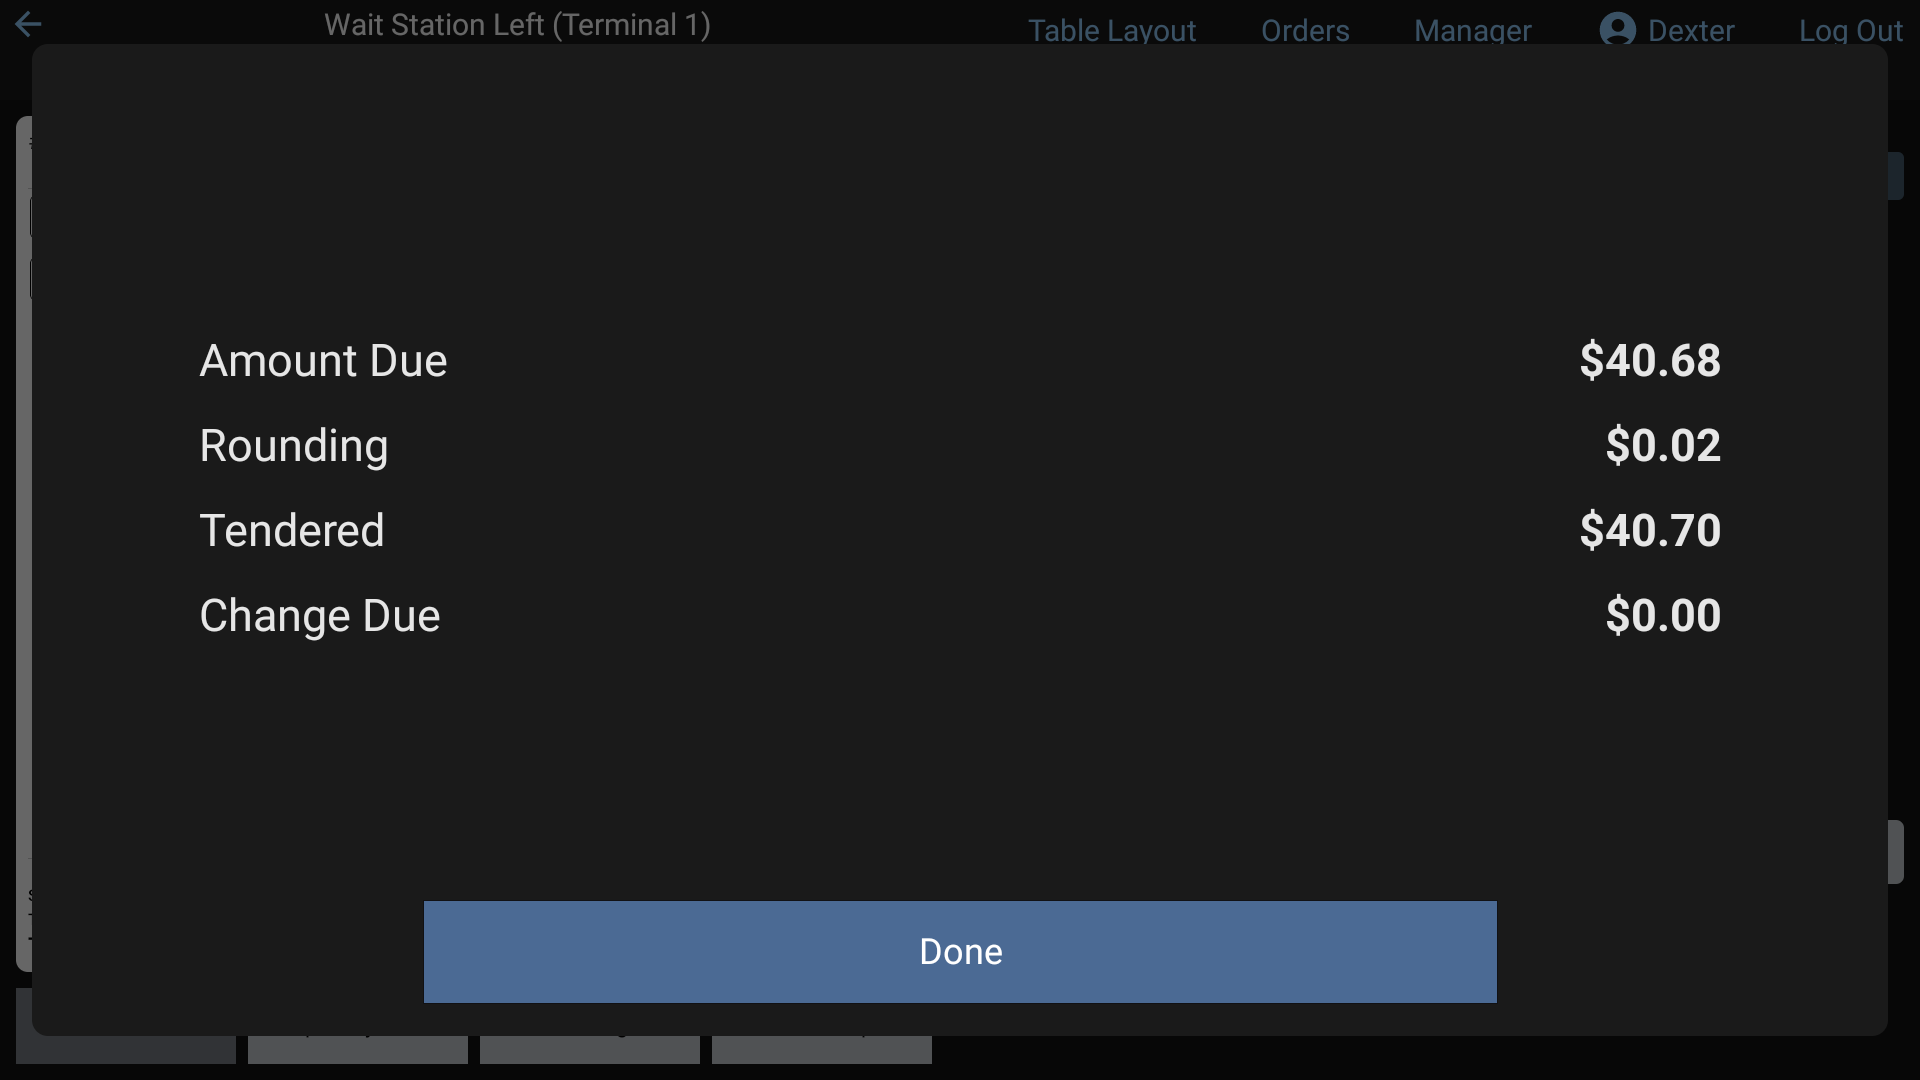 The change screen after a cash payment
#Part cash, part card
Type the cash amount and tap Enter. The rest stays as Balance Due. Then pick the card tender for the remainder. See Take a payment.
#Good to know
- Rounding. If your restaurant rounds cash totals, a Rounding line shows on the change screen. The items themselves keep their prices.
- Someone else's check. If you take cash for another server's order, RealPOS reminds you: Please hand the $X to (server).
- At the end of your shift, your closeout shows how much cash you owe the house. See Your shift closeout.
Card payments
Charge a card on the card reader, key in a card by hand, handle a partial approval, and use Pre Auth tabs.
#Charge the whole check: Quick Card
- In the order, tap Quick Card under the ticket.
- Card Reader pops up: Have the guest insert, tap or swipe their card on the card reader. Hand the reader to the guest.
- Once the card is approved, the check closes and you go back to the Table Layout (or the tab you came from). The receipt prints if your restaurant prints card receipts.
The guest's tip gets added later, from your Employee Menu. See Tips.
Cancel on the Card Reader box stops the payment, but only until the card has been read.
#Charge part of the check, or a typed amount
- Tap $ Pay $.
- Tap the card tender under Tender Type. Balance Due changes to the card amount.
- To charge less than the full balance, type the amount.
- Tap Enter, then have the guest use the card reader.
#Key in a card by hand
If a card won't read, tap Card Manual Entry (right under the card tender) on the payment screen, then tap Enter. Type the card number on the card reader.
#Partial approval
Sometimes a card only approves part of the amount, for example a gift or debit card that runs out. A large PARTIAL APPROVAL banner shows how much was approved and how much is STILL OWED. The check stays open. Take the rest with another card or another tender.
After a Quick Card partial approval, you're taken to the payment screen to finish the rest.
#Declined cards
If a card is declined or the payment fails, the reason shows on the screen and nothing is charged. Try again, or use another card or tender.
#Pre Auth: start a tab on a card
If your restaurant uses Pre Auth, you can take the guest's card at the start, like a bar tab.
- In an order: tap the blue Pre Auth button. The guest uses the card reader. You'll see PRE AUTH APPROVED with the card. The button then shows Pre Auth ✓.
- New order on a card: on an Orders tab or Quick Tab, press and hold + Add Order, then tap Pre Auth Card.
Orders with a stored card show a blue ✓ on their square.
Closing a Pre Auth order: on the payment screen the card tender says Charge Stored Card. Tap it, then Enter. The balance goes on the stored card. Any held amount shows under Tendered as Pre Auth and the card type.
Paying a different way: tap Remove Stored Card, then Yes. The hold is released and you can take any other payment. If the guest pays another way without you removing it, the stored card is let go when the check is paid.
#Good to know
- Card prices. If your restaurant charges more for cards than cash, the card amount on the payment screen and the card receipt is higher than the cash price. That's expected.
- Pink terminal name. When the internet is down, the reader can still take cards and send them through later. The terminal's name at the top turns pink while this is going on. Keep taking cards as normal, and tell a manager.
Tips
Enter card tips from your Employee Menu, fix a tip, add a gratuity to an order, and declare cash tips.
Card tips are added after the payment, from the slip the guest filled in. You don't enter them while you're taking the payment. You enter them from your Employee Menu. You have to enter every card tip before you can print your closeout or clock out.
#Enter card tips
- Tap your name at the top right. Your Employee Menu opens.
- Tap Pending Tips. The number in brackets is how many are waiting. Each green square is a card payment that still needs its tip.
- Tap a square. Tip for Order # opens with a number pad.
- Type the tip from the signed slip. Numbers fill in from the right:
5,0,0is $5.00. - Tap Save.
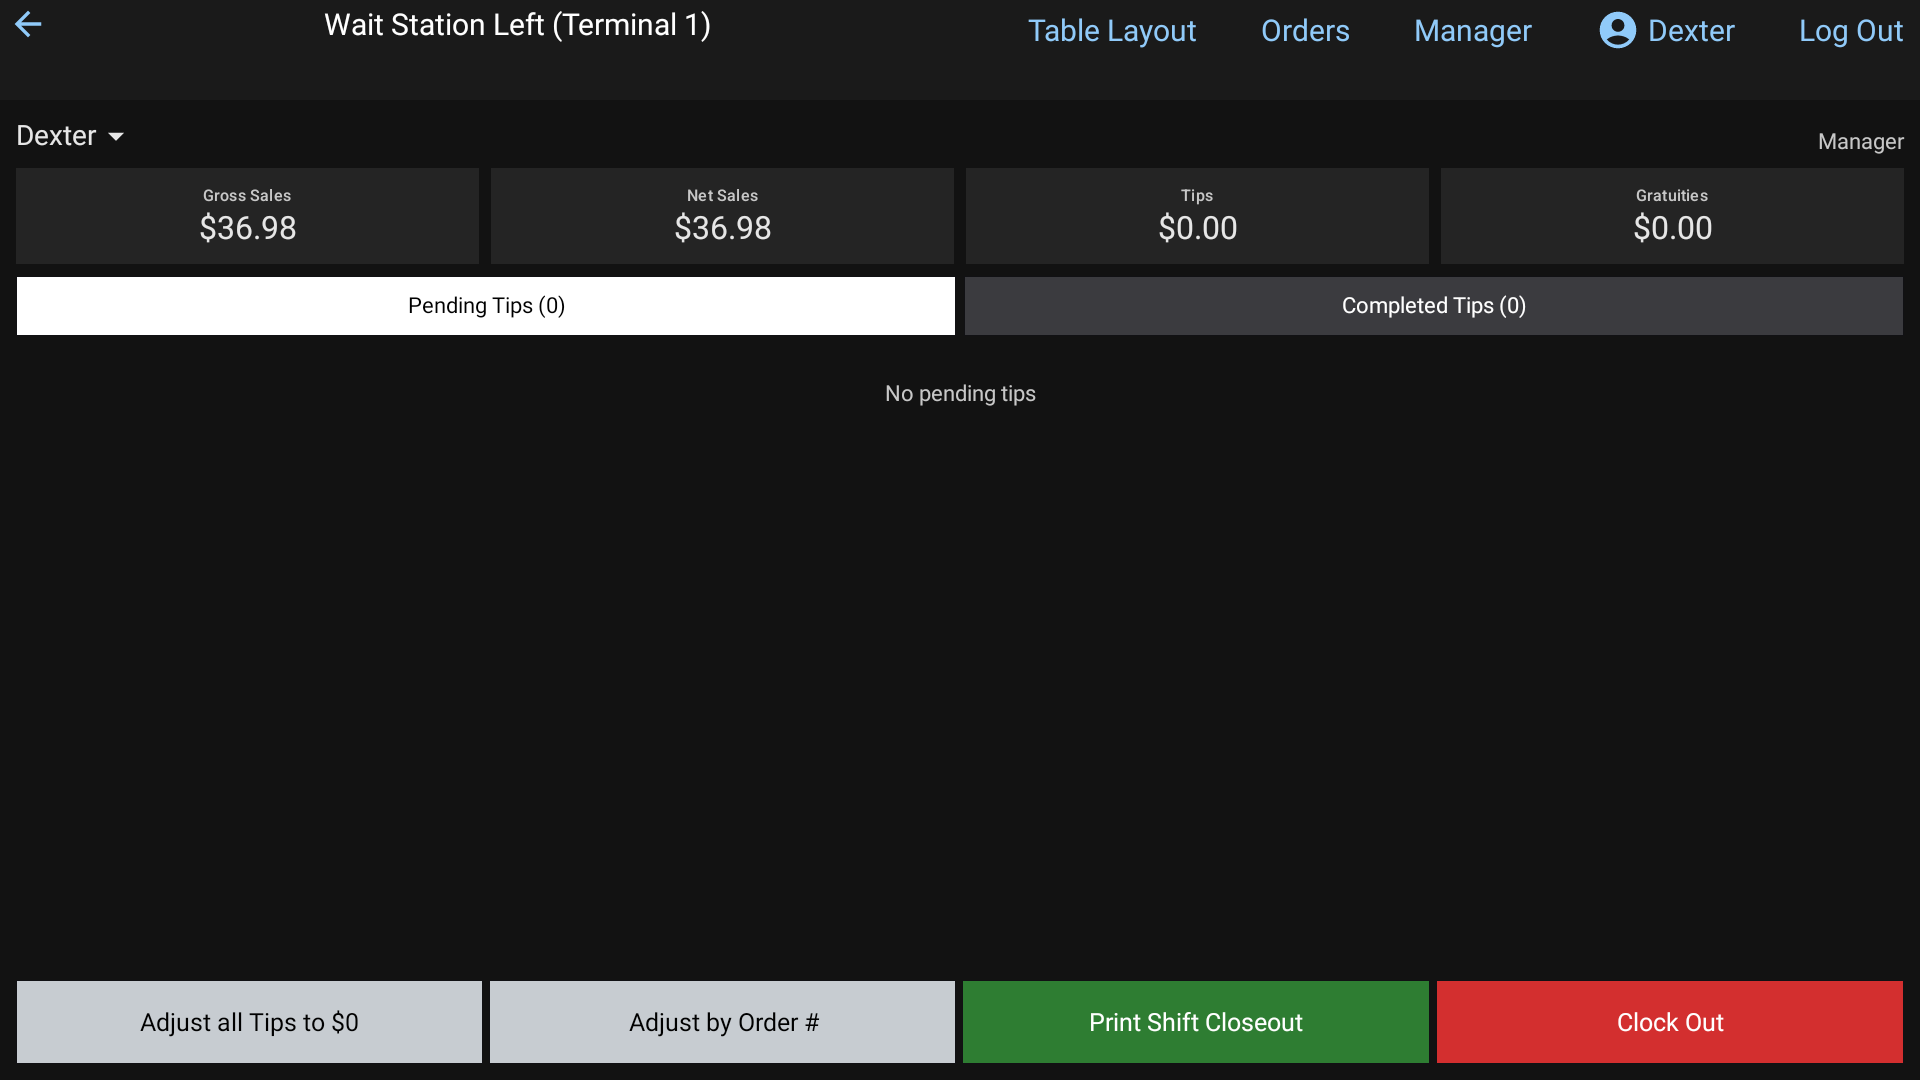 The Employee Menu with Pending Tips
The square moves to Completed Tips and turns light blue with the tip on it.
No tip on the slip? Type 0 and tap Save. Or tap Adjust all Tips to $0 to zero every pending tip at once.
#Enter tips by order number
Faster when you have a stack of slips:
- On the Employee Menu, tap Adjust by Order #.
- Type the order number from the slip and tap Enter.
- Type the tip and tap Save. The Order # pad opens again for the next slip.
You might see:
- Order # 123 was not found: check the number.
- Order # 123 is not your order: only your own, unless you're a manager.
- Order # 123 has no card payment to tip: it was paid another way.
If your restaurant has a barcode scanner, scanning the barcode on a receipt opens that order's tip straight away.
#Fix a tip
On Completed Tips, tap the square and type the right amount. You can also go to Orders > Closed Orders, press and hold the order, and tap + Add Tip.
#High Tip Warning
If a tip is a higher percent of the check than your manager's limit, High Tip Warning pops up after you save.
- Adjust reopens the pad so you can fix a typo.
- OK keeps the tip as typed.
Big tips show in dark blue with Tip %: on the square.
#Cash tips
You declare cash tips when you print your shift closeout or clock out. Cash Tips asks you to Enter your cash tips. See Your shift closeout.
#Add a gratuity
For large parties, you can add an automatic gratuity to the order:
- In the order, tap Gratuity.
- Tap a percent.
It shows in the totals as Gratuity and the percent. To take it off, open Gratuity again and tap Remove. Adding a gratuity needs the Gratuity permission. Otherwise a manager types their PIN.
#Good to know
- The tiles at the top of the Employee Menu add up your shift so far: Gross Sales, Net Sales, Tips and Gratuities.
- If a card won't take the tip, the pad stays open and shows why.
- Managers can see and fix everyone's tips. Tap the name at the top left of the Employee Menu to pick employees.
Receipts (print, text or email)
Print a check before payment, and reprint, text or email a receipt after the check is paid.
#Print the check before the guest pays
- In the order: tap the printer icon under the ticket. The check prints and you go back to the Table Layout. The table turns yellow (Printed).
- From the Table Layout: tap Print, then tap the table. For several tables at once, tap Print Multiple, tap each table, then Complete.
- From the Orders screen or Quick Tab: same idea. Tap Print, then the order's square.
Printing the check from inside the order also sends any new items to the kitchen.
#Receipts when the check is paid
When a payment closes the check, a receipt prints by itself, if your manager set that tender to print one. They also choose how many copies. If a check is paid in more than one payment, each payment's receipt carries its own number, like 1101-1 and 1101-2.
#Reprint a receipt
- Tap Orders at the top, then Closed Orders.
- Press and hold the order's square for about a second. The receipt pops up.
- Tap the receipt, or the printer icon under it.
- Print which copy? asks what to print:
- Itemized Copy prints the receipt with every item.
- No Items prints just the header and totals.
If the check was paid more than one way, Print which pay type? asks which payment's receipt you want first.
#Text a receipt
- In Closed Orders, press and hold the order's square.
- Tap the phone icon under the receipt.
- Type the guest's 10-digit phone number and tap Send.
The guest first gets a text asking them to reply YES. The receipt follows once they do. The note on the pad explains this, so let the guest read it before you send. After you send, Sent tells you which text went out.
#Email a receipt
- In Closed Orders, press and hold the order's square.
- Tap the email icon under the receipt.
- Type the address, or tap one under Recent, and tap Send.
Sent confirms the receipt went.
#Good to know
- Enter a 10-digit phone number. or Enter a valid email address. means the number or address is incomplete.
- Voided checks can be reprinted too. Switch on Show Voids Only in Closed Orders to find them.
- To find an older receipt, use the calendar in the Closed Orders search bar. See Find an order, or reopen a check.
Find an order, or reopen a check
Search open and closed orders, look back at another day, and reopen a paid check to fix its payment.
Everything is on the Orders screen. Tap Orders at the top of any screen.
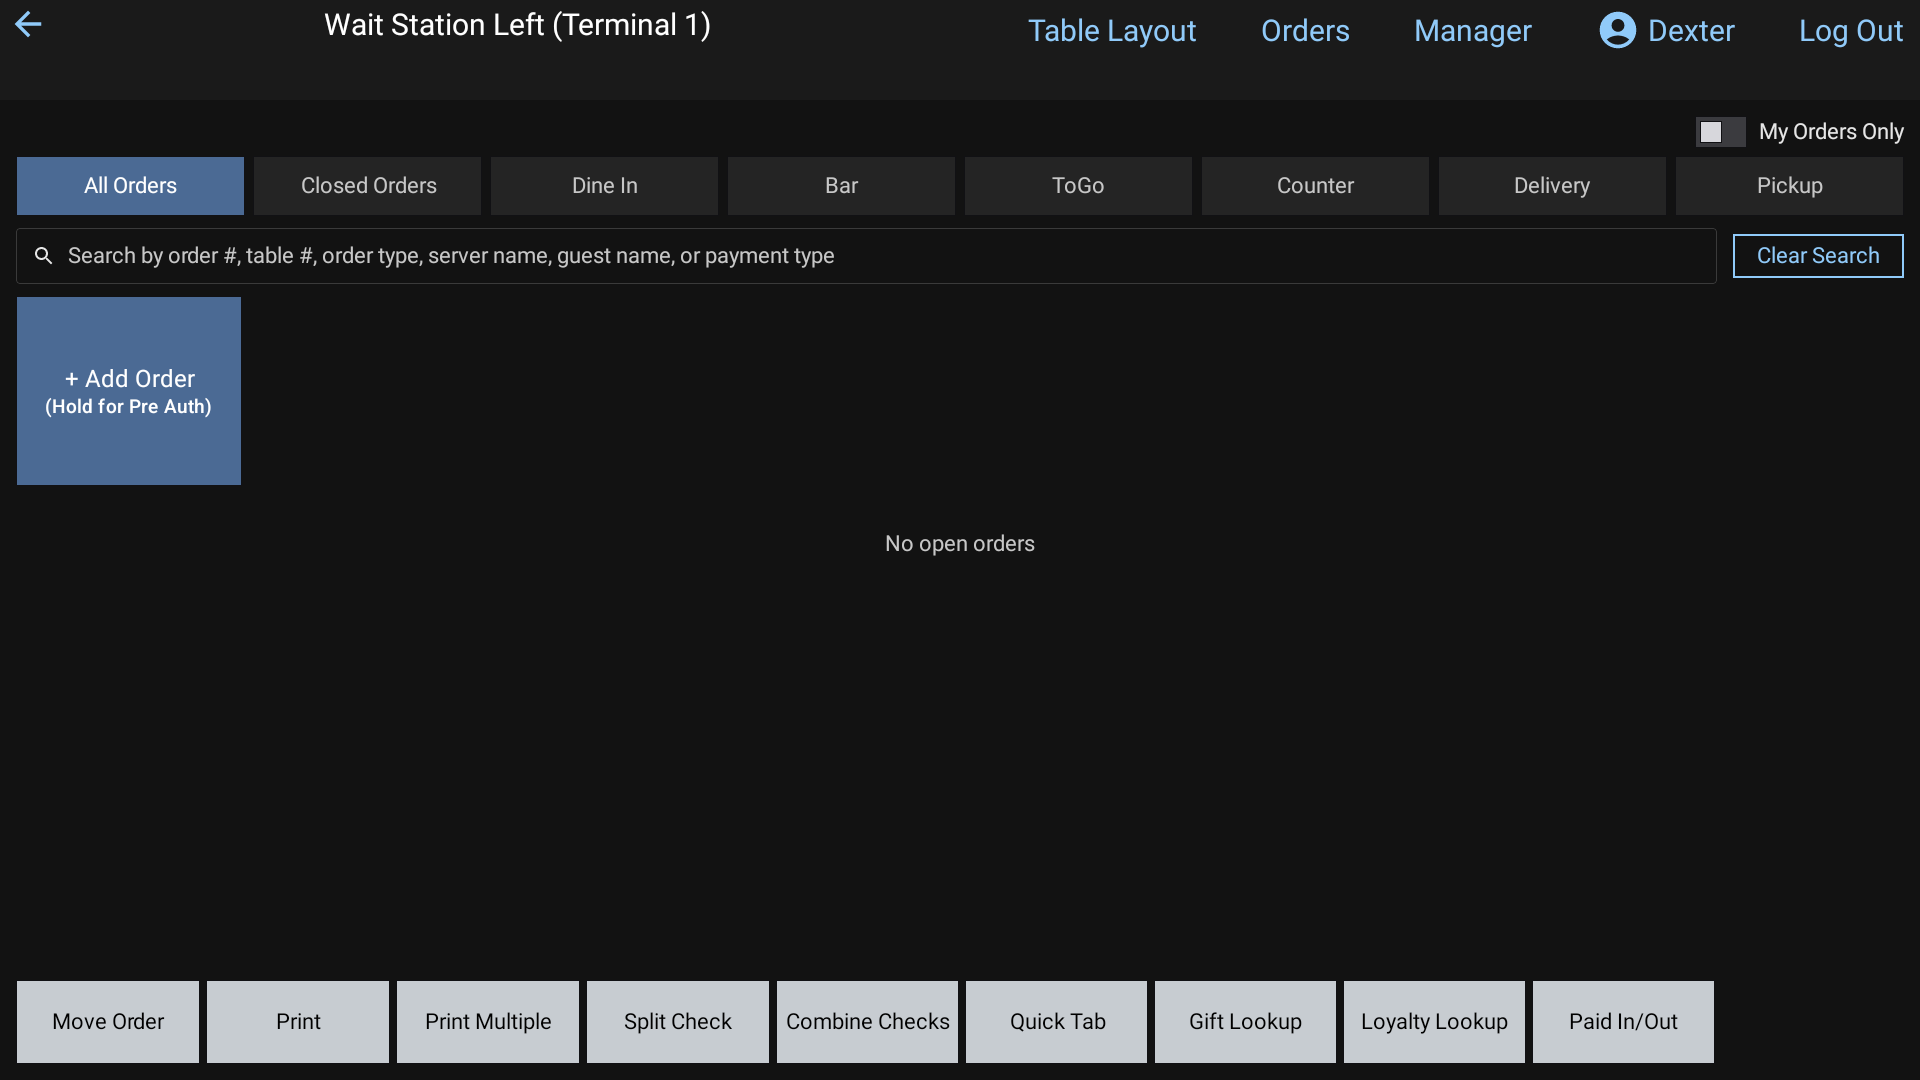 Open orders on the Orders screen
#Find an open order
- Tap All Orders, or the tab for the order's type.
- Tap the search box and type part of the order number, table, order type, server name, guest name or payment type. Tap Done.
- Tap the square to open the order. Press and hold it for about a second to peek at the ticket.
Clear Search shows everything again.
#Closed Orders
Closed Orders shows today's paid checks.
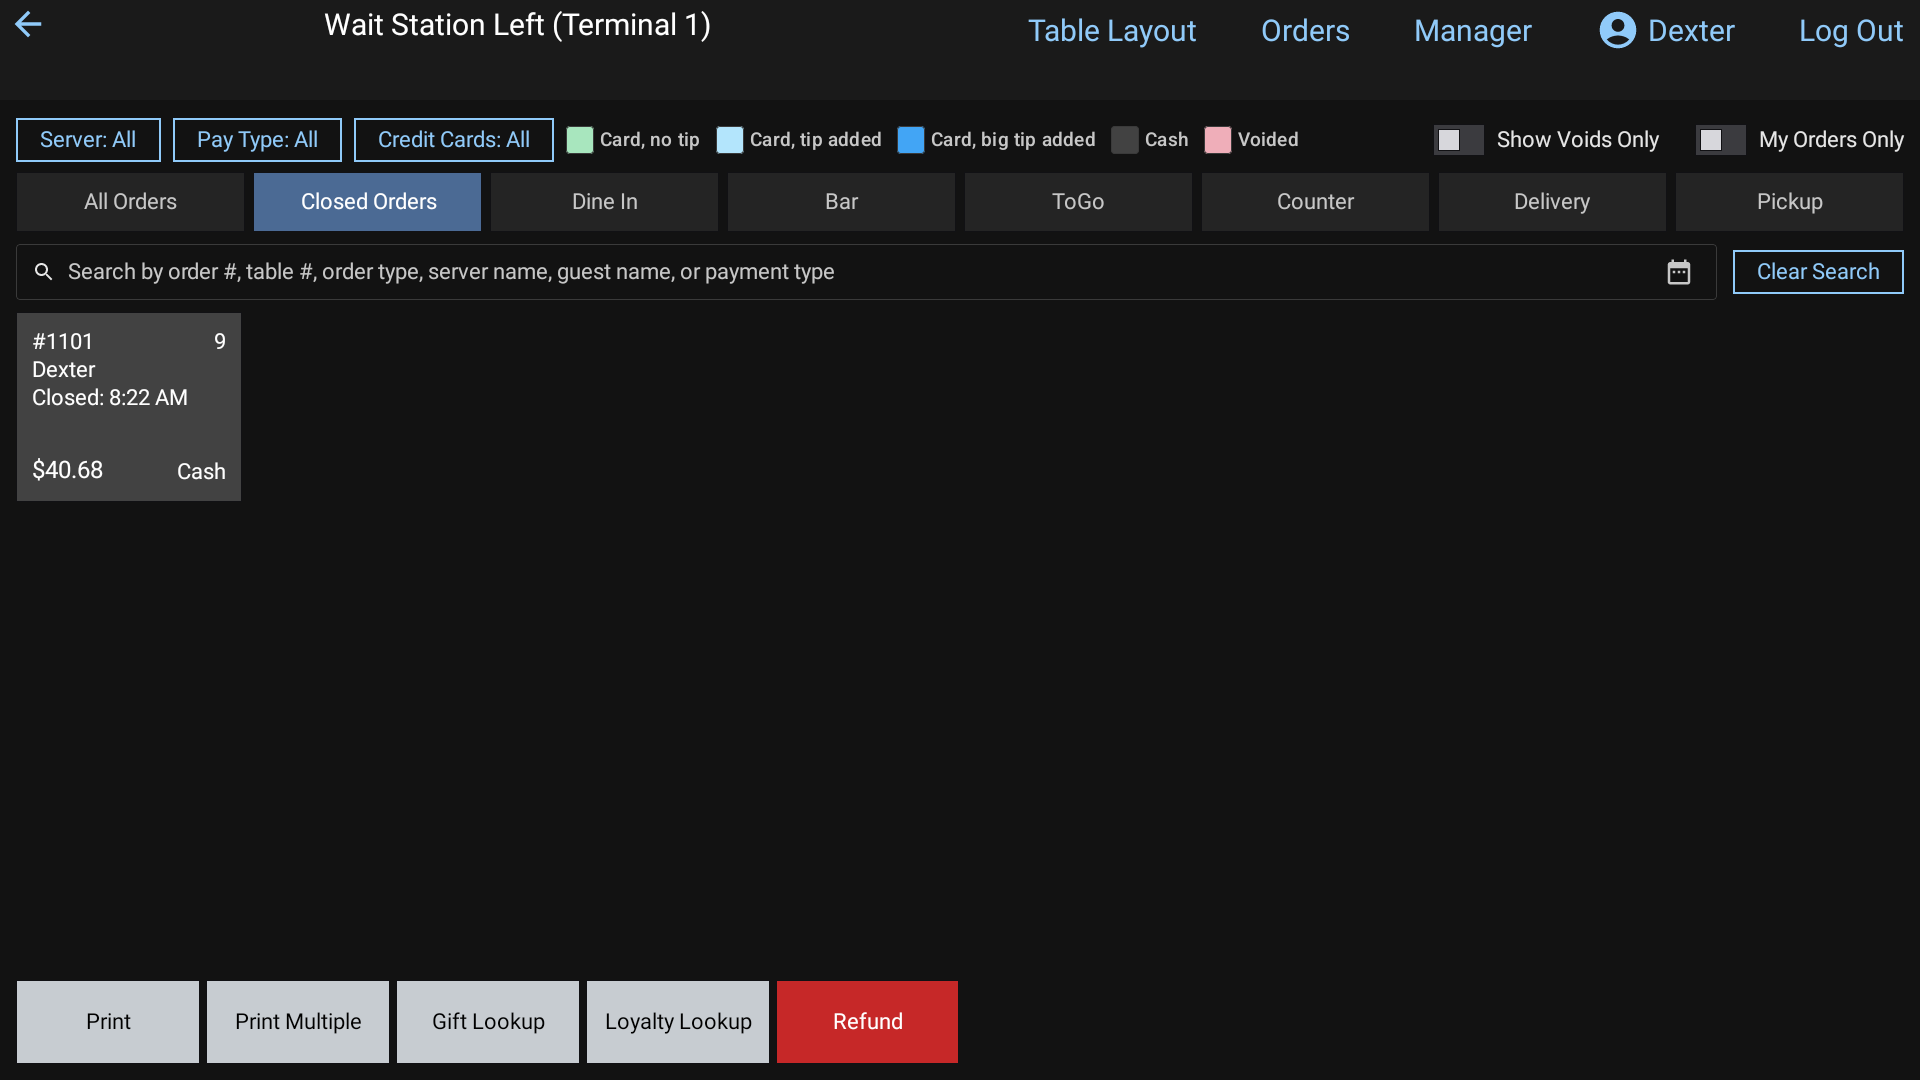 Closed Orders
The square colors:
| Color | Means |
|---|---|
| Green | Card, no tip yet |
| Light blue | Card, tip added |
| Dark blue | Card, big tip added |
| Dark gray | Cash (and gift card) |
| Pink | Voided |
A check paid in several payments shows one square per payment, like #1101-1 and #1101-2.
Narrow the list with the buttons at the top:
- Pay Type (cash or card) and Credit Cards (no tip, tip added, big tip added)
- Server, for managers and staff who can see everyone's orders
- Show Voids Only shows the voided checks instead
Look at another day: tap the calendar icon in the search box and pick a date. The screen says Showing closed orders from and the date. Tap Back to Today to return.
#Reopen a paid check
Use this when a payment went on wrong, for example the wrong card or the wrong tender.
In Closed Orders, tap the paid check's square (any color but pink).
Reopen This Check? Tap Yes.
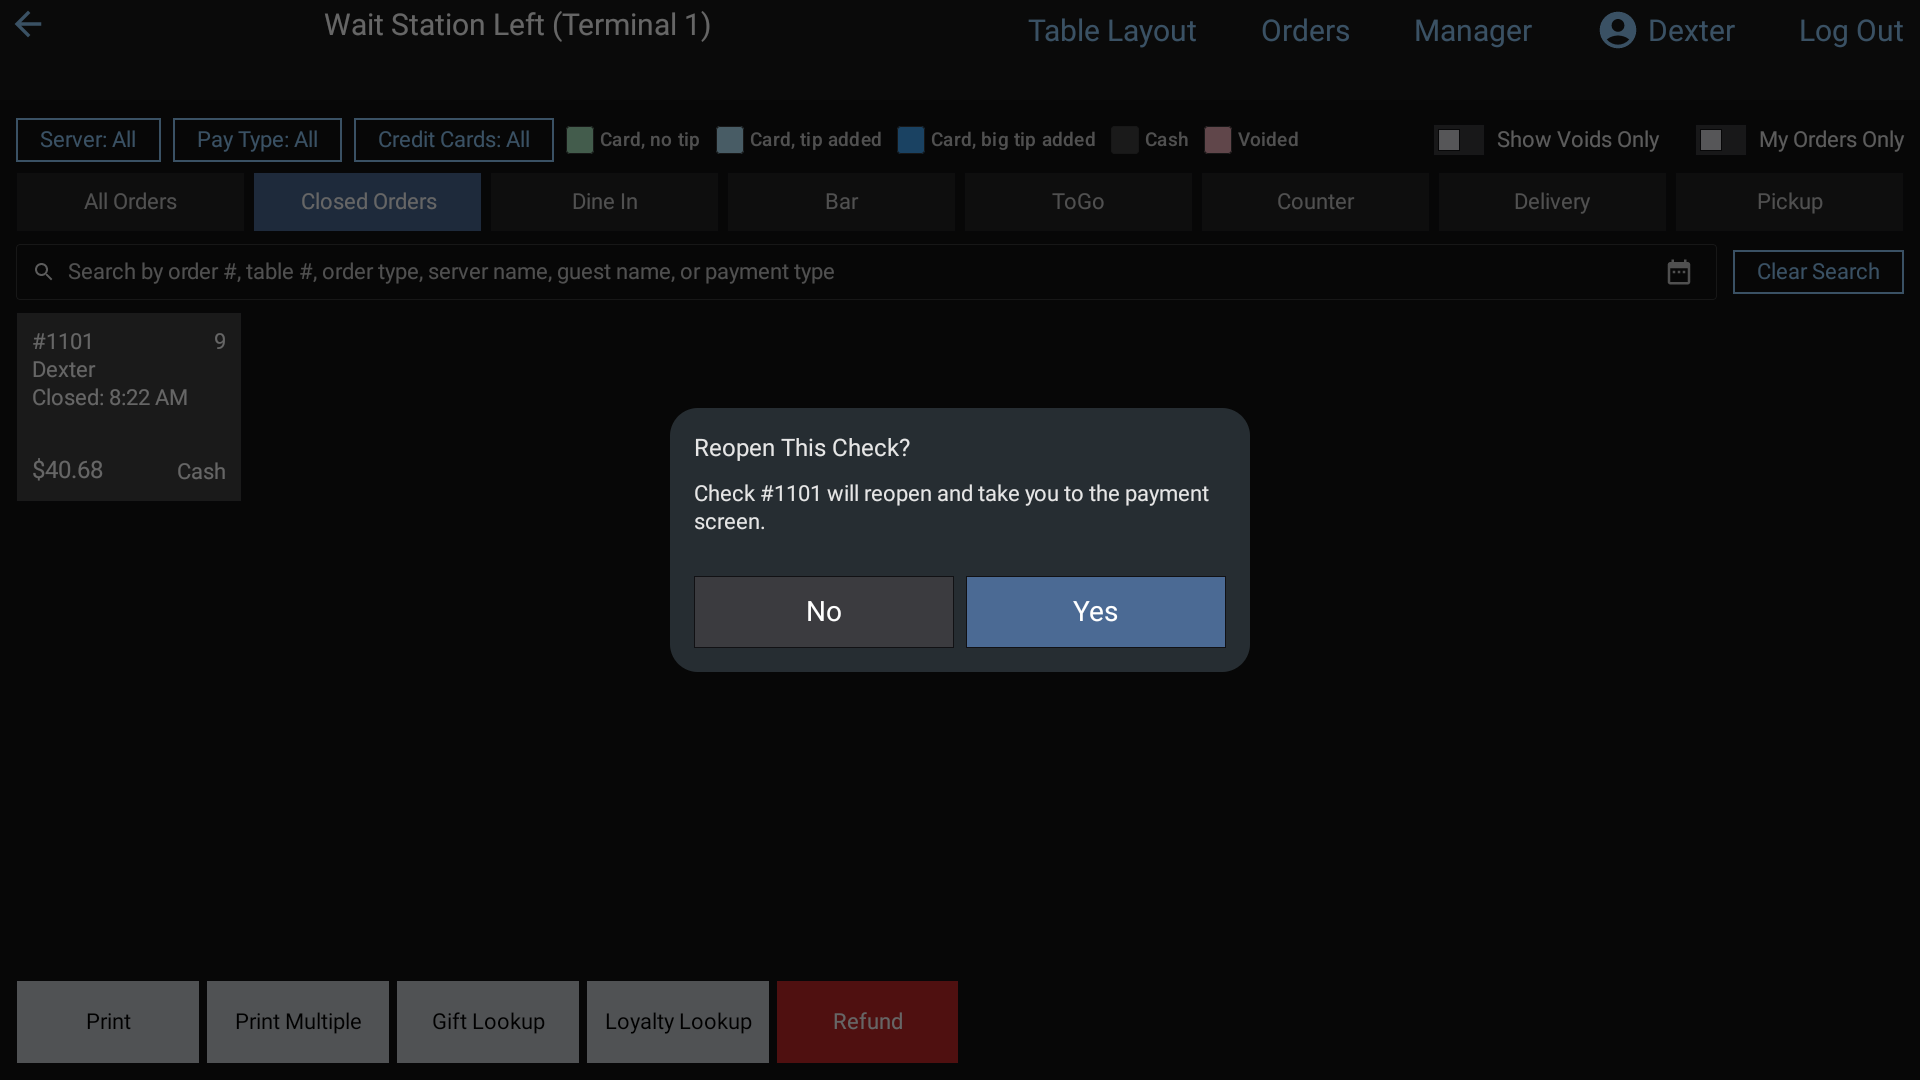 Reopen This Check? after tapping a paid check in Closed Orders: Yes opens it on the payment screen
The payment screen opens with the old payment still under Tendered.
To change it, tap the old payment, tap Yes to remove it, then take the payment again. See Take a payment.
Reopened it by mistake? While the old payment is still there, the keypad's Enter key says Reclose. Tap it to close the check again as it was.
#Good to know
- Voided checks can't be reopened. You can still hold them to view or reprint.
- You only see your own orders unless you're a manager or have the "See All Staff Orders" permission. Those staff also get a My Orders Only switch.
- Holding a closed order also shows + Add Tip for card payments, and icons to print, text or email the receipt. See Tips and Receipts.
- Money back to a guest is a refund, not a reopen. Ask a manager. Managers can read Refunds.
Your shift closeout
Print your Shift Report at the end of your shift, see the cash you owe, and email it if you need to.
At the end of your shift you print your Shift Report. It shows your sales, payments and tips, and how much cash you hand in.
#Before you start
Your closeout stays locked until:
- every check of yours is closed. If one is still open, the button reads You Have Open Orders. Tap it to go to Orders > All Orders and finish them.
- every card tip is entered. See Tips.
#Print your closeout
- Tap your name at the top right to open your Employee Menu.
- Tap the green Print Shift Closeout button.
- Cash Tips asks you to Enter your cash tips. Type the cash tips you made this shift and tap Print Shift Closeout.
- Your report shows on screen, like a receipt. Scroll to check it.
- Tap Print at the bottom to print it.
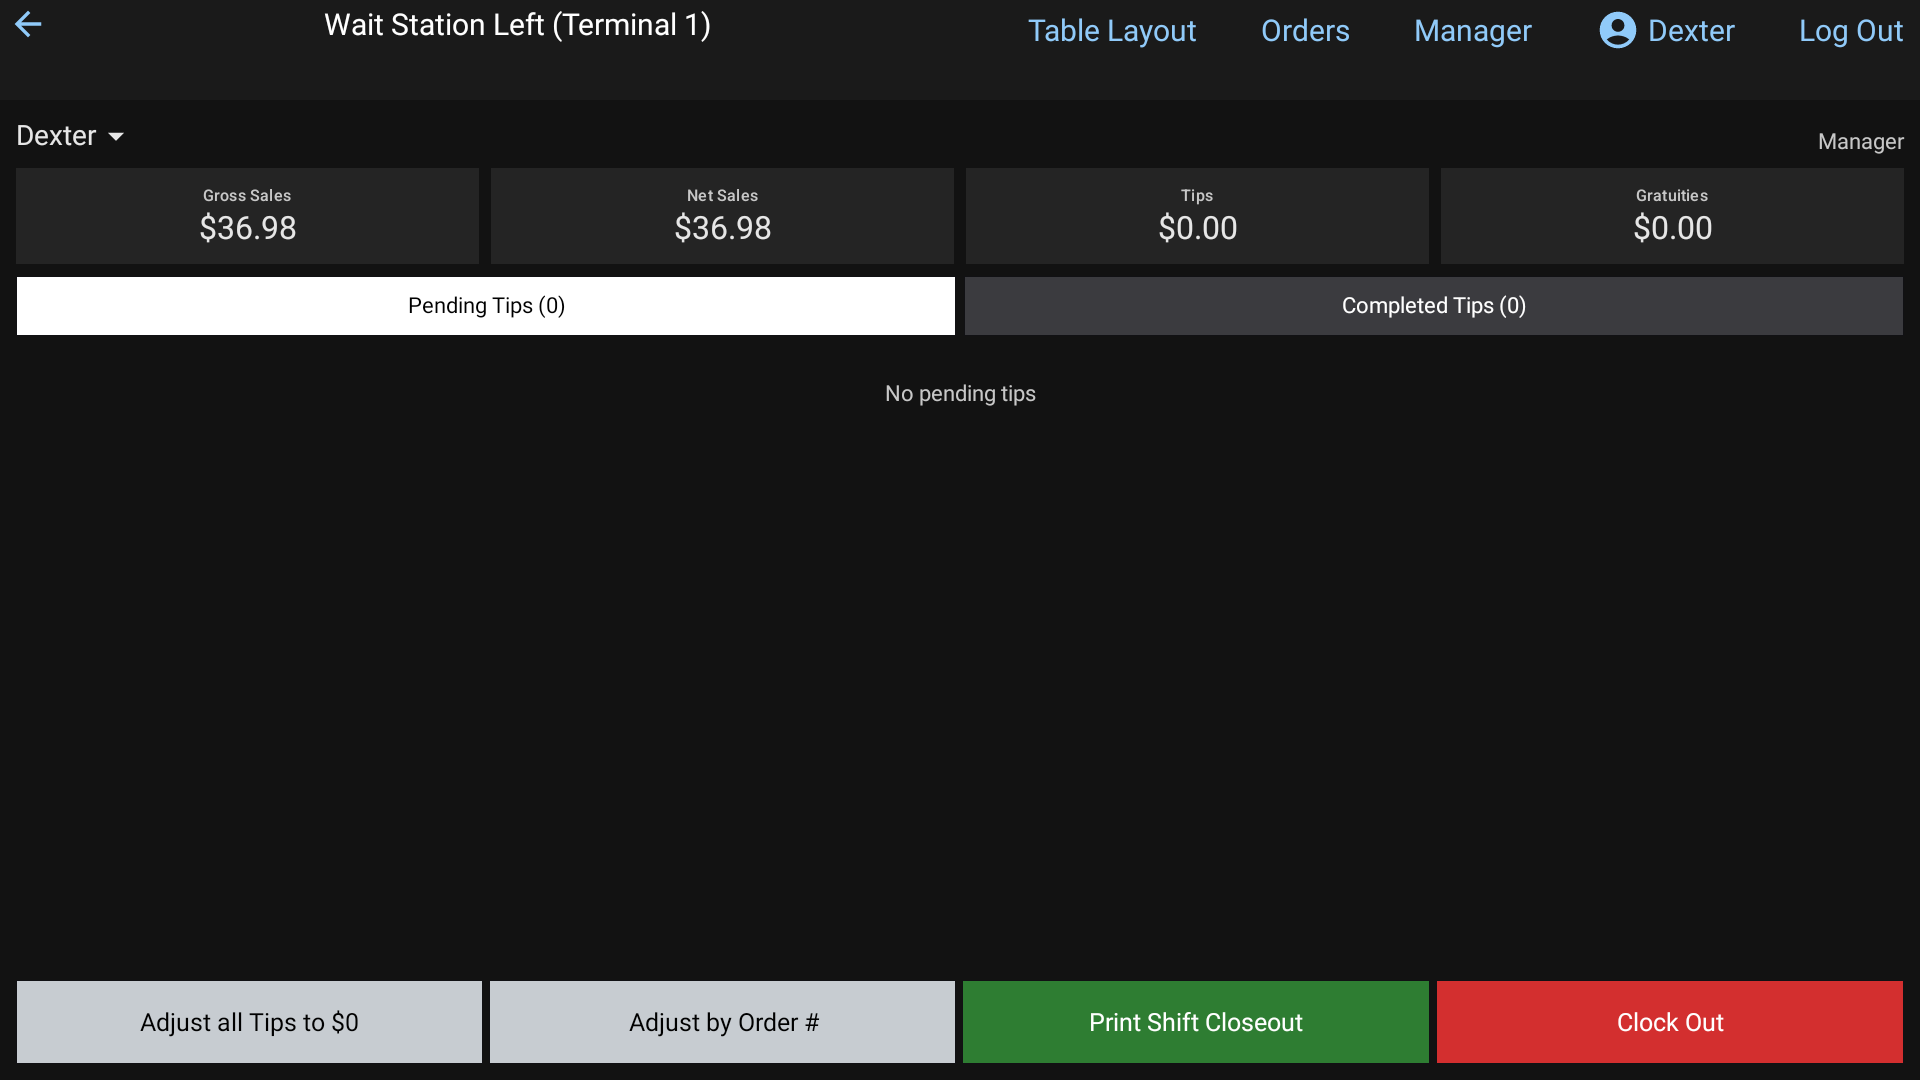 The Shift Report on screen
To email it instead, tap the envelope icon at the top right, type an address (or tap one under Recent) and tap Send. Tap the back arrow at the top left to close the report without printing.
#What's on the report
- Your name, job, and the business date
- Gross Sales by Department, then any Discounts and Refunds, and Net Sales
- Credit Cards, including tips and gratuities
- Any Voids and Paid In / Out
- Tax Details
- Payments Summary: cash, credit cards and gift cards
- Cash Breakdown: the cash you took in, with any card tips and gratuities paid out to you, cash refunds and paid outs taken off
The last line, Total Cash To Drop, is printed large. That's the cash you hand in.
#Then clock out
Tap Clock Out. The cash tips you just typed are already filled in, so just tap Clock Out again. See Clock in and out.
#Good to know
- The report covers your current shift, from when you clocked in.
- You can print it again. Your cash tips can be changed until you clock out.
Automatic sign-out
Why a terminal signs you out by itself after a while, and when it won't.
Your manager can set a terminal to sign you out by itself when nobody has touched it for a while. That keeps the next person from ringing things in under your name.
#How it works
- Every touch, anywhere on the screen, restarts the timer.
- If the screen isn't touched for the set time, the terminal goes back to the sign-in screen.
- Right after you Send an order, pay a check, or finish a split, the terminal can use a different time set for that order type. That way a counter terminal can sign you out soon after each sale. Touch the screen and the normal timer takes over again.
Your manager picks these times. On some terminals it's switched off.
#When it never signs you out
- While you're inside an order.
- While you're on the payment screen.
On the handheld, it never signs you out while an order is open.
#Good to know
- Being signed out doesn't clock you out. Just sign back in with your PIN. See Sign in with your PIN.
- Items you haven't sent yet aren't lost to the timer, because it doesn't run inside an order. Leaving an order yourself is different. See Send to the kitchen.
Using the handheld
Take orders at the table on the 6-inch handheld, send them to the kitchen, and take cash or card payments.
The handheld is a small, phone-sized version of the POS for taking orders at the table. It uses the same menu, tables and orders as the terminals. An order you start on the handheld can be finished on a terminal, and the other way round.
#Sign in
- Type your 4-digit PIN on the Enter PIN pad. You're in as soon as the 4th digit goes in.
- Signing in clocks you in, just like on a terminal.
Before you sign in, scroll down under the pad (Scroll for Stock Watch and Shift Notes) to read the stock counts and the manager's notes.
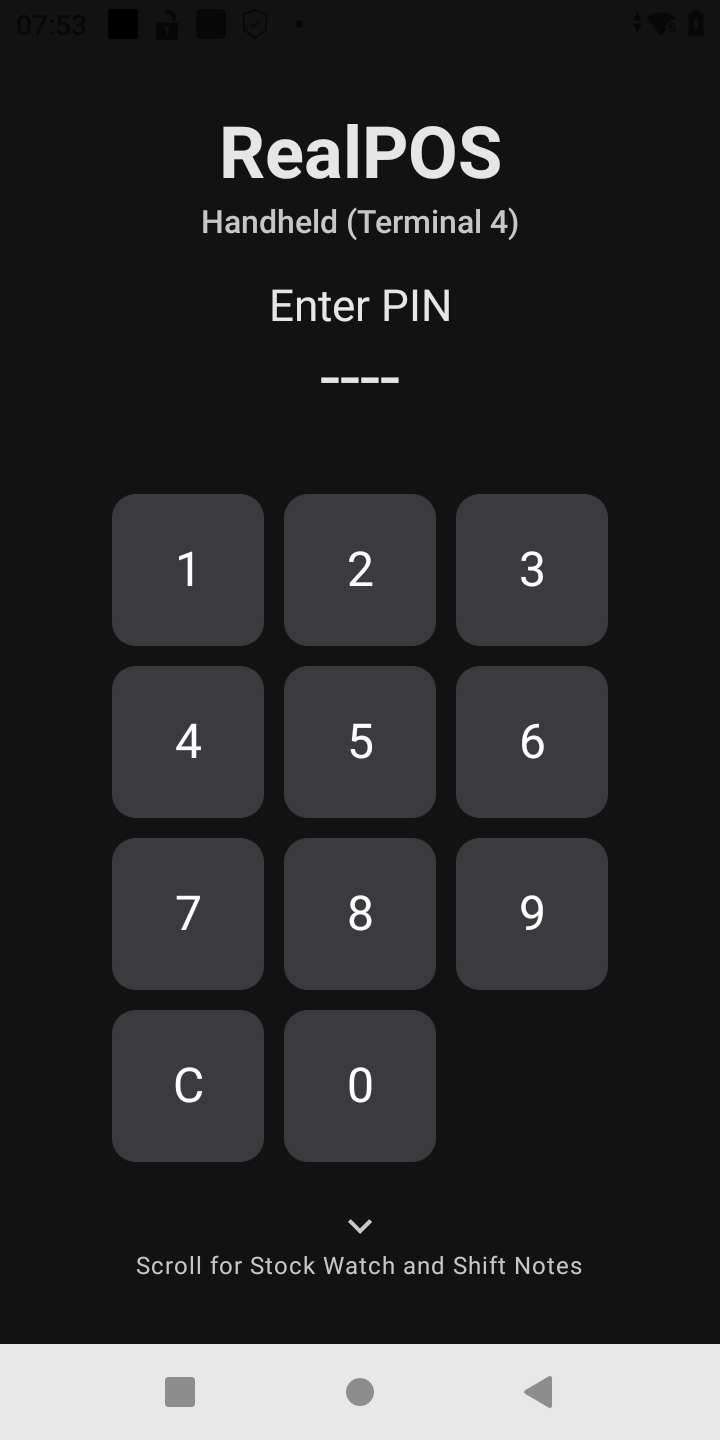 The handheld sign-in screen
#Tables
After you sign in you see Tables: every table as a square, three across. If there's more than one layout, tap its name at the top to switch.
| Square | Means |
|---|---|
| Dark gray, with its seat count | Free |
| Blue | Yours |
| Brown | Another server's |
| Purple-blue | Split into more than one check |
| Yellow border | The check has been printed |
An open table shows the guest or server name and how many minutes it's been open.
- Free table: tap it. How many guests? opens. Type the number and tap Open.
- Your table: tap it to open the order. If it has more than one order, Choose an order lists them.
#Take the order
The bottom bar has Menu, Ticket and Send.
On Menu:
- Seat: tap a seat number for the next items. + adds a seat.
- Tap a department along the top, or type in Search menu.
- Tap items to add them. Items show two across. A gray one is out of stock. An orange number shows how many are left.
- Items with choices open the modifier screen. Pick what's needed, then tap Complete. See Add items and modifiers.
On Ticket:
- You see everything by seat, with the totals. Items show Sent or On hold under them once they've gone.
- Tap an item to select it. Then tap Remove (before it's sent), Quantity, or Done.
Tap Send to send new items to the kitchen. You go back to Tables.
#Take payment
On the Ticket view:
- Print Check prints the check.
- Cash asks Take cash? and shows the total. Tap the Cash button to close the order as paid in cash. Count the change yourself.
- Card asks Charge card? Tap Charge card. The guest uses the card on the handheld. The Card button only works if a card reader is set up for this handheld.
If a card only covers part of the check, Partial approval tells you what's still owed. The order stays open. Take the rest with Cash or Card.
The card tip goes in later from a terminal's Employee Menu. See Tips.
#Leaving an order
Tap the back arrow. If there are items you haven't sent, Cancel order? warns "Items that were not sent will be lost." Tap Yes, cancel to throw them away, or No to stay.
#Your account, clocking out and logging out
Tap the person icon at the top right. My Account shows whether you're clocked in.
- Clock Out ends your shift and signs you out. It's grayed out while you have open checks (Close your open checks before clocking out.). The handheld doesn't ask for cash tips. If you need to enter cash tips or print your closeout, clock out on a terminal instead. See Your shift closeout.
- Log Out signs you out but keeps you on the clock.
#Good to know
- Discounts, voids, split checks, transfers and the full payment screen are on the terminals, not the handheld.
- "(name) has this order open on (terminal)" means someone else has the order open. Tap OK and try again later.
- Tapping another server's table shows who it belongs to, like Table 5 belongs to Sam.
- If the order type needs a guest name, Guest name asks for one when you send or pay. Type it and tap OK.
- The handheld can sign you out by itself after a while, but never while an order is open. See Automatic sign-out.
The kitchen screen (KDS)
Read kitchen tickets, bump items and tickets, recall a ticket, and run the Expo screen.
The kitchen screen shows the orders as they're sent from the POS. There's no sign-in. Each screen is set up for one station (like Grill or Fry) or as the Expo screen.
The top left shows the screen's name, the app version, and what kind of screen it is: Station, Master Expo or Standalone.
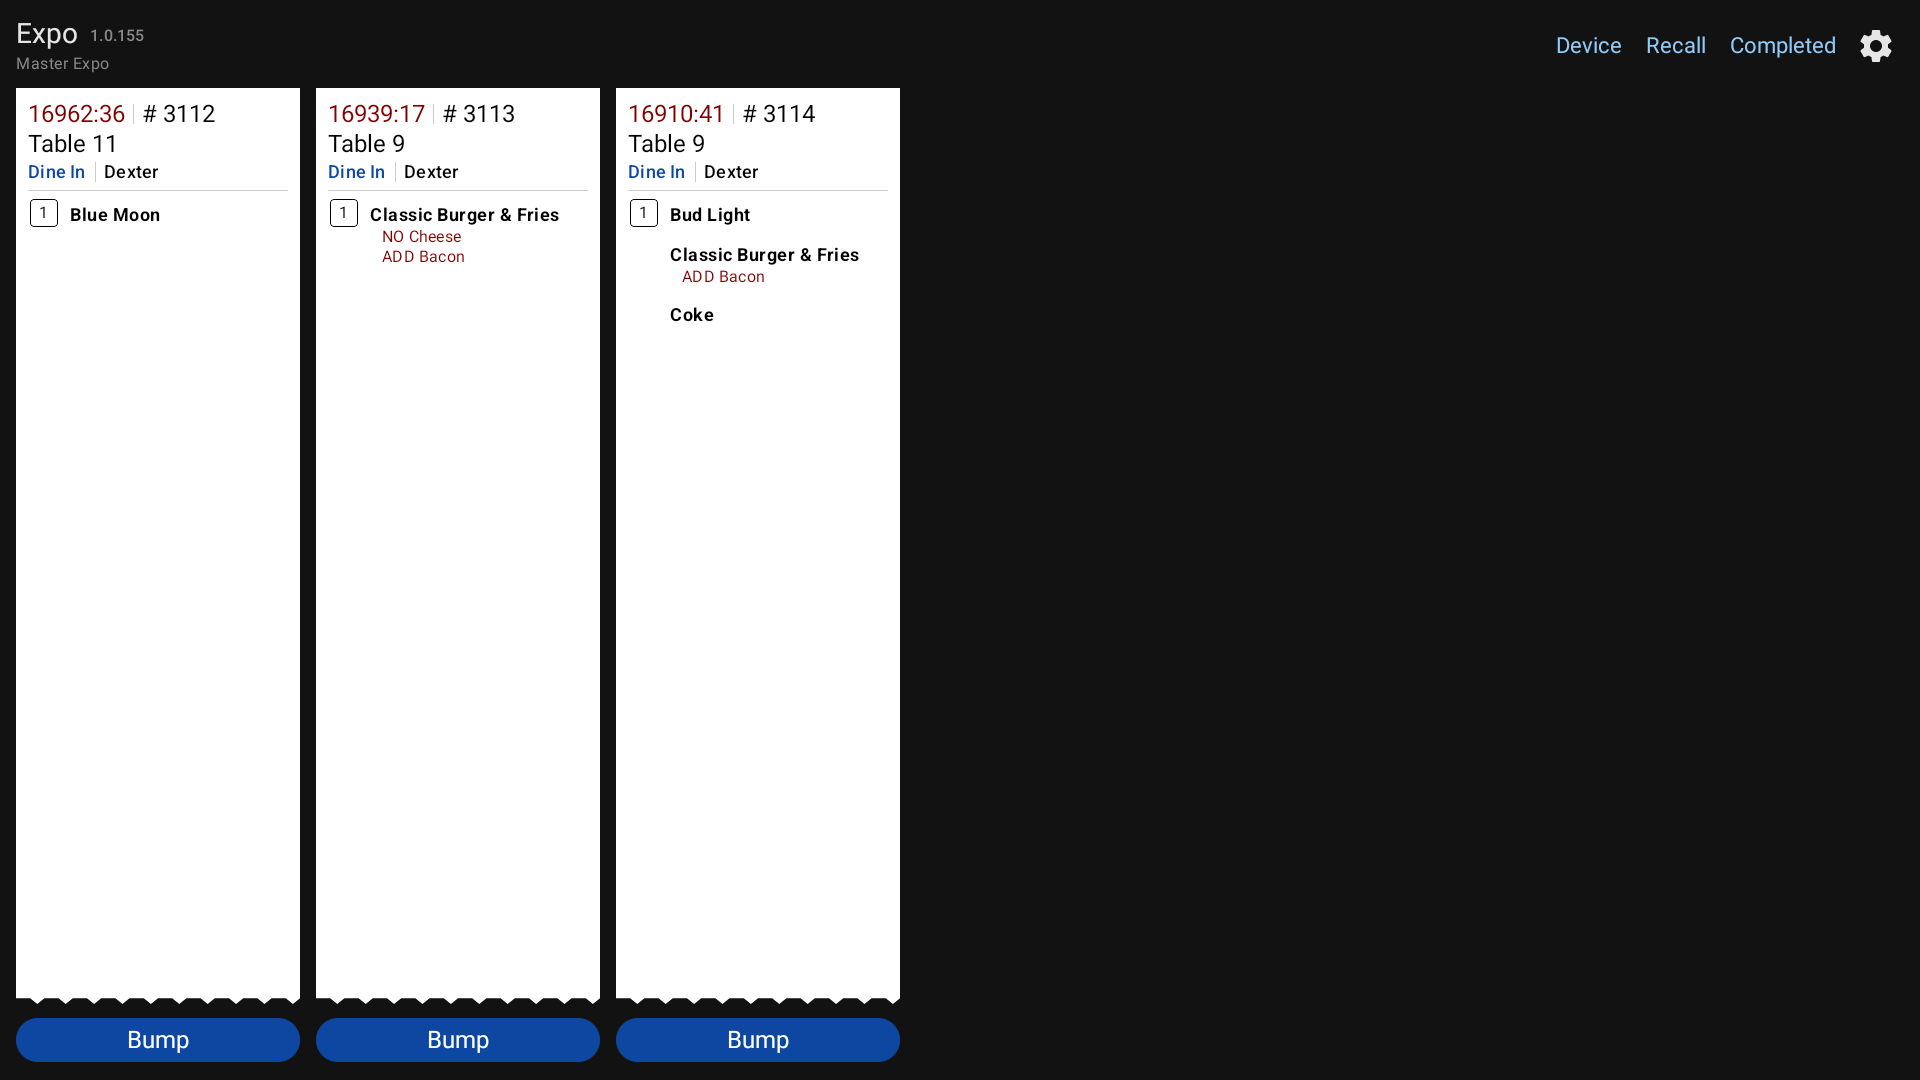 A kitchen station screen
#Read a ticket
Tickets line up left to right, oldest first. Long tickets carry on into a second column.
At the top of each ticket:
- The timer, counting up from when it was sent. It turns orange at the ticket time warning and dark red at the ticket time max.
- # and the order number
- Table and its number, or the order type (like ToGo) if there's no table
- the order type and the server
- Guest: and the name, if one was entered
Under that, the items, grouped by seat. The seat number is in a small box beside each seat's first item.
- Bold is the item.
- Dark red lines under it are its modifiers.
- Red lines ending in
*are messages and special instructions. Read these carefully.
A red border around the whole ticket means a ToGo or Delivery order.
Added items: if the server sends more items to an order later, they come as a new ticket headed in dark red, for example *CHANGES TO ORDER # 1042*. Tap Merge With Original? under it to fold it into the first ticket.
#On a station screen: bump items
Tap an item when it's done. It darkens. Tap it again if you bumped it by mistake.
When every item on the ticket is done, the ticket leaves your screen by itself.
#On the Expo screen
Master Expo shows the whole order from every station. As each station bumps its items, they darken here too, so you can see what's still cooking.
When the order is complete and ready to go, tap the blue Bump under the ticket. A gray ring around Bump means every item has been bumped by its station. Bumping on Expo also finishes the ticket on the station screens.
On Expo you don't tap single items. You just watch them and bump the whole ticket.
When Expo bumps an order, the table turns purple (Order Ready) on the server's floor plan.
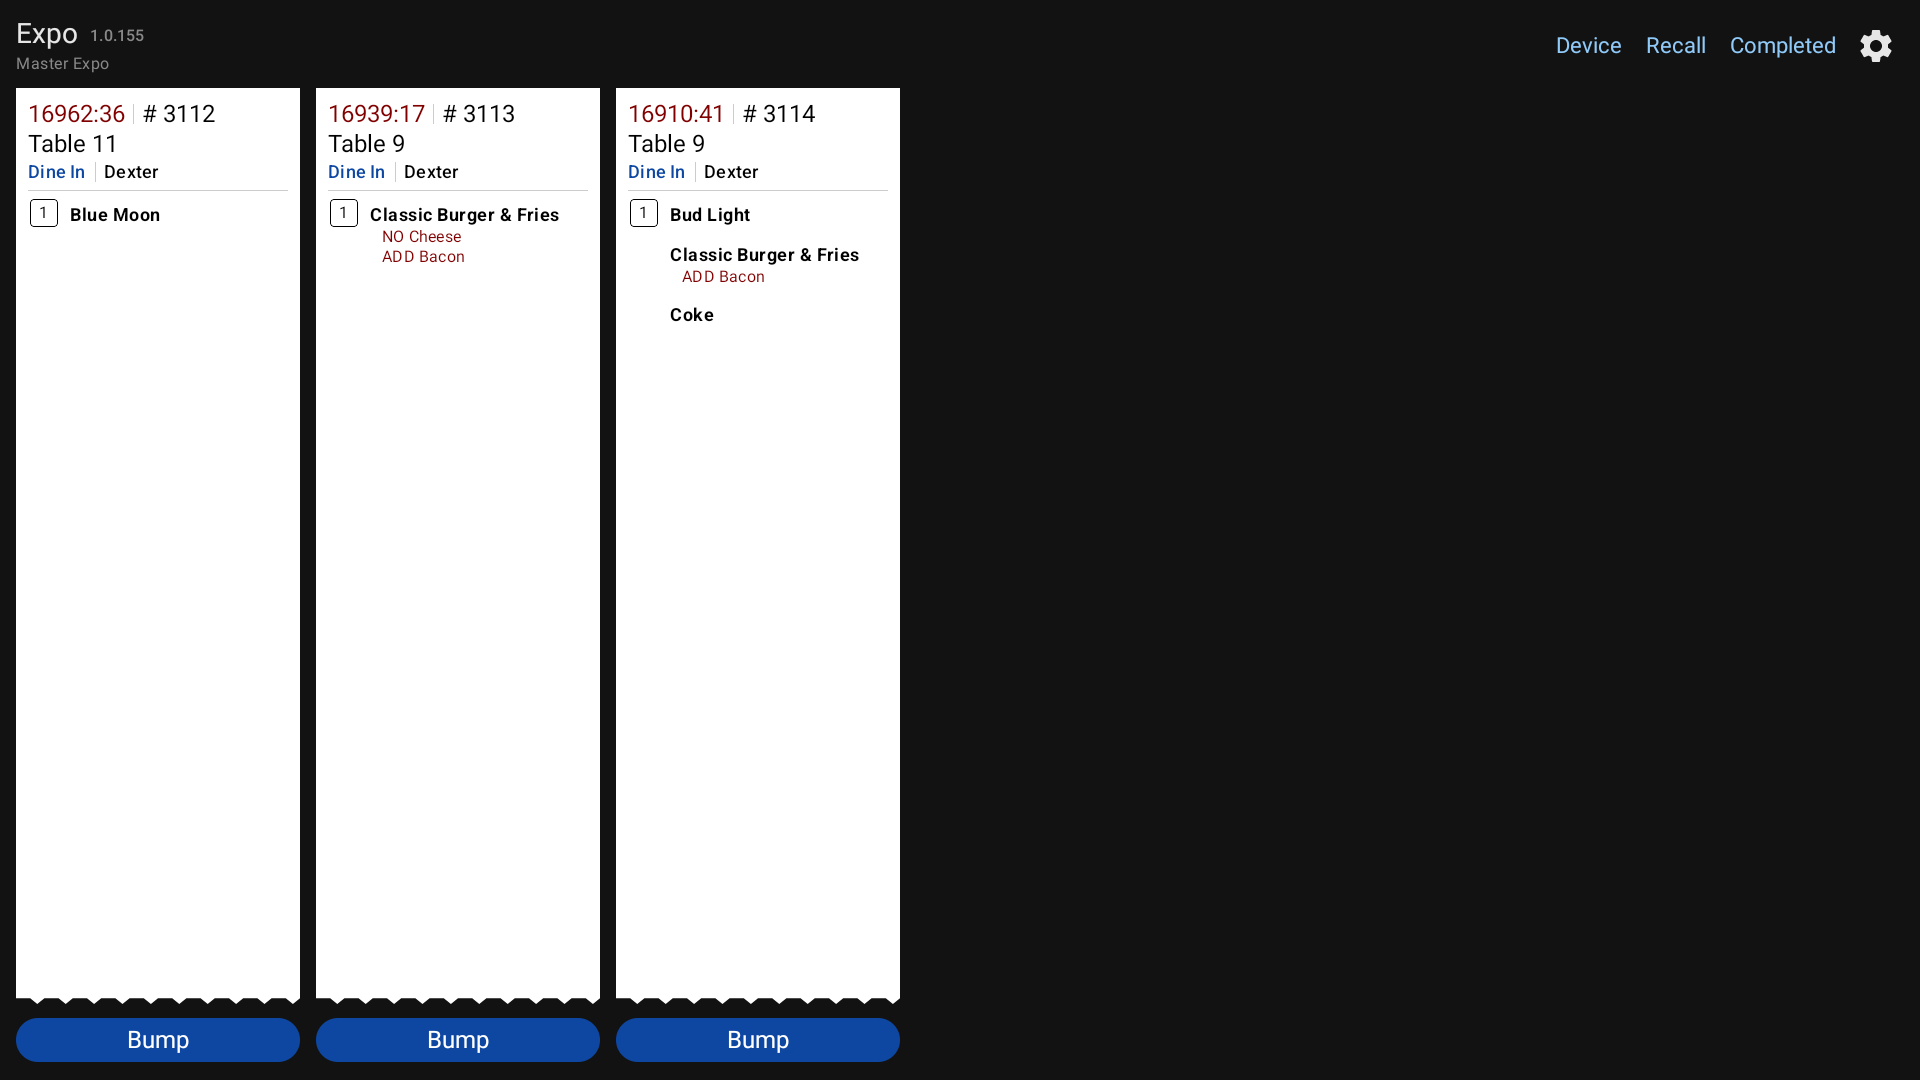 The Expo screen
#Standalone screens
A Standalone screen doesn't go through Expo. You can still tap items one by one, and each ticket has its own Bump button to finish the whole ticket.
#Recall a ticket
- Recall at the top brings back the last ticket you finished on this screen.
- Completed opens Completed Today, every ticket this screen finished today. Tap Recall under one to bring it back.
The recalled ticket goes to the front. Recalling only affects the screen you're on.
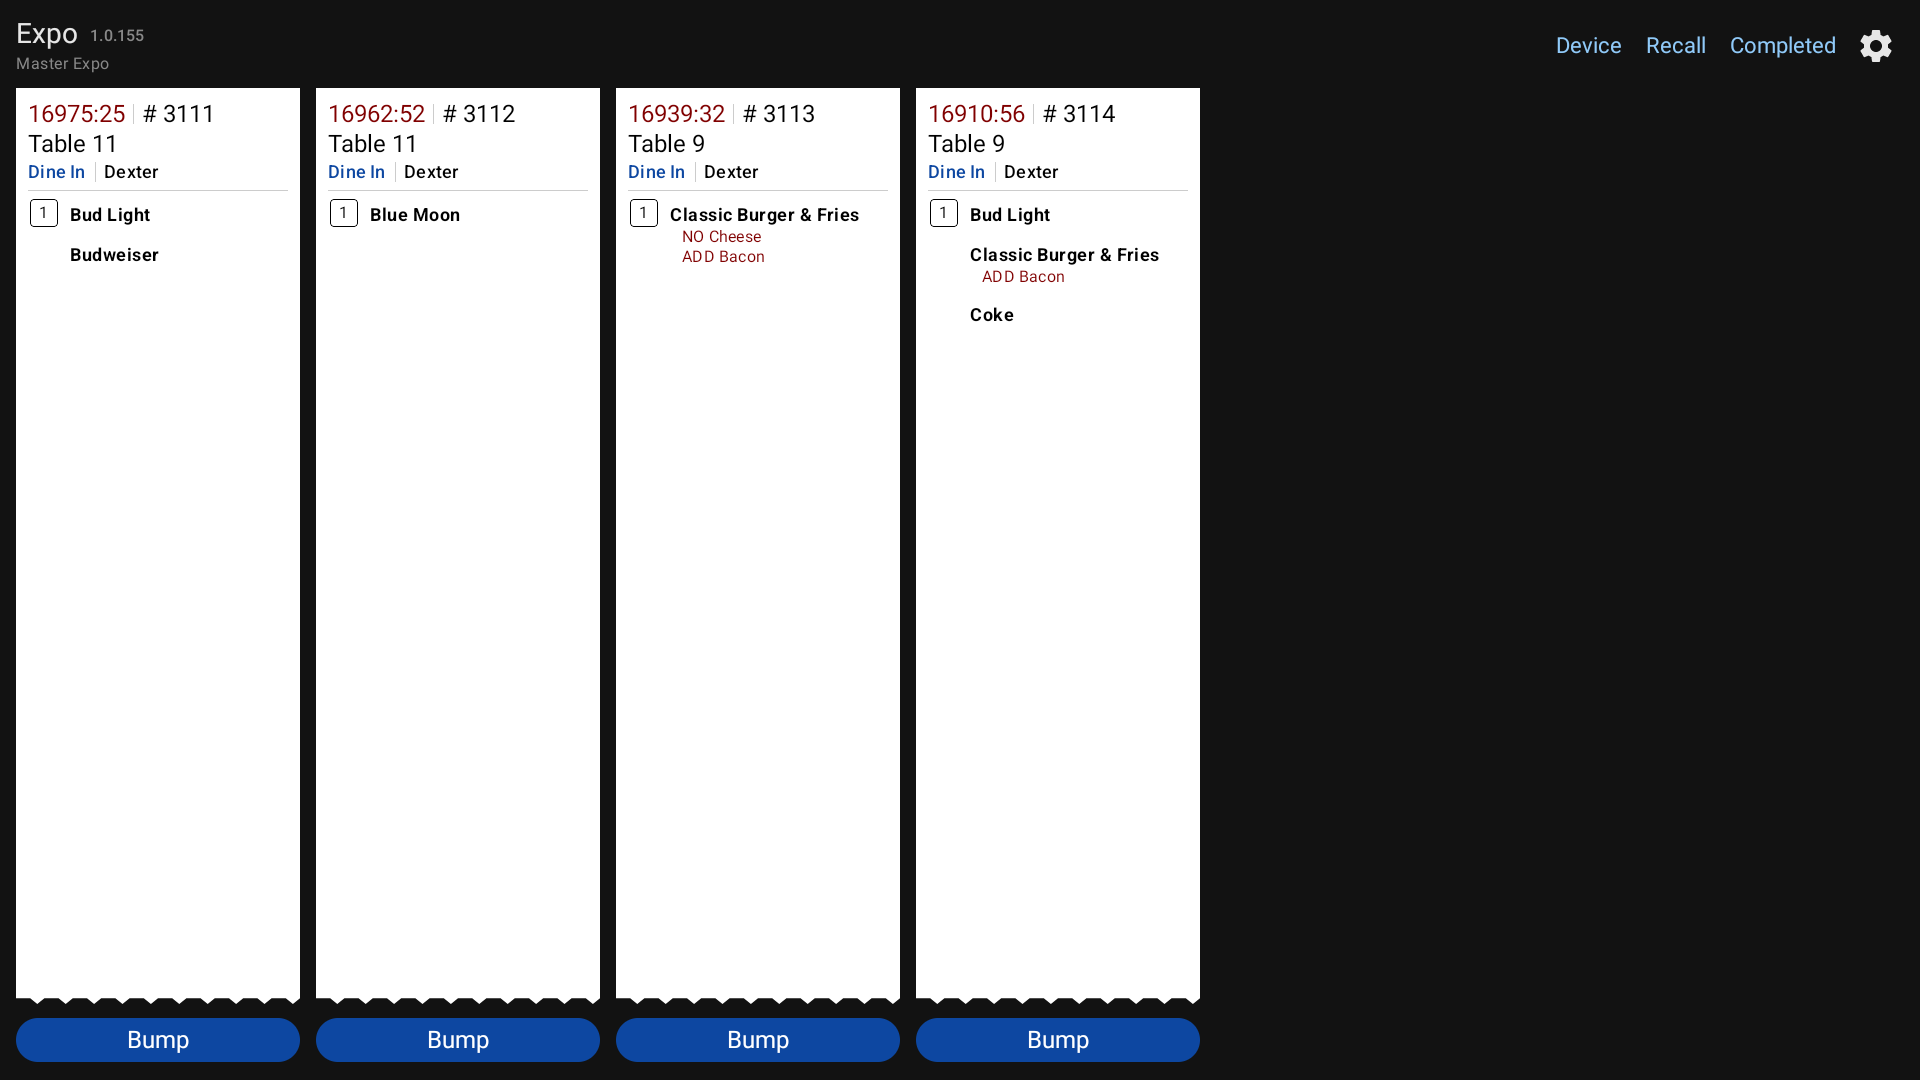 A recalled ticket (# 3111) back at the front, with Recall and Completed at the top right
#Screen settings
Tap the gear at the top right to open Kitchen Screen Settings:
- Font Size: slide toward Smaller or Larger.
- Ticket Time Warning: the minutes before the timer turns orange (starts at 15).
- Ticket Time Max: the minutes before it turns dark red (starts at 20).
Tap a number, type the minutes and tap Enter. Tap Done to close. Each screen keeps its own settings.
#Good to know
- Device at the top right is for setting up which screen this is. Leave it to a manager.
- If a server says their order didn't reach you, check Completed first. It may have been bumped by mistake.
- If the POS can't reach a kitchen screen, the server sees a red warning when they send.